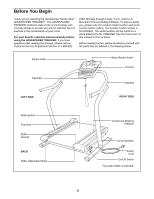
NordicTrack Exp2000 Treadmill English Manual - Page 6
Assembly
 |
View all NordicTrack Exp2000 Treadmill manuals
Add to My Manuals
Save this manual to your list of manuals |
Page 6 highlights
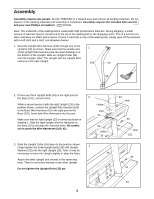
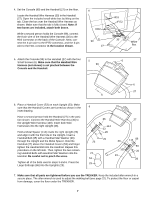
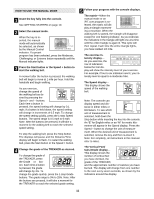
Assembly Assembly requires two people. Set the TREKKER in a cleared area and remove all packing materials. Do not dispose of the packing materials until assembly is completed. Assembly requires the included allen wrench and your own Phillips screwdriver . Note: The underside of the walking belt is coated with high-performance lubricant. During shipping, a small amount of lubricant may be transferred to the top of the walking belt or the shipping carton. This is a normal condition and does not affect performance. If there is lubricant on top of the walking belt, simply wipe off the lubricant with a soft cloth and a mild, non-abrasive cleaner. 1. Feed the Upright Wire Harness (100) through one of the 1 Uprights (23) as shown. Make sure that the smaller end of the Upright Wire Harness (see the inset drawing) is at the bottom of the Upright. Slide an Upright Collar (54) onto the Upright. Note: The Upright with the Upright Wire Harness is the right Upright. 100 23 54 2. If there are three Upright Bolts (33) in the right post on the Base (101), remove them. 2 While a second person holds the right Upright (23) in the position shown, connect the Upright Wire Harness (100) to the Base Wire Harness (41) in the right post on the Base (101). Insert both Wire Harnesses into the post. Make sure that the right Upright (23) is turned as shown in drawing 1. Slide the right Upright onto the right post on the Base (101) and align the indicated holes. Be careful not to pinch the Wire Harnesses (100, 41). Holes 100 41 33 Holes 33 23 Hole 33 Hole 101 3. Slide the Upright Collar (54) down to the position shown. Finger tighten the three Upright Bolts (33) with Upright 3 Washers (32) into the right Upright (23). Note: It may be necessary to move the Upright slightly to align the holes. Attach the other Upright (not shown) in the same way. Note: There is not a wire harness in the other Upright. Do not tighten the Upright Bolts (33) yet. 23 32 33 33 32 54 6
-
 1
1 -
 2
2 -
 3
3 -
 4
4 -
 5
5 -
 6
6 -
 7
7 -
 8
8 -
 9
9 -
 10
10 -
 11
11 -
 12
12 -
13
-
14
-
15
-
16
-
17
-
18
-
19
-
20
-
21
-
22
-
23
-
24
-
25
-
26
-
27
 |
 |
