Oki C7200 English: C7200 & C7400 Series Setup Guide, Version 02 - Page 5
Remove the Shipping Materials, Prepare the Image Drums
 |
View all Oki C7200 manuals
Add to My Manuals
Save this manual to your list of manuals |
Page 5 highlights
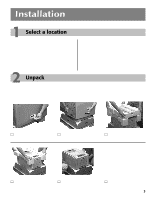
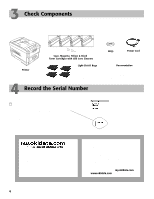
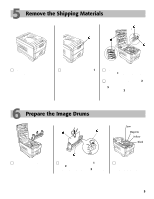
5 Remove the Shipping Materials □ Remove any shipping tape and packaging. □ Pull up on the release latch (1) and open the cover. □ Remove the cardboard shipping restraint (1) from behind the LED heads. □ Pull forward on the blue lever (2), remove the orange transport lock (3) from the end of the fuser, then push the lever (2) toward the back of the printer. 6 Prepare the Image Drums Cyan Magenta Yellow Black □ Lift out the four image drums and place them on a flat surface. □ Remove the protective sheet (1). Push the tab (2) in the direction of the arrow and remove the blanking plate (3) from each drum. □ Place the drums back in the printer, being careful to match them to the correct color position. 5
-
 1
1 -
 2
2 -
 3
3 -
 4
4 -
 5
5 -
 6
6 -
 7
7 -
 8
8 -
 9
9 -
 10
10 -
 11
11 -
12
-
13
-
14
-
15
-
16
-
17
-
18
-
19
-
20
-
21
-
22
-
23
-
24
-
25
-
26
-
27
-
28
 |
 |

5
5
Remove the Shipping Materials
□
Remove any shipping tape and
packaging.
□
Pull up on the release latch (
1
)
and open the cover.
6
Prepare the Image Drums
□
Lift out the four image drums
and place them on a flat
surface.
□
Remove the protective sheet (
1
). Push the
tab (
2
) in the direction of the arrow and
remove the blanking plate (
3
) from each
drum.
□
Place the drums back in
the printer,
being careful
to match them to the
correct color position
.
Black
Cyan
Magenta
Yellow
□
Remove the cardboard shipping
restraint (
1
) from behind the LED
heads.
□
Pull forward on the blue lever (
2
),
remove the orange transport lock
(
3
) from the end of the fuser, then
push the lever (
2
) toward the back
of the printer.