Oki GL408e GL408e/GL412e Rewinder Install Guide - Page 11
Finally, connect the printer power cable
 |
View all Oki GL408e manuals
Add to My Manuals
Save this manual to your list of manuals |
Page 11 highlights
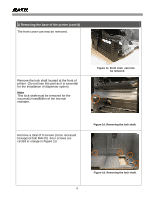
1) Mounting the printer above the rewinder (cont'd) If the front cover snaps into place correctly, you can proceed to further tighten the screws permanently, followed by inserting the thumbscrew used to secure the printer's front cover in the first step of this guide. Finally, connect the printer power cable as shown, routing it through the slot at the bottom of the internal rewinder. Figure 2g. Installing the thumbscrew Figure 2h. Plugging the power cable 11
-
 1
1 -
2
-
3
-
4
-
5
-
 6
6 -
 7
7 -
 8
8 -
 9
9 -
 10
10 -
 11
11 -
 12
12 -
 13
13
 |
 |

11
1)
Mounting the printer above the rewinder (cont’d)
If the front cover snaps into place correctly,
you can proceed to further tighten the screws
permanently, followed by inserting the
thumbscrew used to secure the printer’s front
cover in the first step of this guide.
Finally, connect the printer power cable as
shown, routing it through the slot at the
bottom of the internal rewinder.
Figure 2h. Plugging the
power cable
Figure 2g. Installing the
thumbscrew