Oki GL408e GL408e/GL412e Rewinder Install Guide - Page 5
GL4xxe Internal Rewinder-Dispenser Installation
 |
View all Oki GL408e manuals
Add to My Manuals
Save this manual to your list of manuals |
Page 5 highlights
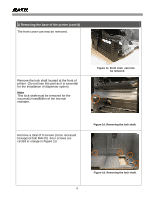
GL4xxe Internal Rewinder-Dispenser Installation The installation procedure for the Internal Rewinder with front-mounted dispenser, involves three major steps, that are similar to the installation of the GL4xxe internal rewinder: 1) Removing the base of the printer. 2) Mounting the printer above the rewinder and reinstallation of all removed covers. 3) Mechanical adjustment of the rewinder. The pictures of the internal-rewinder used in this Guide are applicable for installation processes of both the rewinder and rewinder-dispenser units. 1) Removing the base of the printer Make sure the printer is OFF and disconnected from the power supply and all other cables. Remove the side cover using a #2 phillips screwdriver to remove three screws as circled in orange. Keep these screws aside for later use when putting back the side cover. Slide the side cover outwards by sliding it horizontally by a few inches first (see the red arrow), before lifting it up and out (white arrow). Cover LH Remove the printer's front cover by first unscrewing the thumbscrew indicated here. Figure 1a. Removing the side cover Figure 1b. Removing the thumbscrew that secures the front cover. 5
-
 1
1 -
 2
2 -
 3
3 -
 4
4 -
 5
5 -
 6
6 -
 7
7 -
 8
8 -
 9
9 -
 10
10 -
 11
11 -
12
-
13
 |
 |
