Oki GL408e GL408e/GL412e Rewinder Install Guide - Page 7
The last two screws are on the electronic
 |
View all Oki GL408e manuals
Add to My Manuals
Save this manual to your list of manuals |
Page 7 highlights
1) Removing the base of the printer (cont'd) The fifth screw to be removed is shown here. The sixth and seventh screws are shown here, securing the base to the front of the chassis. Figure 1e. Removing the fifth of nine screws The last two screws are on the electronic section as circled here in orange. Figure 1f. Removing the sixth and seventh screws Figure 1g. Removing the final two screws 7
-
 1
1 -
 2
2 -
 3
3 -
 4
4 -
 5
5 -
 6
6 -
 7
7 -
 8
8 -
 9
9 -
 10
10 -
 11
11 -
 12
12 -
13
 |
 |

7
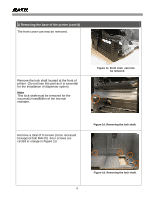
1) Removing the base of the printer (cont’d)
The fifth screw to be removed is shown here.
The sixth and seventh screws are shown
here, securing the base to the front of the
chassis.
The last two screws are on the electronic
section as circled here in orange.
Figure 1e. Removing the fifth of nine
screws
Figure 1f. Removing the sixth and
seventh screws
Figure 1g. Removing the final
two screws