Oki GL408e GL408e/GL412e Rewinder Install Guide - Page 9
Mounting the printer above the rewinder-dispenser
 |
View all Oki GL408e manuals
Add to My Manuals
Save this manual to your list of manuals |
Page 9 highlights
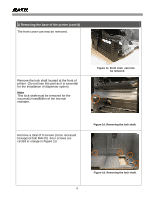
2) Mounting the printer above the rewinder-dispenser To facilitate easier mounting, it is recommended that you remove the front cover of the internal rewinder-dispenser beforehand. Pull down the side cover of the internal rewinder and remove two bind screws (M4x4) located as shown within the orange circles. Side cover Remove two bind screws (M4x4) located as shown within the orange circles. Slightly lift the front cover in the direction of the arrow a little at a time, until it is totally separated from the chassis. フFロrンoトnカt ハco゙vーer 図 Figure 2a. Removing the rewinder's front cover Mount the printer chassis onto the internal rewinder gently. a) Make sure that no cables are sandwiched between the printer chassis and internal rewinder-dispenser chassis during installation. b) Make sure that the sensor cable located at the left bottom of platen roller at the front of the printer (Fig 2c), is not caught in the bracket during installation of the internal rewinder-dispenser. 9 Figure 2b. Removing the rewinder's front cover Sensor cable Figure 2c. Make sure no cables are compressed during the mounting.
-
 1
1 -
2
-
3
-
 4
4 -
 5
5 -
 6
6 -
 7
7 -
 8
8 -
 9
9 -
 10
10 -
 11
11 -
 12
12 -
 13
13
 |
 |
