Oki GL408e GL408e/GL412e Rewinder Install Guide - Page 6
Removing the base of the printer cont'd - locked
 |
View all Oki GL408e manuals
Add to My Manuals
Save this manual to your list of manuals |
Page 6 highlights
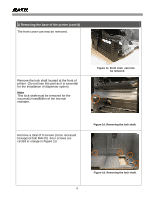
1) Removing the base of the printer (cont'd) The front cover can now be removed. Remove the lock shaft located at the front of printer. (Do not lose this part as it is essential for the installation of dispenser option) Note This lock shaft must be removed for the successful installation of the internal rewinder. Figure 1c. Front cover can now be removed Remove a total of 9 screws (cross recessed hexagonal bolt M4x10). Four screws are circled in orange in Figure 1d. Figure 1d. Removing the lock shaft. Figure 1d. Removing the lock shaft. 6
-
 1
1 -
 2
2 -
 3
3 -
 4
4 -
 5
5 -
 6
6 -
 7
7 -
 8
8 -
 9
9 -
 10
10 -
 11
11 -
 12
12 -
13
 |
 |

6
1) Removing the base of the printer (cont’d)
The front cover can now be removed.
Remove the lock shaft located at the front of
printer. (Do not lose this part as it is essential
for the installation of dispenser option)
Note
This lock shaft must
be removed for the
successful installation of the internal
rewinder.
Remove a total of 9 screws (cross recessed
hexagonal bolt M4x10). Four screws are
circled in orange in Figure 1d.
Figure 1c. Front cover can now
be removed
Figure 1d. Removing the lock shaft.
Figure 1d. Removing the lock shaft.