Olympus DM-1 DM-1 Instructions (English) - Page 14
Changing the Time/Date
 |
View all Olympus DM-1 manuals
Add to My Manuals
Save this manual to your list of manuals |
Page 14 highlights
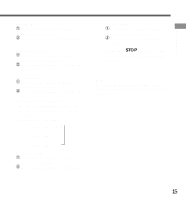
Setting Time/Date Setting Time/Date If you have set the time and date, information as to when an audio or a music file is recorded is stored automatically with that file. The time and date should be set to ease file management tasks. The time and date setting is also needed to perform the alarm playback function (→ P.53-54). The hour indicator will flash automatically when you load batteries before using the recorder for the first time, or after the recorder hasn't been used for a long time. Proceed from step 4. Time/DateScreen 7 8 STOP button MENU button REC STOP INDEX/EQ MENU ERASE Changing the Time/Date 4,5 6 9 FOLDER button (switching the data displayed) PLAY button (accepts a choice and moves on to the next item) FF/+ or REW/- button (alters a choice) 1 Set the POWER/LOCK switch to ON. 2 Press the MENU button. The menu opens (→P.33,52). 3 Press the FF/+ or REW/- button to choose the Time/Date setup screen. 4 Press the PLAY button. Time/Date screen appears. The hour indicator flashes, indicating the start of the Time/Date setup process. • While you are setting the hour and minute, each time the FOLDER button is pressed, the time indicator will alternate between 12-hour and 24-hour time. Example: 5:45 P.M. PM 5:45 ←→ 17:45 14
-
 1
1 -
2
-
3
-
4
-
5
-
6
-
7
-
8
-
 9
9 -
 10
10 -
 11
11 -
 12
12 -
 13
13 -
 14
14 -
 15
15 -
 16
16 -
 17
17 -
 18
18 -
 19
19 -
20
-
21
-
22
-
23
-
24
-
25
-
26
-
27
-
28
-
29
-
30
-
31
-
32
-
33
-
34
-
35
-
36
-
37
-
38
-
39
-
40
-
41
-
42
-
43
-
44
-
45
-
46
-
47
-
48
-
49
-
50
-
51
-
52
-
53
-
54
-
55
-
56
-
57
-
58
-
59
-
60
-
61
-
62
-
63
-
64
 |
 |
