Olympus IR 300 IR-300 Advanced Manual (English) - Page 135
Connecting the camera to a computer
 |
UPC - 050332151352
View all Olympus IR 300 manuals
Add to My Manuals
Save this manual to your list of manuals |
Page 135 highlights
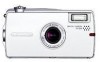
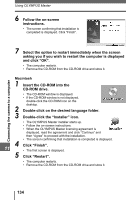
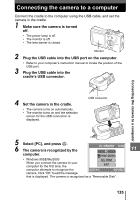
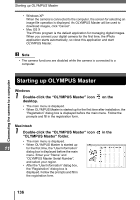
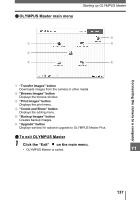
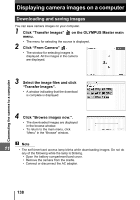
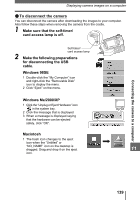
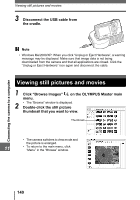
Connecting the camera to a computer Connect the cradle to the computer using the USB cable, and set the camera in the cradle. 1 Make sure the camera is turned off. • The power lamp is off. • The monitor is off. • The lens barrier is closed. Monitor 2 Plug the USB cable into the USB port on the computer. • Refer to your computer's instruction manual to locate the position of the USB port. 3 Plug the USB cable into the cradle's USB connector. Connecting the camera to a computer 4 Set the camera in the cradle. • The camera turns on automatically. • The monitor turns on and the selection screen for the USB connection is displayed. USB connector 5 Select [PC], and press Z. 6 The camera is recognized by the computer. PC / PRINTER 11 PC PRINT ORDER • Windows 98SE/Me/2000 When you connect the camera to your computer for the first time, the SEL. PRINT EXIT computer attempts to recognize the SELECT GO camera. Click "OK" to exit the message that is displayed. The camera is recognized as a "Removable Disk". 135
-
 1
1 -
2
-
3
-
4
-
5
-
6
-
7
-
8
-
9
-
10
-
11
-
12
-
13
-
14
-
15
-
16
-
17
-
18
-
19
-
20
-
21
-
22
-
23
-
24
-
25
-
26
-
27
-
28
-
29
-
30
-
31
-
32
-
33
-
34
-
35
-
36
-
37
-
38
-
39
-
40
-
41
-
42
-
43
-
44
-
45
-
46
-
47
-
48
-
49
-
50
-
51
-
52
-
53
-
54
-
55
-
56
-
57
-
58
-
59
-
60
-
61
-
62
-
63
-
64
-
65
-
66
-
67
-
68
-
69
-
70
-
71
-
72
-
73
-
74
-
75
-
76
-
77
-
78
-
79
-
80
-
81
-
82
-
83
-
84
-
85
-
86
-
87
-
88
-
89
-
90
-
91
-
92
-
93
-
94
-
95
-
96
-
97
-
98
-
99
-
100
-
101
-
102
-
103
-
104
-
105
-
106
-
107
-
108
-
109
-
110
-
111
-
112
-
113
-
114
-
115
-
116
-
117
-
118
-
119
-
120
-
121
-
122
-
123
-
124
-
125
-
126
-
127
-
128
-
129
-
 130
130 -
 131
131 -
 132
132 -
 133
133 -
 134
134 -
 135
135 -
 136
136 -
 137
137 -
 138
138 -
 139
139 -
 140
140 -
141
-
142
-
143
-
144
-
145
-
146
-
147
-
148
-
149
-
150
-
151
-
152
-
153
-
154
-
155
-
156
-
157
-
158
-
159
-
160
-
161
-
162
-
163
-
164
-
165
-
166
-
167
-
168
-
169
-
170
-
171
-
172
-
173
-
174
-
175
-
176
-
177
-
178
-
179
-
180
-
181
-
182
 |
 |
