Olympus SP-565 UZ SP-565UZ Instruction Manual (English) - Page 3
Please read Menu Settings p. 31 to 63 while referring to - digital camera
 |
UPC - 050332165977
View all Olympus SP-565 UZ manuals
Add to My Manuals
Save this manual to your list of manuals |
Page 3 highlights
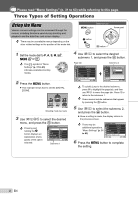
Please read "Menu Settings" (p. 31 to 63) while referring to this page. Three Types of Setting Operations Using the Menu Various camera settings can be accessed through the menus, including functions used during shooting and playback and the date/time and screen display. There may be unavailable menus depending on the other related settings or the position of the mode dial. Buttons in use m button Arrow pad E button o button 1 Set the mode dial to P, A, S, M, r, s, A or q. The symbol in "Menu Settings" (p. 31 to 63) indicates available shooting modes. 2 Press the m button. ● This example shows how to set the [DIGITAL ZOOM]. IMAGE QUALITY CAMERA RESET MENU SETUP PANORAMA EXIT MENU SCN SILENT MODE SET OK Shooting mode top menu 3 Use 789: to select the desired menu, and press the o button. Pressing and holding the E button displays an explanation (menu guide) of the option selected. CAMERA MENU 1 WB 2 ISO 3 DRIVE 4 FINE ZOOM 5 DIGITAL ZOOM EXIT MENU AUTO AUTO o OFF OFF SET OK Submenu 1 4 Use 78 to select the desired submenu 1, and press the o button. Page tab CAMERA MENU 1 WB 2 ISO 3 DRIVE 4 FINE ZOOM 5 DIGITAL ZOOM EXIT MENU AUTO AUTO o OFF OFF SET OK Submenu 2 CAMERA MENU DIGITAL ZOOM 1 WB AUTO 2 ISO OFF AUTO 3 DRIVE ON o 4 FINE ZOOM OFF 5 DIGITAL ZOOM OFF BACK MENU SET OK To quickly jump to the desired submenu, press 9 to highlight the page tab, and then use 78 to move the page tab. Press : to return to the submenu 1. Some menus include submenus that appear by pressing the o button. 5 Use 78 to select the submenu 2, and press the o button. ● Once a setting is made, the display returns to the previous screen. There may be additional operations. "Menu Settings" (p. 31 to 63) CAMERA MENU 1 WB 2 ISO 3 DRIVE 4 FINE ZOOM 5 DIGITAL ZOOM EXIT MENU AUTO AUTO o OFF ON SET OK 6 Press the m button to complete the setting. 3 EN
-
 1
1 -
 2
2 -
 3
3 -
 4
4 -
 5
5 -
 6
6 -
 7
7 -
 8
8 -
 9
9 -
10
-
11
-
12
-
13
-
14
-
15
-
16
-
17
-
18
-
19
-
20
-
21
-
22
-
23
-
24
-
25
-
26
-
27
-
28
-
29
-
30
-
31
-
32
-
33
-
34
-
35
-
36
-
37
-
38
-
39
-
40
-
41
-
42
-
43
-
44
-
45
-
46
-
47
-
48
-
49
-
50
-
51
-
52
-
53
-
54
-
55
-
56
-
57
-
58
-
59
-
60
-
61
-
62
-
63
-
64
-
65
-
66
-
67
-
68
-
69
-
70
-
71
-
72
-
73
-
74
-
75
-
76
-
77
-
78
-
79
-
80
-
81
-
82
-
83
-
84
-
85
-
86
-
87
-
88
-
89
-
90
-
91
-
92
-
93
-
94
 |
 |
