Olympus SP-565 UZ SP-565UZ Instruction Manual (English) - Page 80
ash to set to RC mode - remote cable
 |
UPC - 050332165977
View all Olympus SP-565 UZ manuals
Add to My Manuals
Save this manual to your list of manuals |
Page 80 highlights
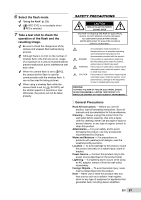
Using a microSD Attachment Do not use the attachment with Olympus digital cameras that do not support this microSD Attachment, as well as with other brands of digital cameras, computers, printers and other devices that support xD-Picture Card. Doing so not only may damage the pictures taken, but may also result in the malfunction of the device. If the microSD card cannot be removed, do not use force. Contact authorized distributors/service centers. Cards compatible with this camera microSD card microSDHC card For a list of tested microSD cards, please visit our website (http://www.olympus.com/). Sending images You can send images to a computer or printer by using the USB cable provided with the camera. To send data to other devices, remove the attachment from the camera and use a commercially available microSD card adapter. Handling precautions Do not touch the contact area of the attachment or microSD card. Doing so may cause failure in reading the images. When fingerprints or stains are found on the contact area, wipe the area with a soft dry cloth. Taking pictures with the Olympus Wireless RC Flash System You can take pictures with a wireless flash when using a flash compatible with the Olympus Wireless RC Flash System. This enables multi-flash photography using multiple flash units compatible with this system. The camera's built-in flash is used for communication between the camera and flash. For details about operation of a wireless flash, refer to the instruction manual for the special external flash. 1 Set the wireless flash based on the guidelines below. Wireless flash setup range guidelines The setup range varies depending on the ambient environment. Point the remote sensor toward the camera Flash direction 30° 50° 50° 5m 30° 10m 2 Turn on the wireless flash. 3 Use the MODE button on the wireless flash to set to RC mode, and make the channel and group settings. ● The group is set to A. (The B and C settings do not work.) 4 Turn on the camera, and press the # button to flip up the built-in flash. 5 Set [QFLASH] (p. 38) on the camera to [#RC], and set the channel (CH1 to CH4) to the same setting as the wireless flash. 80 EN
-
 1
1 -
2
-
3
-
4
-
5
-
6
-
7
-
8
-
9
-
10
-
11
-
12
-
13
-
14
-
15
-
16
-
17
-
18
-
19
-
20
-
21
-
22
-
23
-
24
-
25
-
26
-
27
-
28
-
29
-
30
-
31
-
32
-
33
-
34
-
35
-
36
-
37
-
38
-
39
-
40
-
41
-
42
-
43
-
44
-
45
-
46
-
47
-
48
-
49
-
50
-
51
-
52
-
53
-
54
-
55
-
56
-
57
-
58
-
59
-
60
-
61
-
62
-
63
-
64
-
65
-
66
-
67
-
68
-
69
-
70
-
71
-
72
-
73
-
74
-
 75
75 -
 76
76 -
 77
77 -
 78
78 -
 79
79 -
 80
80 -
 81
81 -
 82
82 -
 83
83 -
 84
84 -
 85
85 -
86
-
87
-
88
-
89
-
90
-
91
-
92
-
93
-
94
 |
 |