Olympus Stylus 410 Digital Stylus 410 Digital Reference Manual (English) - Page 32
Day/Year, D-M-Y Day/Month, Year/Month/Day, M-D-Y Month
 |
View all Olympus Stylus 410 Digital manuals
Add to My Manuals
Save this manual to your list of manuals |
Page 32 highlights
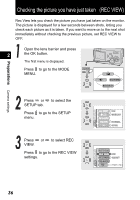
Setting the date and time (X) Preparations Camera settings Press or to select one of the following date formats: Y-M-D (Year/Month/Day), M-D-Y (Month/ Day/Year), D-M-Y (Day/Month/ Year). Press to go to the year field. 2 The following steps show the procedure used when the date format is set to YM-D. Press or to set each of the last two digits of the year. Press to go to the month field. Repeat the above steps to set the time. The time is displayed in 24-hour format. For example, 1:00 p.m. is displayed as 13:00. Press the OK button. Press the OK button again to exit the menu. 2004 . 01 . 01 Y MD SELECT SET GO 2004 . 03 . 01 SELECT SET GO For a more accurate setting, press the OK button when the time hits 00 seconds. The clock starts when you press the button. If the camera is left for about a day with the battery removed, the date and time settings will revert to the factory default settings. 2004 . 03 . 17 SELECT SET GO 32
-
 1
1 -
2
-
3
-
4
-
5
-
6
-
7
-
8
-
9
-
10
-
11
-
12
-
13
-
14
-
15
-
16
-
17
-
18
-
19
-
20
-
21
-
22
-
23
-
24
-
25
-
26
-
 27
27 -
 28
28 -
 29
29 -
 30
30 -
 31
31 -
 32
32 -
 33
33 -
 34
34 -
 35
35 -
 36
36 -
 37
37 -
38
-
39
-
40
-
41
-
42
-
43
-
44
-
45
-
46
-
47
-
48
-
49
-
50
-
51
-
52
-
53
-
54
-
55
-
56
-
57
-
58
-
59
-
60
-
61
-
62
-
63
-
64
-
65
-
66
-
67
-
68
-
69
-
70
-
71
-
72
-
73
-
74
-
75
-
76
-
77
-
78
-
79
-
80
-
81
-
82
-
83
-
84
-
85
-
86
-
87
-
88
-
89
-
90
-
91
-
92
-
93
-
94
-
95
-
96
-
97
-
98
-
99
-
100
-
101
-
102
-
103
-
104
-
105
-
106
-
107
-
108
-
109
-
110
-
111
-
112
-
113
-
114
-
115
-
116
-
117
-
118
-
119
-
120
-
121
-
122
-
123
-
124
-
125
-
126
-
127
-
128
-
129
-
130
-
131
-
132
-
133
-
134
-
135
-
136
-
137
-
138
-
139
-
140
-
141
-
142
-
143
-
144
-
145
-
146
-
147
-
148
-
149
-
150
-
151
-
152
-
153
-
154
-
155
-
156
-
157
-
158
-
159
-
160
-
161
-
162
-
163
-
164
-
165
-
166
-
167
-
168
-
169
-
170
-
171
-
172
-
173
-
174
-
175
-
176
-
177
-
178
-
179
-
180
-
181
-
182
-
183
-
184
-
185
-
186
-
187
-
188
-
189
-
190
-
191
-
192
-
193
-
194
-
195
-
196
-
197
-
198
-
199
-
200
-
201
-
202
-
203
-
204
-
205
-
206
-
207
-
208
-
209
-
210
-
211
-
212
-
213
-
214
-
215
-
216
-
217
-
218
-
219
-
220
-
221
-
222
-
223
-
224
-
225
-
226
-
227
-
228
 |
 |
