Onkyo BD-SP308 Owner Manual - Page 11
Installation, Connecting to Your TV, HDMI Connection - black
 |
View all Onkyo BD-SP308 manuals
Add to My Manuals
Save this manual to your list of manuals |
Page 11 highlights
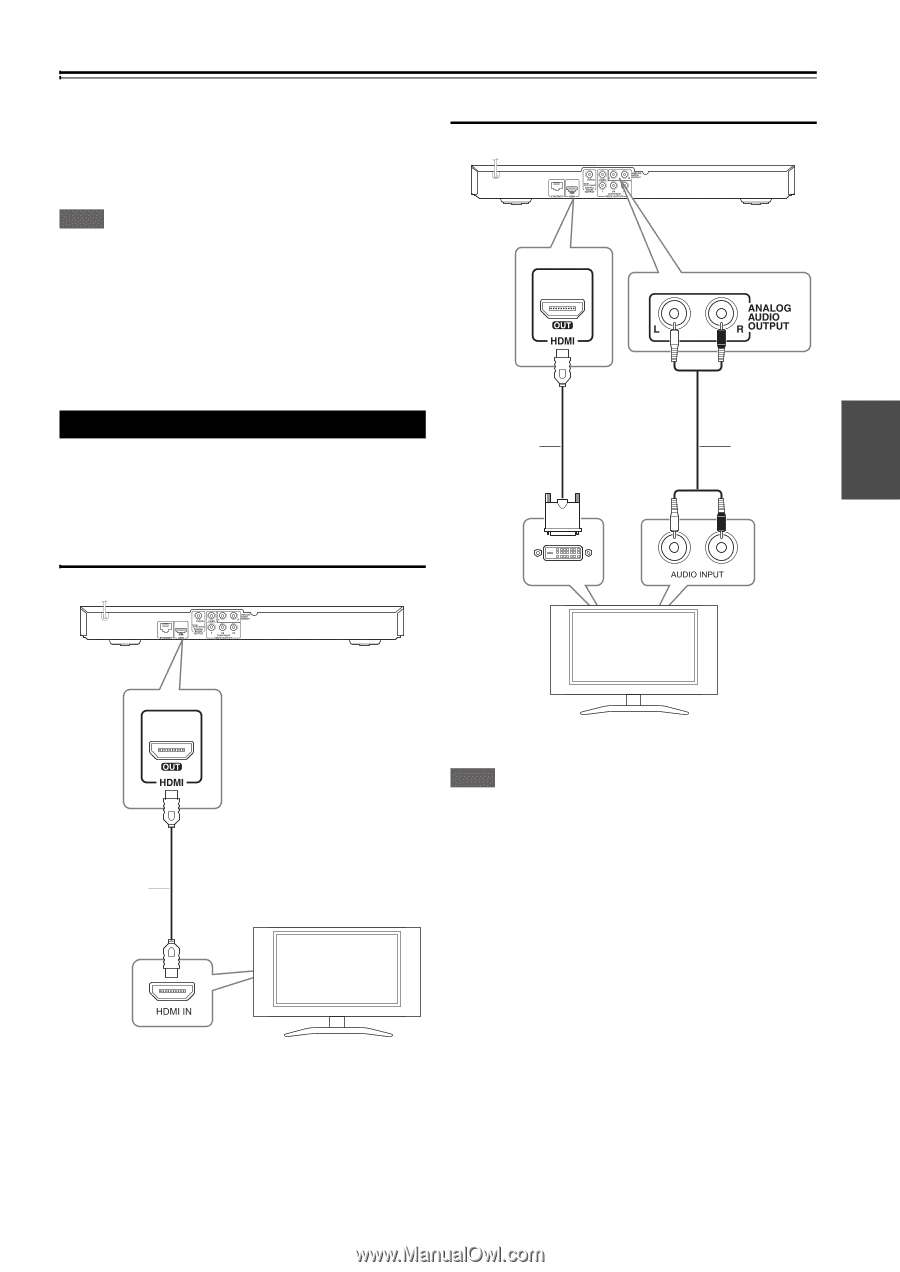
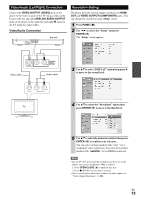
Installation Connecting to Your TV Make one of the following connections, depending on the capabilities of your existing equipment. • HDMI connection (➔ 11) • Component Video connection (➔ 12) • Video/Audio (Left/Right) Connection (➔ 13) Note • Depending on your TV and other equipment you wish to connect, there are various ways you could connect the player. Use only one of the connections described in this manual. • Please refer to the manuals of your TV, Stereo System or other devices as necessary to make the best connections. • Do not connect the player's ANALOG AUDIO OUTPUT jack to the phono in jack (record player) of your audio system. • Do not connect your player via your VCR. The image could be distorted by the copy protection system. HDMI-DVI Connection this unit HDMI Connection If you have a HDMI TV or monitor, you can connect it to this player using a HDMI cable (Type A, Version 1.3). Connect the HDMI jack on the player to the HDMI OUT jack on a HDMI compatible TV or monitor. HDMI Connection this unit HDMI-DVI cable DVI IN Audio cable L R TV HDMI cable Note • If a connected HDMI device does not accept the audio output of the player, the HDMI device's audio sound may be distorted or may not output. • When you use HDMI connection, you can change the resolution for the HDMI output. Refer to "Resolution Setting" (➔ 13). • Select the type of video output from the HDMI OUT jack using "HDMI Color Setting" option on the "Setup" menu (➔ 20). • Changing the resolution when the connection has already been established may result in malfunctions. To solve the problem, turn off the player and then turn it on again. TV • When the HDMI connection with HDCP is not verified, TV screen is changed to black screen. In this case, check the HDMI connection, or disconnect the HDMI cable. • If there are noises or lines on the screen, please check the HDMI cable (length is generally limited to 4.5 m). Set the TV's source to HDMI (refer to TV's Owner's manual). En 11
-
 1
1 -
2
-
3
-
4
-
5
-
 6
6 -
 7
7 -
 8
8 -
 9
9 -
 10
10 -
 11
11 -
 12
12 -
 13
13 -
 14
14 -
 15
15 -
 16
16 -
17
-
18
-
19
-
20
-
21
-
22
-
23
-
24
-
25
-
26
-
27
-
28
-
29
-
30
-
31
-
32
-
33
-
34
-
35
-
36
-
37
-
38
-
39
-
40
-
41
-
42
-
43
-
44
 |
 |