Onkyo BD-SP308 Owner Manual - Page 16
Connecting to your Home Network, Wired network connection, Wired Network Setup - test
 |
View all Onkyo BD-SP308 manuals
Add to My Manuals
Save this manual to your list of manuals |
Page 16 highlights
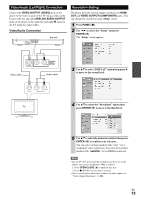
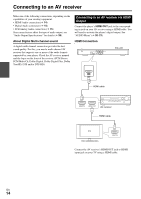
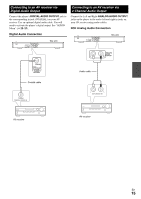
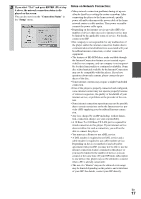
Connecting to your Home Network This player can be connected to a local area network (LAN) via the ETHERNET port on the rear panel. By connecting the unit to a broadband home network, you have access to services such as BD-LIVE interactivity, Netflix and software updates. Wired network connection Connect the player's ETHERNET port to the corresponding port on your Modem or Router using a commercially available LAN or Ethernet cable (CAT5 or better with RJ45 connector). Note • When plugging or unplugging the LAN cable, hold the plug por- tion of the cable. When unplugging, do not pull on the LAN cable but unplug while pressing down on the lock. • Do not connect a modular phone cable to the ETHERNET port. • Since there are various connection configurations, please follow the specifications of your telecommunication carrier or internet service provider. Wired Network Setup If there is a DHCP server on the local area network (LAN) via wired connection, this player will automatically be allocated an IP address. After making the physical connection, a small number of home networks may require the player's network setting to be adjusted. Adjust the "NETWORK" setting as follow. ■ Preparation Before setting the wired network, you need to connect the broadband internet to your home network. 1 Select "Connection Setting" option in the "Setup" menu then press ENTER (K). Wired Network Connection Router/Modem Broadband service 2 Use R/X/F/S select the IP mode between "Dynamic" and "Static". Normally, select "Dynamic" to allocate an IP address automatically. PC PC LAN cable this unit En 16 Note • If there is no DHCP server on the network and you want to set the IP address manually, select "Static" then set "IP Address", "Subnet Mask", "Gateway" and "DNS Server" using R/X/F/S and numerical buttons. If you make a mistake while entering a number, press CLEAR to clear the highlighted part. 3 Select "OK" and press ENTER (K) to apply network settings. The player will ask you to test the network connection. 4 Select "OK" and press ENTER (K) to complete the network connection.
-
 1
1 -
2
-
3
-
4
-
5
-
6
-
7
-
8
-
9
-
10
-
 11
11 -
 12
12 -
 13
13 -
 14
14 -
 15
15 -
 16
16 -
 17
17 -
 18
18 -
 19
19 -
 20
20 -
 21
21 -
22
-
23
-
24
-
25
-
26
-
27
-
28
-
29
-
30
-
31
-
32
-
33
-
34
-
35
-
36
-
37
-
38
-
39
-
40
-
41
-
42
-
43
-
44
 |
 |
