Onkyo HT-S570 Owner Manual - Page 20
Subwoofer Mode 1 Default
 |
View all Onkyo HT-S570 manuals
Add to My Manuals
Save this manual to your list of manuals |
Page 20 highlights
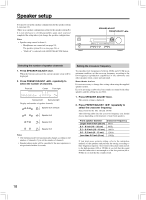
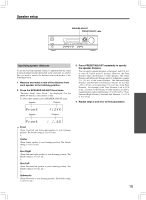
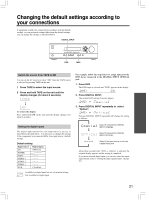
Speaker setup SUBWOOFER MODE Before operating the remote controller, press RCVR/TAPE. TEST CH SEL LEVEL Setting the subwoofer mode Press SUBWOOFER MODE on the unit. With the first press of the button, you can check the present setting. Then each press of the button changes the subwoofer mode as follows (a tip on how to select the right subwoofer mode is in parenthesis): → Subwoofer Mode 1 (Default) (To output the low frequencies of all channels from the subwoofer.) ↓ Subwoofer Mode 2 (To output the low frequencies of the center and surround channels from the subwoofer.) ↓ Subwoofer Mode 3 (To output only the LFE channel* of a 5.1-channel source from the subwoofer.) ↓ Subwoofer Off (When no subwoofer is connected or when a subwoofer is connected but not used.) * LFE channel: The channel recording the LFE (Low Frequency Effects). The normal display resumes in three seconds. Note When the subwoofer mode is set to Mode 2 or Mode 3 and audio is reproduced in the Stereo mode, the subwoofer may not output audio from certain sources (2 channel-Dolby Digital/DTS source etc.). Adjusting each speaker's relative volume balance - Test tone Adjust each speaker's relative volume balance so that the volumes of all speakers' test tones sound equal at the listening position. Adjust the volume to your normal listening level, prior to commencing settings. Note You cannot adjust the volume balance while the muting function is activated. 1. Press TEST on the remote controller. Each speaker emits the test tone (pink noise) and the display shows the speaker emitting the test tone. 2. Press CH SEL repeatedly to select the speaker, then press LEVEL / on the remote controller to adjust the volume level. When CH SEL is pressed repeatedly, each speaker produces the test tone (pink noise) in the following order: Left → Center → Right → Surr Right → Surr Left → Subwoofer. The volume level can be adjusted between -12dB and +12dB. Notes • No test tone will be emitted from the speaker which is not included in the speaker configuration on page 18 even if it is actually connected. • No test tone will be emitted from the subwoofer when the subwoofer mode is set to "Subwoofer Off". • Even when CH SEL is not pressed, the test tone will move to the next speaker in 2 seconds. 3. When you have completed the adjustment by repeating step 2, press TEST. The test tone stops and the normal display resumes. Note Even if you don't press TEST, the test tone will stop after 2 minutes. 20
-
 1
1 -
2
-
3
-
4
-
5
-
6
-
7
-
8
-
9
-
10
-
11
-
12
-
13
-
14
-
 15
15 -
 16
16 -
 17
17 -
 18
18 -
 19
19 -
 20
20 -
 21
21 -
 22
22 -
 23
23 -
 24
24 -
 25
25 -
26
-
27
-
28
-
29
-
30
-
31
-
32
-
33
-
34
-
35
-
36
-
37
-
38
-
39
-
40
-
41
-
42
-
43
-
44
-
45
-
46
-
47
 |
 |
