Onkyo LS3100 Owner Manual - Page 13
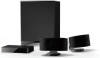
Placing the Subwoofer, Wall mounting, Fixing the front speakers to prevent a, falling accident
 |
View all Onkyo LS3100 manuals
Add to My Manuals
Save this manual to your list of manuals |
Page 13 highlights
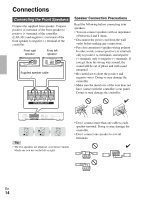
■ Wall mounting 1 Attach the supplied stand referring to the illustration for wall mounting. 2 Screw a commercially available wallmounting screw into the wall. 3 Insert the head of the screw into the keyhole slot on the bottom of the supplied stand and fix it firmly. Please confirm that the head of the screw is at the top of the hole. ■ Fixing the front speakers to prevent a falling accident When you mount the speaker to the wall, make sure to set it firmly so that it cannot slip and fall. This is especially important if you have small children. Pass the end of the supplied wire through the hole of the stand and tie it. Screw the eye bolt into the eye bolt hole on the back of the cabinet. 2 1 Screw Keyhole slot for wall mounting Note • A mounting screw's ability to support a speaker depends on the material and the position of studs of the wall (We recommend that you consult a home installation professional). Note • For mounting the front Wall speaker, use a screw with a head diameter of 2/32" (7 mm) or more and 5/16" (9 mm) or less, and a shank diameter of 1/8" (3 mm) or more and 5/32" to 3/16" 5/32" (4 mm) or less. The (4 to 5 mm) screws as thick and long as possible are recommended. • Leave a gap of between 5/32" (4 mm) and 3/16" (5 mm) between the wall and the base of the screw head, as shown. • Mount the front speaker to the vertical wall. Mounting to the inclined wall might cause a falling of the speaker by coming off the stand. Placing the Subwoofer ■ Using the rubber stoppers for a more stable platform We recommend to use the supplied rubber stoppers to achieve the best possible sound. Attach the rubber stoppers to the four corners of the bottom. The rubber stopper also provides stability. Thin rubber stoppers Bottom of the SLW-301 En 13
-
 1
1 -
2
-
3
-
4
-
5
-
6
-
7
-
 8
8 -
 9
9 -
 10
10 -
 11
11 -
 12
12 -
 13
13 -
 14
14 -
 15
15 -
 16
16 -
 17
17 -
 18
18 -
19
-
20
-
21
-
22
-
23
-
24
-
25
-
26
-
27
-
28
 |
 |
