Onkyo TX-NR1008 Owner Manual
Onkyo TX-NR1008 Manual
 |
View all Onkyo TX-NR1008 manuals
Add to My Manuals
Save this manual to your list of manuals |
Onkyo TX-NR1008 manual content summary:
- Onkyo TX-NR1008 | Owner Manual - Page 1
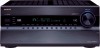
AV Receiver Contents Introduction 2 TX-NR1008 Connections 13 Turning On & Basic Operations ......24 Instruction Manual Advanced Operations 42 Controlling iPod & Other Components 79 Thank you for purchasing an Onkyo AV Receiver. Please read this manual thoroughly before making connections - Onkyo TX-NR1008 | Owner Manual - Page 2
servicing) instructions in the literature accompanying the appliance. Important Safety Instructions 1. Read these instructions. 2. Keep these instructions. 3. Heed all warnings. 4. Follow all instructions the rear. The rear edge of the shelf or board above the apparatus shall be set 10 cm (4") - Onkyo TX-NR1008 | Owner Manual - Page 3
-serviceable. If you cannot turn on the unit, contact your Onkyo Excessive sound pressure from long time, it may not work properly the next time you instructions receiving antenna. • Increase the separation between the equipment and receiver CONFORME À LA NORME NMB003 DU CANADA. Sur les modèles dont - Onkyo TX-NR1008 | Owner Manual - Page 4
leakage or corrosion. Aiming the Remote Controller To use the remote controller, point it at the AV receiver's remote control sensor, as shown below. Transmission Remote control sensor AV receiver Received Transmitter Incoming sensor 15 Approx. 16 ft. (5 m) AV receiver 15 En Approx. 16 ft - Onkyo TX-NR1008 | Owner Manual - Page 5
Codes 86 Remote Control Codes for Onkyo Components Connected via V 86 Resetting REMOTE MODE Buttons 87 Resetting the Remote Controller 87 Controlling Other Components 87 Activities Setup 89 Learning Commands 90 Using Normal Macros 91 Others Troubleshooting 92 Specifications 97 About HDMI - Onkyo TX-NR1008 | Owner Manual - Page 6
to 1080p Compatible) with Faroudja DCDi Cinema Enhancement • HDMI (Ver.1.4a with Audio Return Channel, 3D), Deep- Color, x.v.Color*11, Lip Sync, DTS*2-HD Master Audio, DTS-HD High Resolution Audio, Dolby TrueHD*3, Dolby Digital Plus, DSD and Multi-CH PCM • Dolby Pro Logic IIz*3 - New Surround Format - Onkyo TX-NR1008 | Owner Manual - Page 7
for home theater playback. * "Xantech" is a registered trademark of Xantech Corporation. * "Niles" is a registered trademark of Niles Audio Corporation. * "DLNA®, the DLNA Logo and DLNA CERTIFIED™ are trademarks, service marks, or certification marks of the Digital Living Network Alliance - Onkyo TX-NR1008 | Owner Manual - Page 8
C STANDBY indicator (➔ 24) D ZONE 2 indicator (➔ 76) E ZONE 3 indicator (➔ 76) F Remote control sensor/transmitter (➔ 4) G Display (➔ 9) H DISPLAY button (➔ 25) I MASTER VOLUME control and indicator (➔ 25) J PURE AUDIO button (➔ 36) K HDMI THRU indicator (➔ 59) L Input selector buttons (BD/DVD, VCR - Onkyo TX-NR1008 | Owner Manual - Page 9
buttons (MOVIE/TV, MUSIC, GAME and THX) (➔ 36) [ AUX INPUT jacks (HDMI, VIDEO, AUDIO L/R and DIGITAL) (➔ 18, 19) " Up S and Down F buttons (➔ channel indicators C Z2 (Powered Zone 2) indicator (➔ 76) D Z3 (Powered Zone 3) indicator (➔ 76) E Listening mode and format indicators (➔ 36, 61) F NETWORK - Onkyo TX-NR1008 | Owner Manual - Page 10
control. D V REMOTE CONTROL jack E UNIVERSAL PORT jack F ETHERNET port G SIRIUS antenna jack (North American models) H MONITOR OUT V and S jacks I COMPONENT VIDEO IN and MONITOR OUT jacks J HDMI IN and HDMI output (HDMI OUT MAIN and HDMI AV Receiver" for connection information (➔ 13 to 22). En 10 - Onkyo TX-NR1008 | Owner Manual - Page 11
Controlling the AV Receiver B C D E *1 F G B H I J C K L*2 M*2 D *3 N O*2 E P To control the AV receiver, press RECEIVER to select Receiver mode. You can also use the remote controller to control Onkyo Blu-ray Disc/DVD player, CD player and other components. See "Entering Remote Control Codes - Onkyo TX-NR1008 | Owner Manual - Page 12
About Home Theater Enjoying Home Theater Thanks to the AV receiver's superb capabilities, you can enjoy surround sound with a real sense of movement in your own home-just like being in a movie theater or concert hall. With Blu-ray Discs or DVDs, you can enjoy DTS and Dolby Digital. With analog or - Onkyo TX-NR1008 | Owner Manual - Page 13
best from your surround sound system, you need to set the speaker settings. You can do this automatically (➔ 29) or manually (➔ 47). Attaching the Speaker Cable Labels The AV receiver cable labels are also color-coded and you should attach them . • Read the instructions supplied with your speakers - Onkyo TX-NR1008 | Owner Manual - Page 14
one cable to each speaker terminal. Doing so may damage the AV receiver. • Don't connect one speaker to several terminals. Connecting the terminal before inserting the banana plug. • Do not insert the speaker code directly into the center hole of the speaker terminal. The following illustration - Onkyo TX-NR1008 | Owner Manual - Page 15
back speakers. Dipole speakers output the same sound in two directions. Dipole speakers typically have front speakers that support bi-amping, providing improved bass and treble performance. • When bi-amping is used, the AV receiver is able to support bi-amping. Refer to your speaker manual. En 15 - Onkyo TX-NR1008 | Owner Manual - Page 16
you want to use a more powerful power amplifier and use the AV receiver as a preamp, connect it to the PRE OUT jacks, and connect L L L R R R Power amplifier GI J H Note *1 Specify "None" for the channel that you don't want to output (➔ 47). SB···Surround Back, FH···Front High, FW···Front - Onkyo TX-NR1008 | Owner Manual - Page 17
image with AV components HDMI cable : Video & Audio AV receiver Other cables : Video AV receiver : Audio TV, projector, etc. Blu-ray Disc/ DVD player Game console TV, projector, etc. Blu-ray Disc/ DVD player Game console • Before making any AV connections, read the manuals supplied with - Onkyo TX-NR1008 | Owner Manual - Page 18
HDMI component connected to the AV receiver). If the TV power is off or the TV is set to another input source, this may result in no sound from the AV receiver or the sound may be cut off. • When the "Audio TV Out" setting is set to "On" (➔ 58) to hear from your TV's speakers, by controlling the AV - Onkyo TX-NR1008 | Owner Manual - Page 19
(GAME) Game console ✔ IN 2 (TV/CD) TV, CD player ✔ % MONITOR OUT Composite video TV, projector, etc. and S-Video BD/DVD IN VCR/DVR IN Analog audio, composite video and S-Video Blu-ray Disc/DVD player VCR or DVD recorder/digital video recorder CBL/SAT IN Satellite, cable, set-top box, etc - Onkyo TX-NR1008 | Owner Manual - Page 20
not support all V functions. Refer to the manuals supplied with your other Onkyo components. • While Zone 2 or Zone 3 is on, the System On/Auto Power On and Direct Change V functions do not work. • Do not use RI connections if you use HDMI Control (RIHD) (➔ 58). IN L R TV/CD REMOTE CONTROL FRONT - Onkyo TX-NR1008 | Owner Manual - Page 21
equipment on the same circuit. If this is a problem, plug the AV receiver into a different branch circuit. • Do not use a power cord other than the one supplied with the AV receiver. The supplied power cord is designed exclusively for use with the AV receiver and should not be used with any other - Onkyo TX-NR1008 | Owner Manual - Page 22
IN (Analog RGB), component video or HDMI, the latter offering the best picture quality. The AV receiver can upconvert and downconvert between video ` Both: Video signals are output from both HDMI outputs AV receiver at the resolution supported by both TVs. You cannot select "Resolution" setting - Onkyo TX-NR1008 | Owner Manual - Page 23
ray Disc/DVD player, etc. Analog Multichannel Optical Coaxial IN AV receiver *1 *1*3 *1 *1 *3 Analog OUT HDMI HDMI *1 *2 TV, projector, etc. *1 Depends on the "Audio TV Out" setting (➔ 58). *2 This setting is available, when "Audio Return Channel" setting is set to "Auto" (➔ 59), you must - Onkyo TX-NR1008 | Owner Manual - Page 24
connected via V. Turning Off Press ON/STANDBY on the front panel. or Press RECEIVER followed by STANDBY on the remote controller. The AV receiver will enter Standby mode. To prevent any loud surprises when you turn on the AV receiver, always turn down the volume before you turn it off. (European and - Onkyo TX-NR1008 | Owner Manual - Page 25
using the remote controller unless otherwise specified. Selecting the Language Used for the Onscreen Setup Menus You can determine the language used for the onscreen setup menus. See "Language" in the "OSD Setup" (➔ 57). Playing the Connected Component ■ Operating on the AV receiver 1 Use the - Onkyo TX-NR1008 | Owner Manual - Page 26
sleep time by 10 minutes. Selecting Speaker Layout You can prioritize which speakers you want to use. Press RECEIVER followed by SP LAYOUT repeatedly. ■ 9.1 ch playback `Speaker Layout:SB/FH: The sounds from surround back and front high speakers are output by priority. `Speaker Layout:SB/FW: The - Onkyo TX-NR1008 | Owner Manual - Page 27
and listening mode, not all channels shown here output the sound. *4 When you have entered a custom name in "Name Edit" (➔ 53), the input source is displayed with that name. But even if not, the component name may be displayed if the AV receiver receives it via HDMI connection (➔ 18). *5 For the - Onkyo TX-NR1008 | Owner Manual - Page 28
/channel AV receiver, playback components and TV. ` Normal Macro mode: You can assign desired operations (➔ 89, 91). Note • If you set any one of the ACTIVITIES to Normal Macro mode, all the ACTIVITIES will be set to Normal Macro mode. • To use ACTIVITIES, first assign the remote control codes - Onkyo TX-NR1008 | Owner Manual - Page 29
problems over the listening area in both the frequency and time domain. The result is clear, well-balanced sound home theater seating arrangements. Choose the one that best it away from all audio electronics. • The AV receiver and the connected TV. On the TV, select the input to which the AV receiver - Onkyo TX-NR1008 | Owner Manual - Page 30
control on the subwoofer. Note • If your subwoofer does not have a volume control Review Speaker Configuration - - Subwoofer Front Center Surround Front Wide Front High Surr Back Surr Back Ch . • If the AV receiver is muted, it 2 or 3 attempts, contact your Onkyo dealer. • Speaker Detect Error This - Onkyo TX-NR1008 | Owner Manual - Page 31
Correction and Speaker Setup again. Note that if the volume is set too high and the sound distorts, detection issues may occur, so use an appropriate volume level. If the subwoofer has a low-pass filter switch, set it to Off or Direct. Refer to your subwoofer's instruction manual for details. En 31 - Onkyo TX-NR1008 | Owner Manual - Page 32
to get good reception. In this case, switch to manual tuning mode and listen to the station in mono. ■ Tuning into stations by frequency You can tune into AM and FM stations directly by entering the appropriate frequency. 1 On the remote controller, press TUNER repeatedly to select "AM" or "FM - Onkyo TX-NR1008 | Owner Manual - Page 33
the AV receiver, or the remote controller's CH +/-. Tip • You can also use the remote controller's (excluding North American and Taiwan models) RDS works only in areas where RDS broadcasts are available. etc.). The AV receiver supports four types of RDS information: ■ PS (Program Service) When tuned - Onkyo TX-NR1008 | Owner Manual - Page 34
PRESET F/S to select the type of program you want. See the table shown later in this chapter. 3 To start the search, press ENTER. The AV receiver searches until it finds a station of the type you specified, at which point it stops briefly before continuing with the search. 4 When a station you want - Onkyo TX-NR1008 | Owner Manual - Page 35
that you want to record. You can watch the source while recording. The AV receiver's MASTER VOLUME control has no effect on recording. 2 On your recorder, start recording. Camcorder CD player VCR : Video signal : Audio signal 1 Prepare the camcorder and CD player for playback. 2 Prepare the VCR - Onkyo TX-NR1008 | Owner Manual - Page 36
player is connected to the AV receiver with a digital audio connection (coaxial, optical, or HDMI). • The listening modes Audio, Mono, Direct, and Stereo. • The listening modes cannot be used while you are listening to sound through your TV speakers coming from components connected to the AV receiver - Onkyo TX-NR1008 | Owner Manual - Page 37
Modes The AV receiver's listening modes can transform your listening room into a movie theater or concert hall, with high fidelity and stunning surround sound. Explanatory Notes SP LAYOUT JK LM BC D G LISTENING MODE EF HI ■ Input Source The following audio formats are supported by the - Onkyo TX-NR1008 | Owner Manual - Page 38
from an HDMI output(s).) ' Direct In this mode, audio from the input source is output without surround-sound ( D i r e c t d i oPPoPP processing. The speaker configuration (presence of speakers), speaker distances and A/V Sync settings are enabled, but much of the processing set via ) HOME is - Onkyo TX-NR1008 | Owner Manual - Page 39
soundtracks, which use a dis- ( crete surround back channel for true 6.1/7.1-channel playback. The seven totally separate audio channels provide better spatial imaging and 360degree sound localization, perfect for sounds that pan across the surround channels. Use it with DVDs that bear the DTS-ES - Onkyo TX-NR1008 | Owner Manual - Page 40
in movie theaters and home theaters just as the director Plus is configured for game audio levels, with Timbre Matching active sounds to produce the surround back channel out- put. • THX Select2 Music This mode is designed for use with music. It expands 5.1-channel sources for 7.1-channel - Onkyo TX-NR1008 | Owner Manual - Page 41
high and front wide speakers are not supported. *5 For the Blu-ray Discs, Dolby Digital is used in a 3.1/5.1-channel speaker system. *6 AV receiver can input the DSD signal from HDMI IN. Setting the output setting on the player side to PCM might obtain a better sound according to the player. In that - Onkyo TX-NR1008 | Owner Manual - Page 42
Audio Setup D Audio Adjust (➔ 50) 7. Hardware Setup 1. Remote ID 2. Multi Zone 3. Tuner 4. HDMI 5. Auto Power Down 6. Network 7. Firmware Update I Remote Controller Setup (➔ 84, 89) 3. Audio Note • This procedure can also be performed on the AV receiver by using SETUP, arrow buttons, and ENTER. • - Onkyo TX-NR1008 | Owner Manual - Page 43
• When you select other than "Analog", the onscreen setup menus are output by only the HDMI output. If you're not using the HDMI output and select settings by mistake and the menus disappear, press AV receiver's MONITOR OUT to select "Analog". • For Deep Color output, if the "Monitor Out" setting is - Onkyo TX-NR1008 | Owner Manual - Page 44
can specify the output resolution for the HDMI output and COMPONENT VIDEO MONITOR OUT and have the AV receiver upconvert the picture resolution as necessary to match the resolution supported by your TV. ` Through*1: Select this to pass video through the AV receiver at the same resolution and with no - Onkyo TX-NR1008 | Owner Manual - Page 45
output (even if the HDMI input is assigned), the AV receiver selects the video source based on the setting of "Component Video Input". • When an HDMI IN is assigned to an input selector as explained here, the same HDMI IN will be set as a priority in the "Digital Audio Input" (➔ 46). In this case - Onkyo TX-NR1008 | Owner Manual - Page 46
PORT jack, you cannot assign any input to "PORT" selector. Analog Audio Input Some DVD players output the LFE channel from their analog subwoofer output at 15 dB higher than normal. With this setting, you can change the AV receiver's subwoofer sensitivity to match your DVD player. ■ Subwoofer Input - Onkyo TX-NR1008 | Owner Manual - Page 47
Audio TV Out" setting is set to "On" (➔ 58) and an input selector other than HDMI 15). Note • When bi-amping is used, the AV receiver is able to drive up to 7.1 speakers in the Sounds below the crossover frequency will be output by the subwoofer instead of the speaker. Refer to your speaker's manuals - Onkyo TX-NR1008 | Owner Manual - Page 48
bass output by feeding bass sounds from the front left, right, and center channels to the subwoofer. ` (➔ 47). • The speakers cannot be calibrated while the AV receiver is muted. • The test tone is output at the using the Home menu are saved (➔ 27). Tip • If you're using a handheld sound level meter - Onkyo TX-NR1008 | Owner Manual - Page 49
Audio listening mode is selected, the equalizer settings have no effect. Tip • Low frequencies (e.g., 63Hz) affect bass sounds; high frequencies (e.g., 16000Hz) affect treble sounds. 3 Use R to select "Channel m) apart. Note • Cannot be set if "Surr Back Ch" is set to "1ch" (➔ 48), "Speakers Type( - Onkyo TX-NR1008 | Owner Manual - Page 50
new volume control technology featured in THX Ultra2 Plus™ and THX Select2 Plus™ Certified receivers. With THX Loudness Plus, home theater audiences , the center channel sound will be distributed to the front left and right speakers to create a phantom center). This setting controls the front left - Onkyo TX-NR1008 | Owner Manual - Page 51
the Height Gain Control to their personal Surround EX listening mode is used. ` Manual: You can select any available listening Audio sources. *3 DSD (Super Audio CD) sources. ■ Neo:6 Music Center Image `0 to 2 to 5 The DTS Neo:6 Music listening mode creates 6-channel surround sound from 2-channel - Onkyo TX-NR1008 | Owner Manual - Page 52
sound even when listening at low volume levels. Audyssey Dynamic EQ solves the problem of deteriorating sound sound pressure level at the listening position. A home theater system automatically cali- brated by Audyssey MultEQ® will play at reference level when the master volume control Audio or - Onkyo TX-NR1008 | Owner Manual - Page 53
delivering a loudness correction solution. Audyssey Dynamic EQ works in tandem with Audyssey MultEQ® to provide well-balanced sound for every listener at any volume level. About Audyssey Dynamic Volume® Audyssey Dynamic Volume solves the problem of large variations in volume level between television - Onkyo TX-NR1008 | Owner Manual - Page 54
*1 You can also be performed on the remote controller by using +10. *2 Press CLR on the remote controller, you can delete all characters in the input Auto: According to the input signals and monitor output setting, the AV receiver automatically selects the "4:3", "Full", "Zoom" or "Wide Zoom" mode - Onkyo TX-NR1008 | Owner Manual - Page 55
Custom: All settings can be performed manually. `ISF Day: Setting when a optimal picture quality from the receiver. Accordingly, Onkyo recommends that setup and calibration the HDMI outputs and have the AV receiver upconvert the picture resolution as necessary to match the resolution supported by - Onkyo TX-NR1008 | Owner Manual - Page 56
remote controller by using the Home menu (➔ 27). *2 Press CLR if you want to reset resumed once the AV receiver has been set to only listening modes for the analog sound to "PORT" selector. 2 audio signal is played (DVD, etc.). ■ 2ch Source With this setting, the default listening mode for 2-channel - Onkyo TX-NR1008 | Owner Manual - Page 57
several Onkyo components are used in the same room, their remote ID codes may overlap. To differentiate the AV receiver from the other components, you can change its remote ID from "1", to "2" or "3". Note • If you do change the AV receiver's remote ID, be sure to change the remote controller to - Onkyo TX-NR1008 | Owner Manual - Page 58
HDMI. • If "On" is selected and the audio can be output from the TV, the AV receiver will output no sound through its speakers. In this case, "TV Sp On" appears on the display. • When "TV Control component's instruction manual for details. • The Q control does not support HDMI OUT SUB. Use HDMI OUT - Onkyo TX-NR1008 | Owner Manual - Page 59
firmware update. ■ Version The current version of the firmware is displayed. ■ Receiver ` via NET: You can update the firmware via Internet. Check the network connection before update. ` via USB: You can update the firmware from a USB mass storage device. You can update the AV receiver's firmware - Onkyo TX-NR1008 | Owner Manual - Page 60
` via NET: You can update the firmware via Internet. Check the network connection before update. ` via USB: You can update the firmware from a USB mass storage device. You can update the Onkyo dock's firmware. Do not shutdown the power of the AV receiver while update. Note • This update shall not be - Onkyo TX-NR1008 | Owner Manual - Page 61
the original sound designer, Audio listening mode is selected. • The setting is stored individually for each input selector. • Alternatively, you can use the AV receiver Audio, DTS-HD Master Audio, DTS Express, DSD, Dolby EX, Dolby Pro Logic IIz Height, Dolby PLIIx Movie, Neo:6 Cinema and 5.1-channel - Onkyo TX-NR1008 | Owner Manual - Page 62
be sent to the HDMI OUT MAIN of the AV receiver.*1 With this selection the TV's audio can be automatically selected as a priority among other assignments. ` HDMI: This can be selected when HDMI IN has been assigned as an input source. If both HDMI (HDMI IN) and digital audio inputs (COAXIAL IN or - Onkyo TX-NR1008 | Owner Manual - Page 63
the AV receiver to your home network. In this example, it's connected to a LAN port on a router, which has a 4-port 100Base-TX switch built-in. ■ Ethernet Router A router manages the network, routing data and supplying IP addresses. Your router must support the following: • NAT (Network Address - Onkyo TX-NR1008 | Owner Manual - Page 64
onkyo.vtuner.com/ portal. To verify your MAC Address, please see "Network Settings" (➔ 69). DISPLAY Note • When the NETWORK indicator flashes, confirm that the Ethernet cable is firmly connected to the AV receiver. • Services available may vary depending on the region. See the separate instructions - Onkyo TX-NR1008 | Owner Manual - Page 65
music by Artist, Album, or Track. Note • The search function does not work with media servers which do not support this function. • Depending on the sharing settings in the media server, the AV receiver may not able to access the content. Refer to the instruction manual of the media server. En 65 - Onkyo TX-NR1008 | Owner Manual - Page 66
Fast Forward/Fast Reverse/ Pause operations do not work. Random Playback The Random function can only be random playback, press RANDOM again. Random playback supports up to 20000 songs per folder. If a case, check your server, network, and AV receiver connections. Windows Media Player 11 Setup This - Onkyo TX-NR1008 | Owner Manual - Page 67
AV receiver supports the following music file formats: MP3, WMA, WAV, FLAC, Ogg Vorbis, AAC and LPCM. Not all servers support all formats. ■ MP3 • MP3 files must be MPEG-1/MPEG-2 Audio be played. • Number of channels: 2 • Variable bit-rate (VBR) MP3 files are supported. (Playing times may not display - Onkyo TX-NR1008 | Owner Manual - Page 68
AV receiver certificate the DLNA Interoperability Guidelines version 1.5. Remote Playback from Media Server/ Personal Computer Remote Playback means you can play the music files stored on the DLNA-certified device such as media server with this product by operating the controller device in the home - Onkyo TX-NR1008 | Owner Manual - Page 69
ENTER. The "Hardware Setup" menu appears. 7. Hardware Setup 1. Remote ID 2. Multi Zone 3. Tuner 4. HDMI 5. Auto Power Down 6. Network 7. Firmware Update 3 Use R/X to select "Network", and then press ENTER. The "Network" screen appears. 7-6. Network MAC Address DHCP IP Address Subnet Mask Gateway - Onkyo TX-NR1008 | Owner Manual - Page 70
network settings, after modifying it is necessary to execute "Save". 7 When you've finished, press SETUP. The setup menu closes. Note • This procedure can also be performed on the AV receiver by using SETUP, arrows, and ENTER. ■ Mac Address This is the AV receiver's MAC (Media Access Control - Onkyo TX-NR1008 | Owner Manual - Page 71
be plugged into the AV receiver's USB port. Supported Audio File Formats For USB mass storage device playback, the AV receiver supports music file formats. See "Supported Audio File Formats" (➔ 67). USB Mass Storage Device Requirements • The AV receiver supports USB devices that support the USB mass - Onkyo TX-NR1008 | Owner Manual - Page 72
your USB MP3 player's instruction manual for details. • Protected WMA music files on an MP3 player cannot be played. • Onkyo accepts no responsibility whatsoever for the loss or damage to data stored on a USB mass storage device when that device is used with the AV receiver. We recommend that you - Onkyo TX-NR1008 | Owner Manual - Page 73
Amp in Zone 2 This setup allows 9.1-channel playback in your main listening room and 2-channel stereo playback in Zone 2, with a different source in each room. Hookup • Use an RCA audio cable to connect the AV receiver's ZONE 2 PRE OUT L/R jacks to an analog audio input on your Zone 2 amp. • Connect - Onkyo TX-NR1008 | Owner Manual - Page 74
Amp in Zone 3 This setup allows 9.1-channel playback in your main listening room and 2-channel stereo playback in Zone 3, with a different source in each room. Hookup • Use an RCA audio cable to connect the AV receiver's ZONE 3 PRE OUT L/R jacks to an analog audio input on your Zone 3 amp. • Connect - Onkyo TX-NR1008 | Owner Manual - Page 75
Calibration 5. Equalizer Settings 6. THX Audio Setup 3 Use R/X to select Setup 1. Remote ID 2. Multi Zone 3. Tuner 4. HDMI 5. Auto Power Down 6. Network 7. Firmware Update 3 Use be set on the AV receiver. If you've connected your Zone 2/3 speakers to an amp with no volume control, set the "Zone2 - Onkyo TX-NR1008 | Owner Manual - Page 76
. 1 Press ZONE repeatedly, then point the remote controller at the AV receiver and press ON. Tip • The ZONE 2/3 terminals. Digital input sources are not output. If no sound is heard when an input source is selected, check 2/3 is on, V functions will not work. Note • When Zone 2/3 is turned off, - Onkyo TX-NR1008 | Owner Manual - Page 77
in Zone 2/3 picks up the infrared signals from the remote controller and feeds them through to the AV receiver in the main room via the connecting block. IR IN Connecting block IR receiver Remote controller Main room Zone 2/3 Signal flow The miniplug cable from the connecting block should - Onkyo TX-NR1008 | Owner Manual - Page 78
jack are fed through to the other component via the IR emitter. Signals picked up by the AV receiver's remote control sensor are not output. IR IN IR OUT Connecting block AV receiver IR Emitter IR receiver Remote controller Other component Signal flow The IR emitter should be connected to the - Onkyo TX-NR1008 | Owner Manual - Page 79
the AV receiver. • The USB indicator lights (➔ 9) if the AV receiver is able to read the iPod/iPhone. • The USB indicator flashes if the AV receiver cannot the Remote Control. Note • The audio of video content can be played back but no video will be displayed onscreen. Extended Mode control The - Onkyo TX-NR1008 | Owner Manual - Page 80
connect the V cable, otherwise a malfunction may occur. • See the RI Dock's instruction manual for more 82 information. *1 To use V (Remote Interactive), you must make an analog audio connection (RCA) between the AV receiver and the RI Dock. V cable*1 Models sold are different depending on the - Onkyo TX-NR1008 | Owner Manual - Page 81
web site. For supported iPod models, see the instruction manual of the Onkyo Dock. UP-A1 Dock With the UP-A1 Dock, you can easily play the music, photo, or movie stored on your Apple iPod through the AV receiver and enjoy great sound. You can use the AV receiver's remote controller to operate your - Onkyo TX-NR1008 | Owner Manual - Page 82
• ON/STANDBY may not work with a remote control code (without V). In this case, make an V connection and enter a remote control code 81993 (with V). With the RI Control In this case, make an V connection and enter a remote control code 81993 (with V). • Set the AV receiver's Input Display to "DOCK - Onkyo TX-NR1008 | Owner Manual - Page 83
L RETURN ✔*5 ✔ ✔ E F • With some iPod models, generations and RI Docks, certain buttons may not work as expected. • For detailed operation of the iPod, please refer to the instruction manual of RI Dock. *1 This button does not turn the Onkyo DS-A2 or DS-A2X RI Dock on or off. Your iPod may not - Onkyo TX-NR1008 | Owner Manual - Page 84
use the AV receiver's remote controller (RC-771M) to control your other AV components, includ- 4 Use R/X to select remote mode, and then press ENTER. ing those made by other manufacturers. This section The category selection menu appears. explains how to enter the remote control code (with the - Onkyo TX-NR1008 | Owner Manual - Page 85
in [***/***] mean the order of the candi- date code and the total number of the codes for the brand. If you can control component, press RECEIVER, use R/X to select "Works", and then press ENTER. 8-1. Remote Mode Setup Category Brand Code TV TV XXXXX xxxxx[***/***] Now we are ready to - Onkyo TX-NR1008 | Owner Manual - Page 86
slowly. Note • The remote control codes provided are correct at the time of printing, but are subject to change. Remote Control Codes for Onkyo Components Connected via V Onkyo components that are connected via V are controlled by pointing the remote controller at the AV receiver, not the component - Onkyo TX-NR1008 | Owner Manual - Page 87
with the remote control code for controlling a TV that supports the Q*1 (limited to some models). The TV must be able to receive remote control commands via Q and be connected to the AV receiver via HDMI. If controlling your TV via Q doesn't work very well, program your TV's remote control code into - Onkyo TX-NR1008 | Owner Manual - Page 88
+10 ✔*1 ✔*1 ✔✔ ✔ F N J DISPLAY K MUTING L CH +/- ✔✔ ✔✔ DISC +/- ✔ ✔ M PREV CH MENU ✔ ✔ ✔✔ G N RETURN O CLR *1 The Q function is not supported. The Q sup- H ported by the AV receiver is the CEC system control function of the HDMI standard. *2 These buttons function - Onkyo TX-NR1008 | Owner Manual - Page 89
RECEIVER followed by SETUP. The main menu appears onscreen. Tip • If the main menu doesn't appear, make sure the appropri- ate external input is selected on your TV. 2 Use R/X to select "Remote Controller Setup", and then press ENTER. The "Remote Controller Setup" menu appears. 8. Remote Controller - Onkyo TX-NR1008 | Owner Manual - Page 90
transfer data to the remote. Please hold the remote so that it is facing the receiver. Use ENTER button of your remote to activate "OK". Ready? OK To use the remote controller, point it at the AV receiver's remote control sensor, as shown below. Remote control sensor (Transmitter) Incoming sensor - Onkyo TX-NR1008 | Owner Manual - Page 91
order in which they were programmed. Keep the remote controller pointed at the AV receiver until all of the commands have been transmitted. Macros can be run at any time, regardless of the current remote controller mode. Deleting Macros 1 While holding down HOME, press and hold down ALL OFF until - Onkyo TX-NR1008 | Owner Manual - Page 92
display and the AV receiver will enter Standby mode. Note that resetting the AV receiver will delete your radio presets and custom settings. RECEIVER HOME To reset the remote controller to its factory defaults, while holding down RECEIVER, press and hold down HOME until RECEIVER button lights (about - Onkyo TX-NR1008 | Owner Manual - Page 93
room is reduced to 7.1-channels and the front wide and surround back speakers produce no sound. While Powered Zone PCM, because the AV receiver does not switch formats immediately, you may not hear any sound, in which case of audio received by an HDMI IN can't be heard Since it takes longer - Onkyo TX-NR1008 | Owner Manual - Page 94
may not work as expected. Make sure you've entered the correct remote control 86 code. Make sure to set the same ID on both the AV receiver 57 and remote controller. ■ Can't control other components If it's an Onkyo component, make sure that the V 20 cable and analog audio cable are connected - Onkyo TX-NR1008 | Owner Manual - Page 95
of the codes work, use the Learning function 90 to learn the commands of the other component's remote controller. To control an Onkyo component that's connected via 86 V, point the remote controller at the AV receiver. Be sure to enter the appropriate remote control code first. To control an Onkyo - Onkyo TX-NR1008 | Owner Manual - Page 96
Select "Skip" in the "VideoProcessor" setting on the display. To reset back to the original setting, press the same button at the same time. If you select "Use", the AV receiver will output video signals from the video processor. Onkyo is not responsible for damages (such as CD rental fees) due to - Onkyo TX-NR1008 | Owner Manual - Page 97
- 100 kHz/+1 dB, -3 dB (Direct mode) Tone Control Characteristics ±10 dB, 50 Hz (BASS) ±10 dB, HDMI Input Output Video Resolution Audio Format Supported IN 1, IN 2, IN 3, IN 4, IN 5, IN 6, AUX INPUT OUT MAIN, OUT SUB 1080p Dolby TrueHD, DTS Master Audio, DVD-Audio, DSD 3D, Audio Return Channel - Onkyo TX-NR1008 | Owner Manual - Page 98
■ Audio Outputs Analog VCR/DVR, ZONE 2/3 PRE OUT Analog Multichannel Pre Outputs 9 Subwoofer Pre SETUP MIC 1 RS232 1 Ethernet 1 IR Input 1 IR Output 1 12 V Trigger Out 2 USB 1 Universal Port 1 RI 1 Specifications and features are subject to change without notice. En 98 - Onkyo TX-NR1008 | Owner Manual - Page 99
This may not work with some TVs and displays, resulting in no picture.) The AV receiver uses HDCP (High-bandwidth Digital Content Protection)*2, so only HDCP-compatible components can display the picture. The AV receiver's HDMI interface is based on the following: Audio Return Channel, 3D, x.v.Color - Onkyo TX-NR1008 | Owner Manual - Page 100
Recorder Q, which stands for Remote Interactive over HDMI, is the name of the system control function found on Onkyo components. The AV receiver can be used with CEC (Consumer Electronics Control), which allows system control over HDMI and is part of the HDMI standard. CEC provides interoperability - Onkyo TX-NR1008 | Owner Manual - Page 101
cable when connecting to the V and V audio control compatible components. • When you select anything other than the HDMI jack where the AV receiver is connected as the input on the TV, input on the AV receiver will be switched to "TV/CD". • The AV receiver will automatically power on in conjunction - Onkyo TX-NR1008 | Owner Manual - Page 102
The following tables show how video signals at different resolutions are output by the AV receiver. NTSC/PAL ✔: Output Output HDMI Input 1080p 1080i 720p HDMI 1080p ✔ 1080i ✔ ✔ ✔ 720p ✔ ✔ ✔ 480p/576p ✔ ✔ ✔ 480i/576i ✔ ✔ ✔ Component 1080p ✔ 1080i ✔ ✔ ✔ 720p ✔ ✔ ✔ 480p - Onkyo TX-NR1008 | Owner Manual - Page 103
Memo En 103 - Onkyo TX-NR1008 | Owner Manual - Page 104
-473-350 Fax: +44-(0)1628-401-700 ONKYO CHINA LIMITED Unit 1 & 12, 9/F, Ever Gain Plaza Tower 1, 88, Container Port Road, Kwai Chung, N.T., Hong Kong. Tel: 852-2429-3118 Fax: 852-2428-9039 http://www.ch.onkyo.com/ SN 29400341 (C) Copyright 2010 ONKYO CORPORATION Japan. All rights reserved. Y1005
-
 1
1 -
 2
2 -
 3
3 -
 4
4 -
 5
5 -
 6
6 -
 7
7 -
8
-
9
-
10
-
11
-
12
-
13
-
14
-
15
-
16
-
17
-
18
-
19
-
20
-
21
-
22
-
23
-
24
-
25
-
26
-
27
-
28
-
29
-
30
-
31
-
32
-
33
-
34
-
35
-
36
-
37
-
38
-
39
-
40
-
41
-
42
-
43
-
44
-
45
-
46
-
47
-
48
-
49
-
50
-
51
-
52
-
53
-
54
-
55
-
56
-
57
-
58
-
59
-
60
-
61
-
62
-
63
-
64
-
65
-
66
-
67
-
68
-
69
-
70
-
71
-
72
-
73
-
74
-
75
-
76
-
77
-
78
-
79
-
80
-
81
-
82
-
83
-
84
-
85
-
86
-
87
-
88
-
89
-
90
-
91
-
92
-
93
-
94
-
95
-
96
-
97
-
98
-
99
-
100
-
101
-
102
-
103
-
104
 |
 |

AV Receiver
TX-NR1008
Instruction Manual
Thank you for purchasing an Onkyo AV Receiver.
Please read this manual thoroughly before making
connections and plugging in the unit.
Following the instructions in this manual will enable
you to obtain optimum performance and listening
enjoyment from your new AV Receiver.
Please retain this manual for future reference.
Contents
Introduction
...................................
2
Connections
.................................
13
Turning On & Basic Operations
......
24
Advanced Operations
.................
42
Controlling iPod & Other
Components
............................
79
Others
...........................................
92
E
n