Onkyo TX-NR1008 Owner Manual - Page 77
Using the Remote Controller in Zone 2/3 and Multiroom Control Kits, Adjusting the Volume for Zones
 |
View all Onkyo TX-NR1008 manuals
Add to My Manuals
Save this manual to your list of manuals |
Page 77 highlights
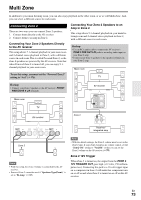
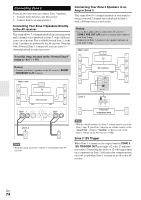
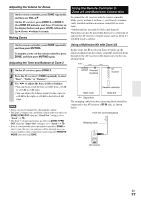
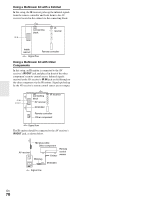
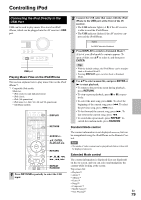
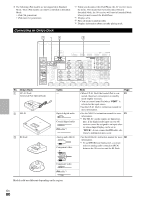
Adjusting the Volume for Zones On the remote controller, press ZONE repeatedly, and then use VOL R/X. On the AV receiver, press ZONE 2 or ZONE 3 (the ZONE 2/3 indicator and Zone 2/3 selector on the display flashes) and press LEVEL followed by Up S/Down F within 8 seconds. Muting Zones On the remote controller, press ZONE repeatedly, and then press MUTING. To unmute a zone, on the remote controller, press ZONE, and then press MUTING again. Adjusting the Tone and Balance of Zone 2 1 On the AV receiver, press ZONE 2. 2 Press the AV receiver's TONE repeatedly to select "Bass", "Treble" or "Balance". 3 Use F/S to adjust the bass, treble or balance. • You can boost or cut the bass or treble from -10 dB to +10 dB in 2 dB steps. • You can adjust the balance from 0 in the center to +10 dB to the right or +10 dB to the left in 2 dB steps. Note • Zones can also be unmuted by adjusting the volume. • The Zone 2 volume, tone, and balance function have no effect on ZONE 2 PRE OUT when the "Zone2 Out" setting is set to "Fixed" (➔ 75). • The Zone 3 volume function has no effect on ZONE 3 PRE OUT when the "Zone3 Out" setting is set to "Fixed" (➔ 75). • Even if you repeatedly press the remote controller's ZONE to select zones, the last zone selection will be retained once you have switched to other components by pressing other REMOTE MODE after pressing ZONE. Using the Remote Controller in Zone 2/3 and Multiroom Control Kits To control the AV receiver with the remote controller while you're in Zone 2 or Zone 3, you'll need a commercially available multiroom remote control kit for each zone. • Multiroom kits are made by Niles and Xantech. These kits can also be used when there isn't a clear line of sight to the AV receiver's remote sensor, such as when it's installed inside a cabinet. Using a Multiroom Kit with Zone 2/3 In this setup, the IR receiver in Zone 2/3 picks up the infrared signals from the remote controller and feeds them through to the AV receiver in the main room via the connecting block. IR IN Connecting block IR receiver Remote controller Main room Zone 2/3 Signal flow The miniplug cable from the connecting block should be connected to the AV receiver's IR IN jack, as shown below. From the connecting block Miniplug cable AV receiver En 77
-
 1
1 -
2
-
3
-
4
-
5
-
6
-
7
-
8
-
9
-
10
-
11
-
12
-
13
-
14
-
15
-
16
-
17
-
18
-
19
-
20
-
21
-
22
-
23
-
24
-
25
-
26
-
27
-
28
-
29
-
30
-
31
-
32
-
33
-
34
-
35
-
36
-
37
-
38
-
39
-
40
-
41
-
42
-
43
-
44
-
45
-
46
-
47
-
48
-
49
-
50
-
51
-
52
-
53
-
54
-
55
-
56
-
57
-
58
-
59
-
60
-
61
-
62
-
63
-
64
-
65
-
66
-
67
-
68
-
69
-
70
-
71
-
 72
72 -
 73
73 -
 74
74 -
 75
75 -
 76
76 -
 77
77 -
 78
78 -
 79
79 -
 80
80 -
 81
81 -
 82
82 -
83
-
84
-
85
-
86
-
87
-
88
-
89
-
90
-
91
-
92
-
93
-
94
-
95
-
96
-
97
-
98
-
99
-
100
-
101
-
102
-
103
-
104
 |
 |
