Onkyo TX-NR1008 Owner Manual - Page 27
Using the Home Menu, Changing the Input Display, RECEIVER, Audio, Video, Input, ENTER, Listening Mode - remote control not working
 |
View all Onkyo TX-NR1008 manuals
Add to My Manuals
Save this manual to your list of manuals |
Page 27 highlights
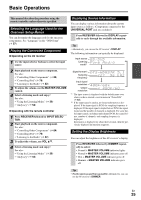
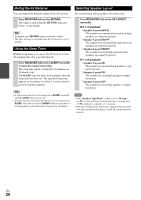
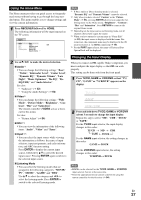
Using the Home Menu The Home menu provides you quick access to frequently used menus without having to go through the long standard menu. This menu enables you to change settings and view the current information. 1 Press RECEIVER followed by HOME. The following information will be superimposed on the TV screen. BD/DVD Audio Bass Video Treble 0dB Info Subwoofer Level Input Center Level Listening Mode Dynamic EQ Dynamic Volume Note *1 If Pure Audio or Direct listening mode is selected, "Dynamic EQ" and "Dynamic Volume" cannot be selected. *2 Only when you have selected "Custom" in the "Picture Mode" (➔ 55), pressing ENTER allows you to adjust the following items via the Home menu; "Brightness", "Contrast", "Hue" and "Saturation". Press RETURN to return to the original Home menu. *3 Depending on the input source and listening mode, not all channels shown here output the sound. *4 When you have entered a custom name in "Name Edit" (➔ 53), the input source is displayed with that name. But even if not, the component name may be displayed if the AV receiver receives it via HDMI connection (➔ 18). *5 For the PORT input selector, the name of Universal Port Option Dock will be displayed. 2 Use R/X/F/S to make the desired selection. ■ Audio*1 ` You can change the following settings: "Bass", "Treble", "Subwoofer Level", "Center Level", "Dynamic EQ", "Dynamic Volume", "Late Night", "Music Optimizer", "Re-EQ", "ReEQ(THX)" and "Audio Selector". See also: • "Audyssey" (➔ 52) • "Using the Audio Settings" (➔ 60) ■ Video*2 ` You can change the following settings: "Wide Mode", "Picture Mode", "Brightness", "Contrast", "Hue" and "Saturation". The remote controller's VIDEO acts as a shortcut for this menu. See also: • "Picture Adjust" (➔ 54) ■ Info*3*4 ` You can view the information of the following items: "Audio", "Video" and "Tuner". ■ Input*4*5 ` You can select the input source while viewing the information as follows: the name of input selectors, input assignments, and radio information, and ARC function setting. Press ENTER to display the current input source, followed by R/X to select the desired input source. Pressing ENTER again switches to the selected input source. ■ Listening Mode ` You can select the listening modes that are grouped in the following categories: "MOVIE/ TV", "MUSIC", "GAME" and "THX". Use R/X to select the category and F/S to select the listening mode. Press ENTER to switch to the selected listening mode. → → Changing the Input Display When you connect an V-capable Onkyo component, you must configure the input display so that V can work properly. This setting can be done only from the front panel. 1 Press TV/CD, GAME or VCR/DVR so that "TV/ CD", "GAME" or "VCR/DVR" appears on the display. 2 Press and hold down TV/CD, GAME or VCR/DVR (about 3 seconds) to change the input display. Repeat this step to select "MD", "CDR", "DOCK" or "TAPE". For the TV/CD input selector, the input display changes in this order: TV/CD → MD → CDR TAPE DOCK For the GAME input selector, the setting changes in this order: GAME ↔ DOCK For the VCR/DVR input selector, the setting changes in this order: VCR/DVR ↔ DOCK Note • DOCK can be selected for the TV/CD, GAME or VCR/DVR input selector, but not at the same time. • Enter the appropriate remote control code before using the remote controller for the first time (➔ 84). → En 27
-
 1
1 -
2
-
3
-
4
-
5
-
6
-
7
-
8
-
9
-
10
-
11
-
12
-
13
-
14
-
15
-
16
-
17
-
18
-
19
-
20
-
21
-
 22
22 -
 23
23 -
 24
24 -
 25
25 -
 26
26 -
 27
27 -
 28
28 -
 29
29 -
 30
30 -
 31
31 -
 32
32 -
33
-
34
-
35
-
36
-
37
-
38
-
39
-
40
-
41
-
42
-
43
-
44
-
45
-
46
-
47
-
48
-
49
-
50
-
51
-
52
-
53
-
54
-
55
-
56
-
57
-
58
-
59
-
60
-
61
-
62
-
63
-
64
-
65
-
66
-
67
-
68
-
69
-
70
-
71
-
72
-
73
-
74
-
75
-
76
-
77
-
78
-
79
-
80
-
81
-
82
-
83
-
84
-
85
-
86
-
87
-
88
-
89
-
90
-
91
-
92
-
93
-
94
-
95
-
96
-
97
-
98
-
99
-
100
-
101
-
102
-
103
-
104
 |
 |
