Onkyo TX-NR1010 Owner Manual - Page 20
En-20, Aux Input Video, Monitor Out V, Component Video Monitor Out, Tv/cd In, Phono In, Pc
 |
View all Onkyo TX-NR1010 manuals
Add to My Manuals
Save this manual to your list of manuals |
Page 20 highlights
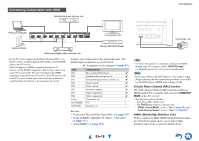
No. Jack/Port ( COMPONENT VIDEO MONITOR OUT IN 1 (BD/DVD) IN 2 (CBL/SAT) ) ZONE 2 OUT * PC IN*5 Components TV, projector, etc. Blu-ray Disc/DVD player, ✔ RI dock Satellite/cable set-top box, ✔ RI dock, etc. TV, projector, etc. Personal computer Note *1 Do not connect the AV receiver's USB port to a USB port on your computer. Music on your computer cannot be played through the AV receiver in this way. *2 Only the front-panel USB input is compatible with iPod/iPhone. *3 When the USB input is selected, you can input video signals from the AUX INPUT VIDEO jack. Video signals input from AUX INPUT VIDEO will be output from MONITOR OUT V, COMPONENT VIDEO MONITOR OUT, and the HDMI output jacks. Select which of COMPONENT VIDEO MONITOR OUT and the HDMI output jacks will output the video signal in the "Monitor Out" setting (➔ page 60). *4 Connect a turntable (MM) that has a built-in phono preamp to TV/CD IN, or connect it to PHONO IN with the phono preamp turned off. If your turntable (MM) doesn't have a phono preamp, connect it to PHONO IN. If your turntable has a moving coil (MC) type cartridge, you'll need a commercially available MC head amp or MC transformer to connect to PHONO IN. See your turntable's manual for details. If your turntable has a ground wire, connect it to the AV receiver's GND screw. With some turntables, connecting the ground wire may produce an audible hum. If this happens, disconnect it. *5 When you connect your personal computer to PC IN and select the PC input selector, the video of the personal computer is output from the HDMI outputs. However, if you have assigned the HDMI inputs to the PC input selector, the AV receiver will output signals received from the HDMI inputs instead of signals from PC IN, based on the priority order of HDMI > component video > PC IN (analog RGB). To have the signals output from PC IN, select for "PC" in the "HDMI Input" setting (➔ page 61). • With connection %, you can enjoy Dolby Digital and DTS. (To listen in Zone 2/3 as well, use % and '.) • With connection ', you can enjoy analog video from external components while you are in Zone 2. • With connection ', you can enjoy audio from external components while you are in Zone 2/3. • With connection ', if your Blu-ray Disc/DVD player has both the main stereo and multichannel outputs, be sure to connect the main stereo. En-20 Connections
-
 1
1 -
2
-
3
-
4
-
5
-
6
-
7
-
8
-
9
-
10
-
11
-
12
-
13
-
14
-
 15
15 -
 16
16 -
 17
17 -
 18
18 -
 19
19 -
 20
20 -
 21
21 -
 22
22 -
 23
23 -
 24
24 -
 25
25 -
26
-
27
-
28
-
29
-
30
-
31
-
32
-
33
-
34
-
35
-
36
-
37
-
38
-
39
-
40
-
41
-
42
-
43
-
44
-
45
-
46
-
47
-
48
-
49
-
50
-
51
-
52
-
53
-
54
-
55
-
56
-
57
-
58
-
59
-
60
-
61
-
62
-
63
-
64
-
65
-
66
-
67
-
68
-
69
-
70
-
71
-
72
-
73
-
74
-
75
-
76
-
77
-
78
-
79
-
80
-
81
-
82
-
83
-
84
-
85
-
86
-
87
-
88
-
89
-
90
-
91
-
92
-
93
-
94
-
95
-
96
-
97
-
98
-
99
-
100
-
101
-
102
-
103
-
104
-
105
-
106
-
107
-
108
-
109
-
110
-
111
-
112
-
113
-
114
-
115
-
116
-
117
-
118
-
119
-
120
-
121
-
122
-
123
-
124
-
125
-
126
-
127
-
128
-
129
-
130
-
131
-
132
-
133
-
134
-
135
-
136
-
137
-
138
-
139
-
140
-
141
-
142
-
143
-
144
-
145
-
146
-
147
-
148
-
149
-
150
-
151
-
152
-
153
-
154
-
155
-
156
-
157
-
158
-
159
-
160
-
161
-
162
-
163
-
164
 |
 |
