Onkyo TX-NR717 Owner Manual - Page 12
Connections, Connecting the AV Receiver, Connecting Your Speakers - onto
 |
View all Onkyo TX-NR717 manuals
Add to My Manuals
Save this manual to your list of manuals |
Page 12 highlights
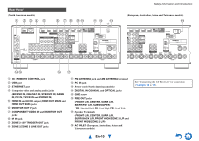
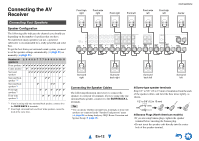
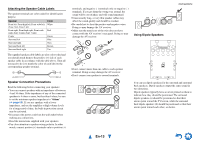
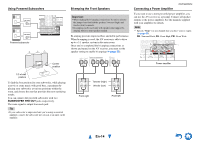
Connecting the AV Receiver Front high right Front wide right Front right Front left Front wide left Front high left Connections Center Connecting Your Speakers Speaker Configuration The following table indicates the channels you should use depending on the number of speakers that you have. No matter how many speakers you use, a powered subwoofer is recommended for a really powerful and solid bass. To get the best from your surround sound system, you need to set the speaker settings automatically (➔ page 35) or manually (➔ page 55). Number of 2 3 4 5 6 7 7 7 8 8 9 9 9 10 11 speakers Front speakers Center speaker Surround speakers Surround back speaker*1*2 ✔ ✔✔ ✔ Surround back speakers*2 ✔ ✔✔ ✔ Front high speakers*2 Front wide speakers*2 *1 If you're using only one surround back speaker, connect it to the SURR BACK L terminals. *2 Front high, surround back and front wide speakers cannot be used at the same time. Surround right Surround back right Connecting the Speaker Cables The following illustration shows how to connect the speakers to each pair of terminals. If you're using only one surround back speaker, connect it to the SURR BACK L terminals. Tip • You can specify whether surround back, front high, or front wide speakers are connected in the "Speaker Configuration" menu (➔ page 55) or during Audyssey 2EQ® Room Correction and Speaker Setup (➔ page 35). Surround back left Surround left ■ Screw-type speaker terminals Strip 1/2" to 5/8" (12 to 15 mm) of insulation from the ends of the speaker cables, and twist the bare wires tightly, as shown. 1/2" to 5/8" (12 to 15 mm) ■ Banana Plugs (North American models) • If you are using banana plugs, tighten the speaker terminal before inserting the banana plug. • Do not insert the speaker code directly into the center hole of the speaker terminal. En-12
-
 1
1 -
2
-
3
-
4
-
5
-
6
-
 7
7 -
 8
8 -
 9
9 -
 10
10 -
 11
11 -
 12
12 -
 13
13 -
 14
14 -
 15
15 -
 16
16 -
 17
17 -
18
-
19
-
20
-
21
-
22
-
23
-
24
-
25
-
26
-
27
-
28
-
29
-
30
-
31
-
32
-
33
-
34
-
35
-
36
-
37
-
38
-
39
-
40
-
41
-
42
-
43
-
44
-
45
-
46
-
47
-
48
-
49
-
50
-
51
-
52
-
53
-
54
-
55
-
56
-
57
-
58
-
59
-
60
-
61
-
62
-
63
-
64
-
65
-
66
-
67
-
68
-
69
-
70
-
71
-
72
-
73
-
74
-
75
-
76
-
77
-
78
-
79
-
80
-
81
-
82
-
83
-
84
-
85
-
86
-
87
-
88
-
89
-
90
-
91
-
92
-
93
-
94
-
95
-
96
-
97
-
98
-
99
-
100
-
101
-
102
-
103
-
104
-
105
-
106
-
107
-
108
-
109
-
110
-
111
-
112
-
113
-
114
-
115
-
116
-
117
-
118
-
119
-
120
-
121
-
122
-
123
-
124
-
125
-
126
-
127
-
128
-
129
-
130
-
131
-
132
-
133
-
134
-
135
-
136
-
137
-
138
-
139
-
140
-
141
-
142
-
143
-
144
-
145
-
146
-
147
-
148
 |
 |
