Onkyo TX-NR717 Owner Manual - Page 14
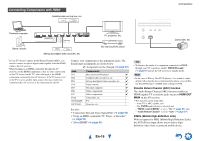
En-14, Using Powered Subwoofers, Bi-amping the Front Speakers, Connecting a Power Amplifier - how to biamp
 |
View all Onkyo TX-NR717 manuals
Add to My Manuals
Save this manual to your list of manuals |
Page 14 highlights
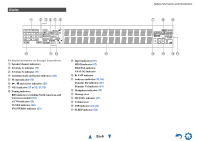
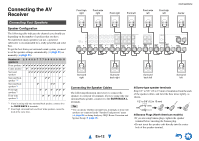
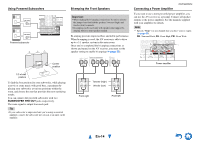
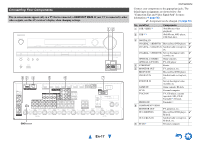
Using Powered Subwoofers LINE INPUT LINE INPUT LINE INPUT LINE INPUT Powered subwoofer Bi-amping the Front Speakers Important: • When making the bi-amping connections, be sure to remove the jumper bars that link the speakers' tweeter (high) and woofer (low) terminals. • Bi-amping can be used only with speakers that support biamping. Refer to your speaker manual. Bi-amping provides improved bass and treble performance. When bi-amping is used, the AV receiver is able to drive up to a 5.1 speaker system in the main room. Once you've completed the bi-amping connections as shown and turned on the AV receiver, you must set the speaker setting to enable bi-amping (➔ page 55). Connecting a Power Amplifier Connections If you want to use a more powerful power amplifier, you can use the AV receiver as a preamp. Connect all speaker outputs to the power amplifier. See the manuals supplied with your amplifier for details. Note *1 Specify "None" for any channel that you don't want to output (➔ page 55). SB···Surround Back, FH···Front High, FW···Front Wide L *1 R Corner position 1/3 of wall position To find the best position for your subwoofer, while playing a movie or some music with good bass, experiment by placing your subwoofer at various positions within the room, and choose the one that provides the most satisfying results. You can connect the powered subwoofer with two SUBWOOFER PRE OUT jacks respectively. The same signal is output from each jack. Tip • If your subwoofer is unpowered and you're using an external amplifier, connect the subwoofer pre out jack to an input on the amplifier. Tweeter (high) Woofer (low) Front right Front left Power amplifier En-14
-
 1
1 -
2
-
3
-
4
-
5
-
6
-
7
-
8
-
 9
9 -
 10
10 -
 11
11 -
 12
12 -
 13
13 -
 14
14 -
 15
15 -
 16
16 -
 17
17 -
 18
18 -
 19
19 -
20
-
21
-
22
-
23
-
24
-
25
-
26
-
27
-
28
-
29
-
30
-
31
-
32
-
33
-
34
-
35
-
36
-
37
-
38
-
39
-
40
-
41
-
42
-
43
-
44
-
45
-
46
-
47
-
48
-
49
-
50
-
51
-
52
-
53
-
54
-
55
-
56
-
57
-
58
-
59
-
60
-
61
-
62
-
63
-
64
-
65
-
66
-
67
-
68
-
69
-
70
-
71
-
72
-
73
-
74
-
75
-
76
-
77
-
78
-
79
-
80
-
81
-
82
-
83
-
84
-
85
-
86
-
87
-
88
-
89
-
90
-
91
-
92
-
93
-
94
-
95
-
96
-
97
-
98
-
99
-
100
-
101
-
102
-
103
-
104
-
105
-
106
-
107
-
108
-
109
-
110
-
111
-
112
-
113
-
114
-
115
-
116
-
117
-
118
-
119
-
120
-
121
-
122
-
123
-
124
-
125
-
126
-
127
-
128
-
129
-
130
-
131
-
132
-
133
-
134
-
135
-
136
-
137
-
138
-
139
-
140
-
141
-
142
-
143
-
144
-
145
-
146
-
147
-
148
 |
 |
