Onkyo TX SR804 Instruction Manual - Page 12
Pre Out Front L/r, Surround L/r, Video 1 In/out And Video 2 In/out - setting
 |
View all Onkyo TX SR804 manuals
Add to My Manuals
Save this manual to your list of manuals |
Page 12 highlights
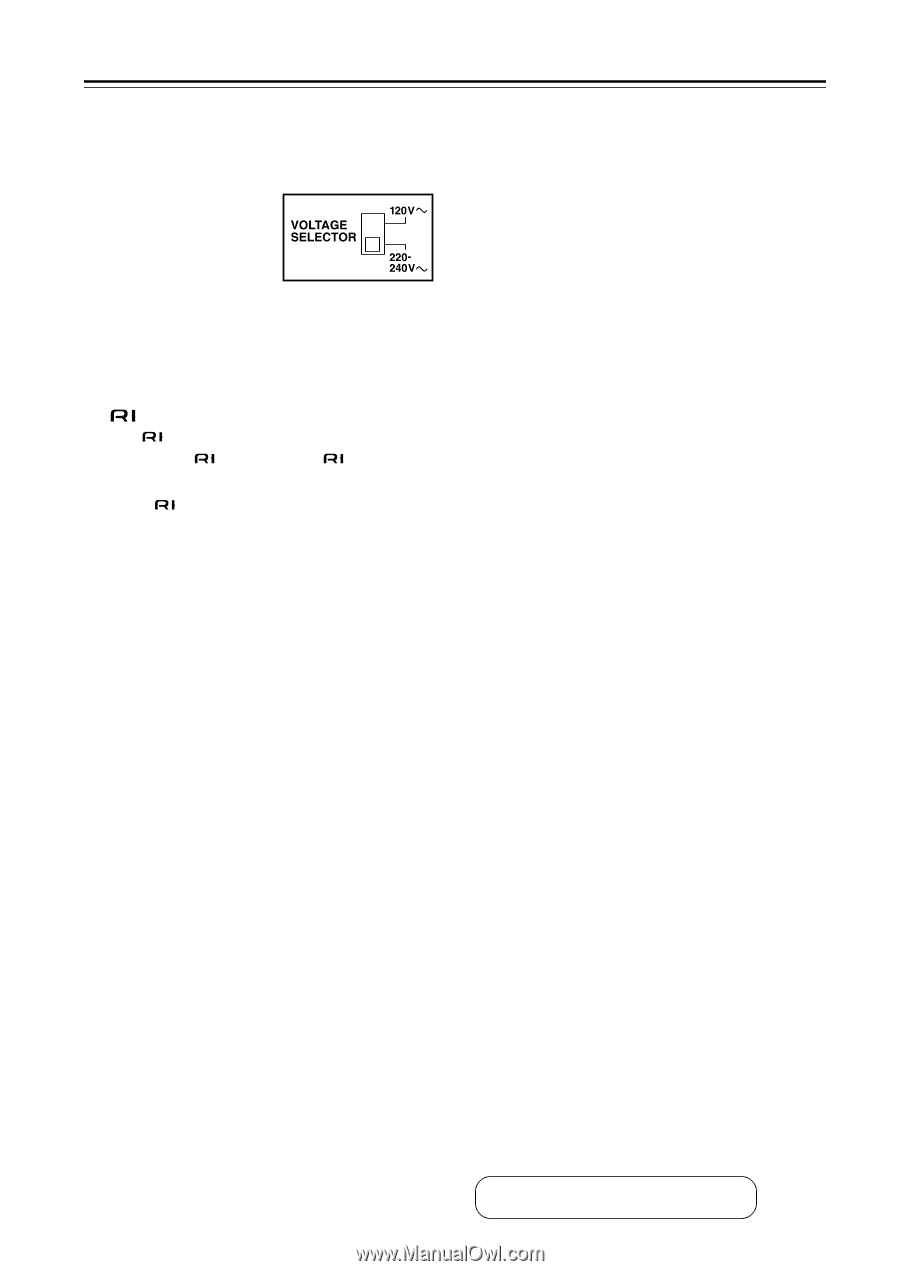
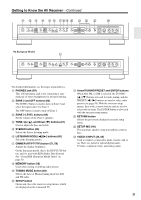
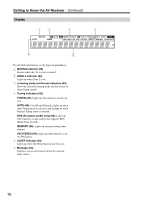
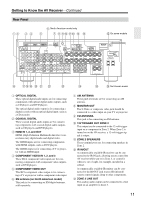
Getting to Know the AV Receiver-Continued N RS232 This port is for connecting the AV receiver to home automation equipment and external controllers. O VOLTAGE SELECTOR (on some models) Some models have a voltage selector switch for compatibility with power systems around the world. Before you plug in such a model, make sure that the voltage selector is set to the correct voltage for your area. If it isn't, use a small screwdriver to select the correct setting. For example, if the voltage in your area is 120 volts, set the selector to "120 V." If it's between 220 and 240 volts, set it to "220-240 V." P REMOTE CONTROL This (Remote Interactive) jack can be con- nected to the jack on another -capable Onkyo component, for remote and system control. To use , you must make an analog audio connection (RCA) between the AV receiver and the other component, even if they are connected digitally. Q GND screw This screw is for connecting a turntable's ground wire. R PHONO IN This analog audio input is for connecting a turntable. S CD IN This analog audio input is for connecting a CD player's analog audio output. T TAPE IN/OUT This analog audio input and output are for connecting a recorder with an analog audio input and output, such as a cassette deck, MD recorder, etc. U VIDEO 3 IN A VCR for playback only, or a cable or satellite receiver can be connected here. There's S-Video and composite video input jacks for connecting the video signal. V VIDEO 1 IN/OUT and VIDEO 2 IN/OUT One or two video components can be connected here for recording and playback, such as a VCR. There's S-Video and composite video input and output jacks for connecting the video signal. W DVD IN This input are for connecting a DVD player. There's S-Video and composite video input jacks for connecting the video signal, and stereo (FRONT) and multichannel 5.1/7.1 jacks for connecting the analog audio signals. X PRE OUT FRONT L/R, SURROUND L/R, CENTER, SUBWOOFER, and SURR BACK L/R This 5.1/7.1 analog audio output can be connected to the analog audio input on another power amplifier, for when you want to use the AV receiver as a preamplifier. The SUBWOOFER jack is for connecting a powered subwoofer. Y FRONT, CENTER, SURROUND, and SURROUND BACK SPEAKERS These terminal posts are for connecting the front L/R, center, surround L/R, and surround back L/R speakers. Z AC OUTLETS These switched AC outlets can be used to supply power to other AV components. The type and number of outlets depends on the country in which you purchased your AV receiver. See pages 19-38 for hookup information. 12
-
 1
1 -
2
-
3
-
4
-
5
-
6
-
 7
7 -
 8
8 -
 9
9 -
 10
10 -
 11
11 -
 12
12 -
 13
13 -
 14
14 -
 15
15 -
 16
16 -
 17
17 -
18
-
19
-
20
-
21
-
22
-
23
-
24
-
25
-
26
-
27
-
28
-
29
-
30
-
31
-
32
-
33
-
34
-
35
-
36
-
37
-
38
-
39
-
40
-
41
-
42
-
43
-
44
-
45
-
46
-
47
-
48
-
49
-
50
-
51
-
52
-
53
-
54
-
55
-
56
-
57
-
58
-
59
-
60
-
61
-
62
-
63
-
64
-
65
-
66
-
67
-
68
-
69
-
70
-
71
-
72
-
73
-
74
-
75
-
76
-
77
-
78
-
79
-
80
-
81
-
82
-
83
-
84
-
85
-
86
-
87
-
88
-
89
-
90
-
91
-
92
-
93
-
94
-
95
-
96
 |
 |