Onkyo TX SR804 Instruction Manual - Page 40
First Time Setup, Automatic Speaker Setup
 |
View all Onkyo TX SR804 manuals
Add to My Manuals
Save this manual to your list of manuals |
Page 40 highlights
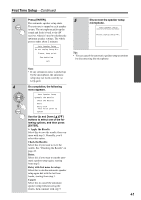
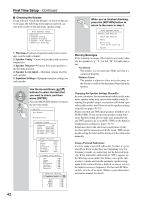
First Time Setup This section explains the settings that you need to make before using the AV receiver for the very first time. Automatic Speaker Setup With the supplied speaker setup microphone, the Automatic Speaker Setup function can measure the test tone output by each speaker and automatically determine the number of speakers connected, the crossover frequency, the distance from each speaker to the listening position, and so on. Before using this function, connect and position all of your speakers. 1 STANDBY/ON POWER STANDBY ZONE 2 ON OFF PURE AUDIO MULTI CH DVD VIDEO 1 VIDEO 2 VIDEO 3 VIDEO 4 TAPE TUNER CD PHONO DISPLAY MASTER VOLUME PHONES ZONE 2 OFF TONE ZONE 2 LEVEL STEREO TUNING DIMMER MEMORY MODE SETUP RETURN ENTER SETUP MIC LISTENING MODE CLEAR PRESET PRESET TUNING DIGITAL VIDEO 4 INPUT S VIDEO VIDEO L AUDIO R 2, 5 3, 4 ON STANDBY I T V INPUT V1 1 V2 2 V3 3 + SETUP MIC V4 MULTI CH DVD T V CH 4 5 6 - CD TAPE TUNER 7 8 9 PHONO T V VOL +10 0 CLEAR --/--- 10 11 12 INPUT SELECTOR MACRO 1 2 3 ZONE2 RECEIVER TAPE/AMP REMOTE MODE DVD CD HDD TV DIMMER + CH DISC ALBUM - VCR CABLE CDR TOP MENU MENU ENTER SAT MD SLEEP VOL PREV CH DISPLAY RETURN SET UP MUTING REC PLAYLIST RANDOM LISTENING MODE STEREO SURR Note: If any of your speakers is 4 ohms, change the REPEAT PURE A AUDIO SUBTITLE PLAY MODE DIRECT THX ALLST minimum speaker impedance setting TESTTONE CH SEL LEVEL LEVEL before running the automatic speaker setup OPEN/CLOSE VIDEOOFF (see page 46). L NIGHT Re-EQ 2 Put the speaker setup micro- phone in the listening position. Microphone Notes: • Make sure the microphone is hori- zontal. • If there's an obstacle between the microphone and any speaker, the automatic setup will not work correctly. Set up the room as you would when enjoying a DVD. • Positioning the microphone close to where your ears would normally will provide better results. You can adjust the height of the microphone by using a tripod or level table. SETUP MIC Connect the setup microphone to the SETUP MIC jack. Auto Speaker Setup Push Enter:Start Caution! Loud sound. Notes: • If the AV receiver was previously muted, it will be unmuted. • Automatic speaker setup cannot be performed while a pair of headphones is connected. 1 Turn on the AV receiver and the connected TV. On the TV, select the input to which the AV receiver is connected. 40
-
 1
1 -
2
-
3
-
4
-
5
-
6
-
7
-
8
-
9
-
10
-
11
-
12
-
13
-
14
-
15
-
16
-
17
-
18
-
19
-
20
-
21
-
22
-
23
-
24
-
25
-
26
-
27
-
28
-
29
-
30
-
31
-
32
-
33
-
34
-
 35
35 -
 36
36 -
 37
37 -
 38
38 -
 39
39 -
 40
40 -
 41
41 -
 42
42 -
 43
43 -
 44
44 -
 45
45 -
46
-
47
-
48
-
49
-
50
-
51
-
52
-
53
-
54
-
55
-
56
-
57
-
58
-
59
-
60
-
61
-
62
-
63
-
64
-
65
-
66
-
67
-
68
-
69
-
70
-
71
-
72
-
73
-
74
-
75
-
76
-
77
-
78
-
79
-
80
-
81
-
82
-
83
-
84
-
85
-
86
-
87
-
88
-
89
-
90
-
91
-
92
-
93
-
94
-
95
-
96
 |
 |
