Oreck XL 2600HH Owners Guide - Page 6
tuffing or, lockage, ow to, eplace - vacuum bags
 |
View all Oreck XL 2600HH manuals
Add to My Manuals
Save this manual to your list of manuals |
Page 6 highlights
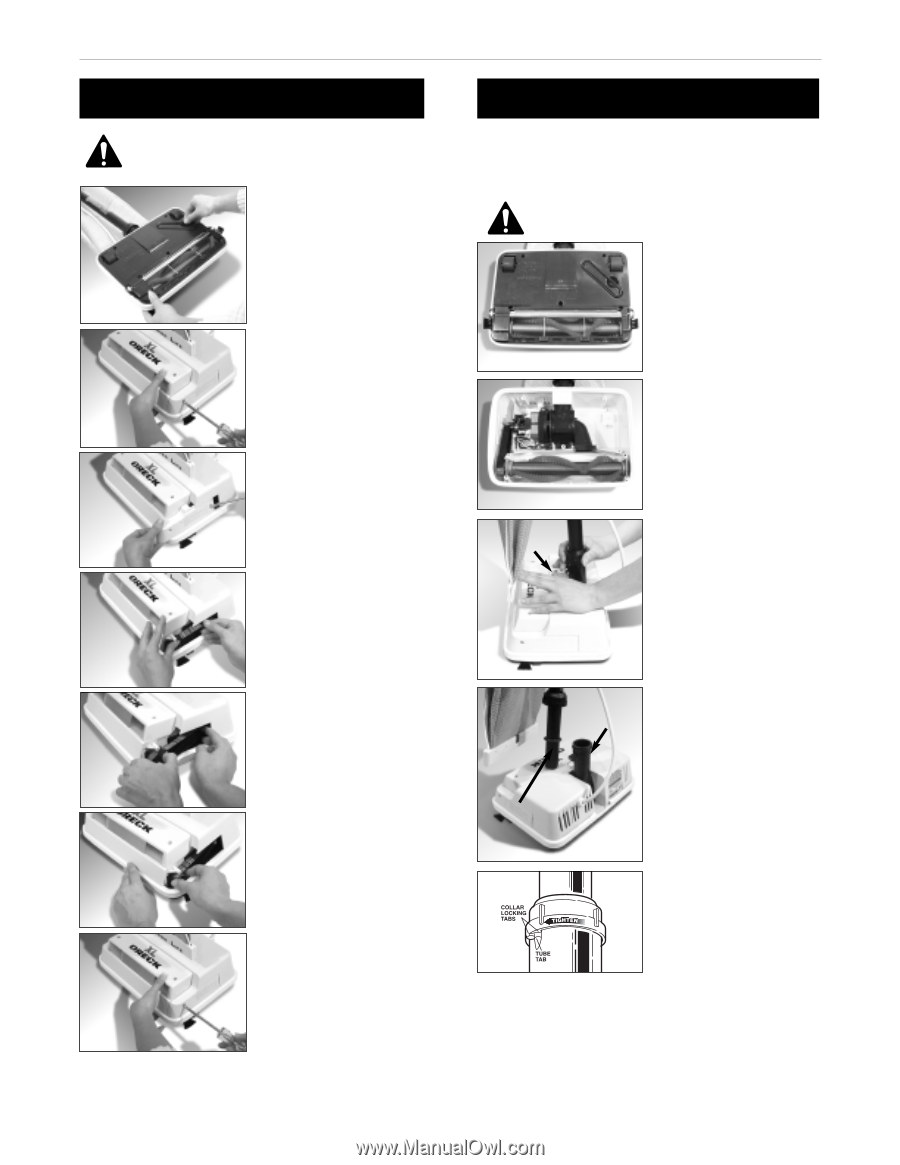
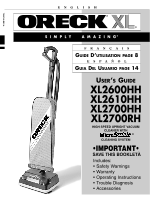
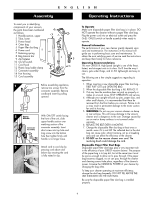
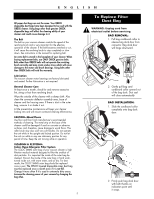
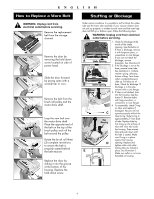
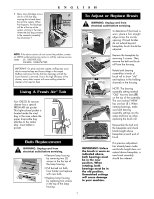
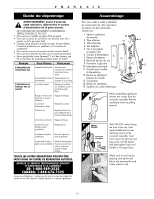
ENGLISH How to Replace a Worn Belt Stuffing or Blockage WARNING: Unplug cord from electrical outlet before servicing. Remove the replacement belt from the storage channel. Remove the door by removing the hold down screw located on side of power head. Slide the door forward by prying open with a screwdriver or coin. Remove the belt from the brush roll pulley and the motor drive shaft. NEW PHOTO NEW PHOTO Loop the new belt over the motor drive shaft. Place the opposite end of the belt on the top of the brush pulley and roll the belt around the pulley. Rotate the brush roll three (3) complete revolutions to ensure the belt is properly seated behind the belt retainer. Replace the door by sliding it into the groove at the bottom of the housing. Replace the hold down screw. Under certain conditions it is possible to stuff or block the intake tube and the lower tube assembly. If your vacuum cleaner does not pick up properly, or makes unusual noise and the outer bag does not fluff up or balloon open, follow the following steps: WARNING: Unplug cord from electrical outlet before servicing. A Intake Opening ± B Intake Opening Retainer Spring C Fan Housing O-ring D E ± 1. Check for blockage at the mouth of the intake opening. See illustration A. If there is blockage, remove it with long-nose pliers, a screwdriver or coat hanger. If you can not reach the blockage, remove baseplate. See illustration B. 2. If the blockage is not at the base, remove lower tube. See illustration C. Unhook retainer spring, releasing bottom of bag. Twist lower collar counterclockwise to slide up. Pull tube out of base. Check for blockage. If blockage is in the tube, remove with a coat hanger. 3. If tube is not blocked, look into fan housing. See illustration D. Remove debris with long-nose pliers, a screwdriver or coat hanger. 4. To reassemble, check O-ring on tube, and replace if damaged. Vacuum will not operate properly without the tube O-ring. Slide O-ring to approximately 2" from base of tube. Replace tube by first lining up slot at base of tube with inner tab inside fan housing. Then reinsert tube and push down until the tube is seated. Make sure O-ring is in place against fan housing opening. Replace and tighten collar until collar locking tabs are locked in place. See illustration E. Make sure collar is not cross threaded on housing. 6
-
 1
1 -
 2
2 -
 3
3 -
 4
4 -
 5
5 -
 6
6 -
 7
7 -
 8
8 -
 9
9 -
 10
10 -
 11
11 -
 12
12 -
13
-
14
-
15
-
16
-
17
-
18
-
19
-
20
 |
 |