Panasonic AG-AC90APJ Operating Instructions Advanced - Page 25
Using with the wireless remote control
 |
View all Panasonic AG-AC90APJ manuals
Add to My Manuals
Save this manual to your list of manuals |
Page 25 highlights
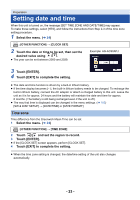
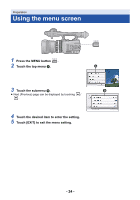
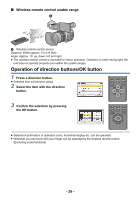
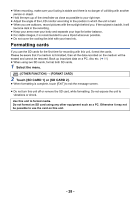
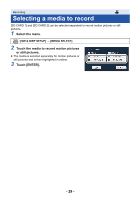
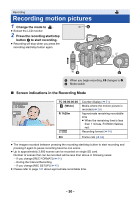
Preparation Using with the wireless remote control Select the menu. MENU : [OTHER FUNCTION] # [REMOTE CONTROL] # [ON] 10 Menu button [MENU]* 11 OK button [OK] (l 26) * means that these buttons function in the same manner as the corresponding buttons on the unit. 1 7 START/ STOP 2 /VOL 8 3 EXT DISPLAY DATE/TIME 9 SEARCH PLAY SEARCH 4 STILL ADV PAUSE STILL ADV SKIP STOP SKIP 5 MENU 10 6 OK 11 1 Power on/off button [ ] The unit can be turned on/off when the power switch of this unit is set to ON. ≥ Unit cannot be turned off when it is connected to the PC. 2 Photoshot button [ ]* 3 On-screen display button [EXT DISPLAY] (l 77) 4 Playback operation buttons (l 66, 68) These buttons function in the same manner as the corresponding playback operation icon being displayed on screen. [Excluding Skip Playback (l 68)] 5 Delete button [ ] (l 74) 6 Direction buttons [3,4,2,1] 7 Zoom/volume/thumbnail display switch buttons [T, W, /VOL]* 8 Recording start/stop button [START/ STOP]* 9 Date/time button [DATE/TIME] (l 102) Remove the insulation sheet A before using. Replace a button-type battery 1 While pressing the stopper B, pull out the battery holder. 2 Set the button-type battery with its (i) mark facing upward and then put the battery holder back in place. ≥ When the button-type battery runs down, replace it with a new battery (part number: CR2025). The battery should normally last about 1 year, however this depends on how frequently the unit is used. - 25 -
-
 1
1 -
2
-
3
-
4
-
5
-
6
-
7
-
8
-
9
-
10
-
11
-
12
-
13
-
14
-
15
-
16
-
17
-
18
-
19
-
 20
20 -
 21
21 -
 22
22 -
 23
23 -
 24
24 -
 25
25 -
 26
26 -
 27
27 -
 28
28 -
 29
29 -
 30
30 -
31
-
32
-
33
-
34
-
35
-
36
-
37
-
38
-
39
-
40
-
41
-
42
-
43
-
44
-
45
-
46
-
47
-
48
-
49
-
50
-
51
-
52
-
53
-
54
-
55
-
56
-
57
-
58
-
59
-
60
-
61
-
62
-
63
-
64
-
65
-
66
-
67
-
68
-
69
-
70
-
71
-
72
-
73
-
74
-
75
-
76
-
77
-
78
-
79
-
80
-
81
-
82
-
83
-
84
-
85
-
86
-
87
-
88
-
89
-
90
-
91
-
92
-
93
-
94
-
95
-
96
-
97
-
98
-
99
-
100
-
101
-
102
-
103
-
104
-
105
-
106
-
107
-
108
-
109
-
110
-
111
-
112
-
113
-
114
-
115
-
116
-
117
-
118
-
119
-
120
-
121
-
122
-
123
-
124
-
125
-
126
 |
 |
