Panasonic AG-DVX100BPS Operating Instructions
Panasonic AG-DVX100BPS Manual
 |
View all Panasonic AG-DVX100BPS manuals
Add to My Manuals
Save this manual to your list of manuals |
Panasonic AG-DVX100BPS manual content summary:
- Panasonic AG-DVX100BPS | Operating Instructions - Page 1
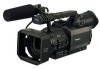
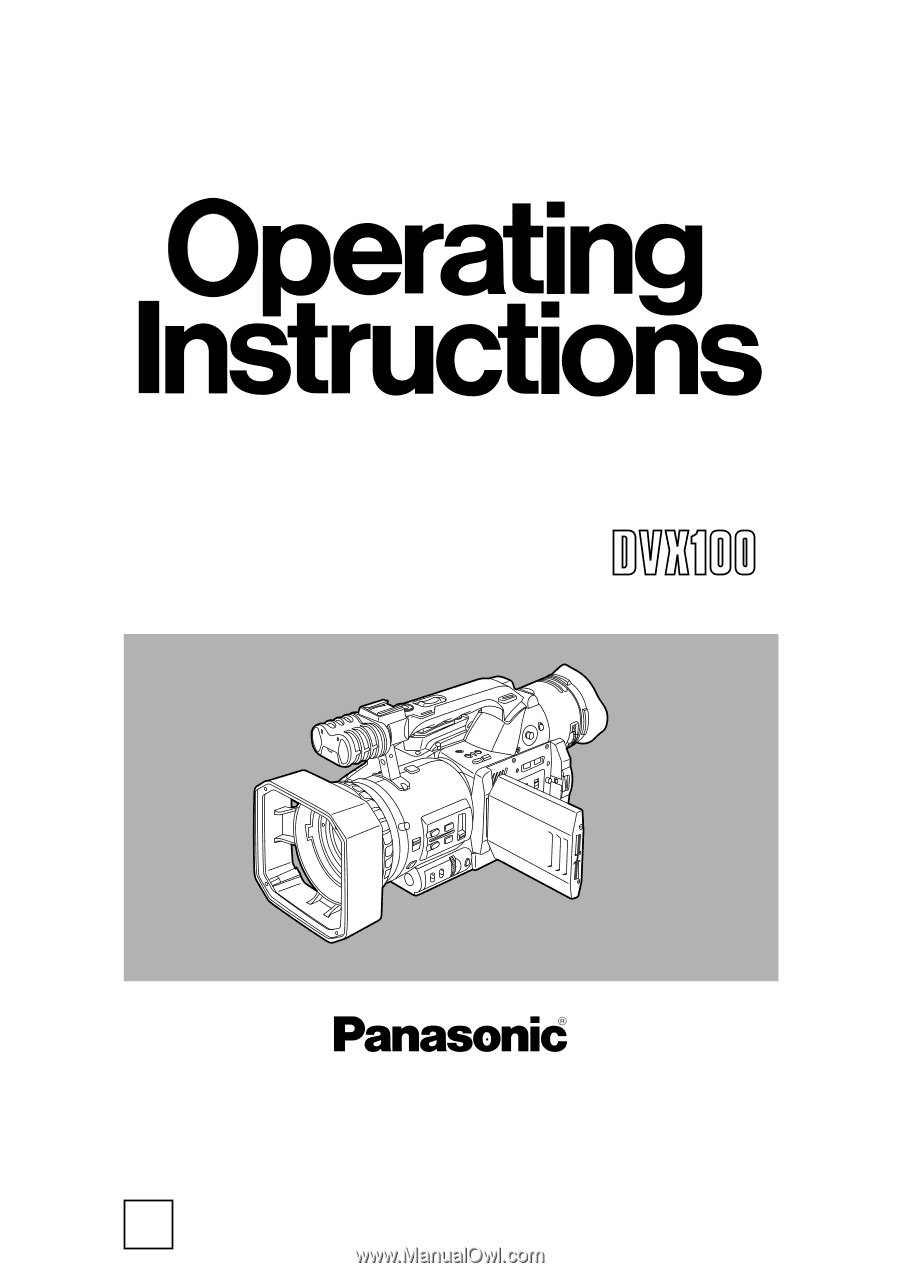
Ò NTSC Digital Video Camera Recorder Model AG- P Before operating this product, please read the instructions carefully and save this manual for future use. P Printed in Japan F0802W1092 @ VQT0A97-1 - Panasonic AG-DVX100BPS | Operating Instructions - Page 2
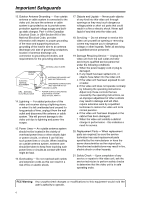
. The exclamation point within an equilateral triangle is intended to alert the user to the presence of important operating and maintenance (service) instructions in the literature accompanying the appliance. WARNING: TO REDUCE THE RISK OF FIRE OR SHOCK HAZARD, DO NOT EXPOSE THIS EQUIPMENT - Panasonic AG-DVX100BPS | Operating Instructions - Page 3
to your home, consult your appliance dealer or local power company. For video units intended to be operated from battery power, or other sources, refer to the operating instructions. 11. Grounding or Polarization - This video unit may be equipped with either a polarized 2wire AC (Alternating Current - Panasonic AG-DVX100BPS | Operating Instructions - Page 4
to proper grounding of the mast and supporting structure, grounding of the lead-in kind onto the video unit. 18. Servicing - Do not attempt to service this video unit yourself as opening or the operating instructions. Adjust only those controls that are covered by the operating instructions, as an - Panasonic AG-DVX100BPS | Operating Instructions - Page 5
Tape blank search 59 Variable speed search 59 Index search 59 Condensation 60 Video heads 60 Troubleshooting (Q&A 61 Power supply-related problems 61 Battery-related problems 61 Problems during normal video recording . .61 Problems during various kinds of video recording 62 Editing-related - Panasonic AG-DVX100BPS | Operating Instructions - Page 6
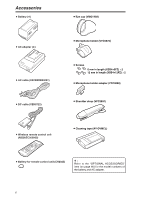
) OCleaning tape (AY-DVMCL) OBattery for remote control unit (CR2025) 2: Refer to the "OPTIONAL ACCESSORIES" item (on page 66) for the model numbers of the battery and AC adapter. 6 - Panasonic AG-DVX100BPS | Operating Instructions - Page 7
. O If the "CHARGE" lamp continues to flash even though the battery temperature is normal, consult your dealer as a problem may have developed within the battery or AC adapter. O When the battery is warm, it takes longer than usual for the battery to be charged. O When the AC adapter is used near - Panasonic AG-DVX100BPS | Operating Instructions - Page 8
not be possible to re-use it. Disposing of the battery ODispose of the battery when it has reached the end of its service life. ODo not dispose of the battery in a fire as it may explode. Protect the battery terminals. Ensure that the battery terminals are free from dust and foreign matter. If the - Panasonic AG-DVX100BPS | Operating Instructions - Page 9
OThe battery's service life is reduced if the battery is stored in a location where the temperature is extremely high or extremely low. OIf the battery is stored in a location exposed to high concentrations of oily vapors and/or dust, the terminals may corrode or other problems may develop, possibly - Panasonic AG-DVX100BPS | Operating Instructions - Page 10
flat and stable surface or, alternatively, support the camera recorder with both hands so 10 4Cassette holder 5CAM REMOTE jack (2.5 mm mini jack) The remote control unit is connected problem has arisen in the tape transport system (about 4 blinks per seconds) O When there is little tape or battery - Panasonic AG-DVX100BPS | Operating Instructions - Page 11
Parts and their functions White balance sensor B @? > A >CAMERA/VCR button and lamp Each time this button is pressed, the operation mode is switched between the camera mode and VCR mode, and the lamp of the selected mode lights. Select the camera mode for shooting. Select the VCR mode to check - Panasonic AG-DVX100BPS | Operating Instructions - Page 12
mode is established. Even if the FOCUS switch is ∞ set to the position, it will return to the M (MANUAL) position. OEven when the manual focus mode is established, the AUTO button K setting takes priority if it is pressed. OIf flicker occurs, the auto focus control may not be exercised - Panasonic AG-DVX100BPS | Operating Instructions - Page 13
Parts and their functions P Q R S O KT L N J M JINDEX button When the INDEX button is pressed while shooting or recording is in progress, the index signal is recorded on the tape. When it is pressed while shooting or recording has been temporarily stopped, the recording of the index signal is - Panasonic AG-DVX100BPS | Operating Instructions - Page 14
tilted in the "6" direction in the stop mode, the tape is rewound. When it is tilted in the same direction during playback, the tape is reviewed at 10a speed. "$" : When the lever is tilted in the "$" direction, the tape is stopped. ";" : When the lever is pressed during playback, the tape is - Panasonic AG-DVX100BPS | Operating Instructions - Page 15
zoom operations. SERVO: For motor-driven zoom operations (At this position, do not attempt to perform manual zoom operations or malfunctioning may result.) MANU: For manual zoom operations ]START/STOP button (on the handle) When this button is pressed in the camera mode, shooting start or stop - Panasonic AG-DVX100BPS | Operating Instructions - Page 16
) OPEN fLCD monitor gInternal speaker hRESET button If the camera recorder cannot be operated even though its power is on or some other form of trouble has occurred, use a pointed object to press the RESET button. This will reset the system microcomputer. Even after resetting has been initiated, the - Panasonic AG-DVX100BPS | Operating Instructions - Page 17
Parts and their functions q r p o s oCOUNTER RESET button This button is used to reset the counter value on the counter display and the memory counter value to zero. It cannot reset the time code or user's bit. pCOUNTER button This button is used to select what data is to be displayed on the - Panasonic AG-DVX100BPS | Operating Instructions - Page 18
Parts and their functions Remote control unit 12 56 7 OSD START/ DATE/ PHOTO STOP TIME SHOT - VOL + COUNTER RESET TITLE ZOOM MULTI/ P-IN-P REC A.DUB C/REW PLAY FF/ B STILL ADV PAUSE STILL ADV INDEX STOP INDEX SELECT STORE VAR. SEARCH OFF/ON P.B.DIGITAL PB. ZOOM MENU SET ITEM 3 8 4 The - Panasonic AG-DVX100BPS | Operating Instructions - Page 19
Parts and their functions 9 OSD START/ DATE/ PHOTO STOP TIME SHOT - VOL + COUNTER RESET TITLE ZOOM MULTI/ P-IN-P REC A.DUB C/REW PLAY FF/ B STILL ADV PAUSE STILL ADV INDEX STOP INDEX SELECT STORE VAR. SEARCH OFF/ON P.B.DIGITAL PB. ZOOM MENU SET ITEM : ; 9VCR operation buttons C/REW - Panasonic AG-DVX100BPS | Operating Instructions - Page 20
operation buttons are pressed at the same time, the operation buttons on the remote control unit are set to be used for VCR2. When the battery in the remote control unit has been replaced, the operation buttons are set to be used for VCR1. OCamera recorder body Set VCR1 and VCR2 - Panasonic AG-DVX100BPS | Operating Instructions - Page 21
. OIf the "CHARGE" lamp continues to flash even though the battery temperature is normal, consult your dealer as a problem may have developed within the battery or AC adapter. OWhen the battery is warm, it takes longer than usual for the battery to be charged. OWhen the AC adapter is used near - Panasonic AG-DVX100BPS | Operating Instructions - Page 22
eject button 1 23 3 Return the viewfinder to its original position. Supplying power from the AC adapter 1 Raise the viewfinder. 2 Push the battery-type connector on the DC cable straight in, and slide it downward until it clicks into position. 3 Connect the DC cable to the AC adapter. 4 - Panasonic AG-DVX100BPS | Operating Instructions - Page 23
on a flat and stable surface or, alternatively, support the camera recorder with both hands so that it is opened. 1 Check that the power supply (battery or AC adapter) is connected to the camera recorder the SP mode) O Do not use 80-minute mini DV cassette tapes. $ Even when material is shot in - Panasonic AG-DVX100BPS | Operating Instructions - Page 24
Adjusting the hand strap Adjust the hand strap to match the size of your hand. 1 Open the cover, and adjust the strap length. 2 Return the cover to its original position. OEnsure that the cover is closed securely and tightly. Attaching the shoulder strap It is recommended that the shoulder strap be - Panasonic AG-DVX100BPS | Operating Instructions - Page 25
Viewfinders This camera recorder has two viewfinders: a viewfinder that uses a small LCD, and a 3.5inch LCD monitor. Use the one that better suits the application and the shooting conditions concerned. OThe brightness and color tones may differ between the images in the viewfinder and on the LCD - Panasonic AG-DVX100BPS | Operating Instructions - Page 26
Viewfinders Using the LCD monitor 1 Set the camera recorder's POWER switch to ON. 2 Press the OPEN button in the direction of the arrow 1 to open the LCD monitor. 5 Select the LCD BRIGHTNESS item, and tilt the OPERATION lever in the 3 or 4 direction to adjust the screen's brightness. (If the - Panasonic AG-DVX100BPS | Operating Instructions - Page 27
Setting the calendar Presented below is a sample setting where the calendar is set to December 7, 2002 and the time is set to 5:20 PM. 1 Set the camera recorder's POWER switch to ON. 2 Select YES as the setting for the CLOCK SET item on the setting menu OTHER FUNCTIONS screen. OFor details on the - Panasonic AG-DVX100BPS | Operating Instructions - Page 28
display appears in the viewfinder and on the LCD monitor screens, it means that the internal battery has run down. Recharge it by following the steps below. Upon completion of charging, reset 4 Keep the camera recorder like this for about 4 hours. OThe internal battery is charged during this time. 28 - Panasonic AG-DVX100BPS | Operating Instructions - Page 29
Setting the electronic shutter Shutter speeds which can be set Progressive mode OFF (60i) 30P 24P/24PA Standard (OFF) shutter speed 1/60 1/50 1/50 Shutter speeds which can be selected using SPEED SEL button SYNCHRO SCAN Shutter speed settings 1/60.3 --- 1/250 1/100, 1/120, 1/250, 1/500, 1/ - Panasonic AG-DVX100BPS | Operating Instructions - Page 30
White balance and black balance Adjusting the white balance The white balance must always be re-adjusted when the lighting conditions have changed. The white balance adjustment values can be stored in the memory at the A and B positions of the WHITE BAL switch. Use A or B, whichever better suits - Panasonic AG-DVX100BPS | Operating Instructions - Page 31
, a slight adjustment error may arise. If an extremely accurate white balance adjustment is required, adjust the white balance by following the instructions on the previous page. OWhen the AWB button is pressed, the white balance is adjusted first. Therefore, ensure that the conditions under - Panasonic AG-DVX100BPS | Operating Instructions - Page 32
Setting the time data Setting the user's bit By setting the user's bit, memos (dates, times) and other information consisting of up to 8 digits in hexadecimal notation can be recorded on the sub-code track. The user's bit settings are automatically stored in the memory and retained even after the - Panasonic AG-DVX100BPS | Operating Instructions - Page 33
Setting the time data Setting the time code The various settings related to the time code are performed using the following items on the setting menu RECORDING SETUP screen. OTC MODE item OTCG item OFIRST REC TC item OTC PRESET item O1394 TC REGEN item (appears in the VCR mode) For further - Panasonic AG-DVX100BPS | Operating Instructions - Page 34
Scene files The settings selected to suit various shooting situations are stored in the positions of the scene file dial. During shooting, the required file can be read out in an instant using this dial. The following files were stored as factory settings prior to shipment. OEven when a scene file - Panasonic AG-DVX100BPS | Operating Instructions - Page 35
Scene files Changing the scene file settings Scene file settings can be changed. In addition, scene files in which changes have been made can be stored in the positions of the scene file dial. 1 Set the camera recorder's POWER switch to ON. 2 Turn the scene file dial, and select the scene file in - Panasonic AG-DVX100BPS | Operating Instructions - Page 36
Scene files 10 The screen shown below appears. Press ";" of the OPERATION lever, and move "1" to YES. FILE F1:222222 SAVE INITIAL H ---- YES H ---- To return the scene file settings to the factory settings, select INITIAL in step 10, and then perform the same steps 11 to 13. PUSH MENU TO RETURN - Panasonic AG-DVX100BPS | Operating Instructions - Page 37
which is to be set. (If the remote control unit is used, press the "V" or "B" button among the SET buttons.) Example: OTHER FUNCTIONS REMOTE HVCR1 DV CONTROL HOFF DV CMD SEL REC LAMP BEEP SOUND ; HREC P OFF FRONT REAR H BOTH HON PUSH MENU TO RETURN 5 Press ";" of the OPERATION lever, and move - Panasonic AG-DVX100BPS | Operating Instructions - Page 38
mode PLAYBACK FUNCTIONS RECORDING SETUP AV IN/OUT SETUP DISPLAY SETUP OTHER FUNCTIONS END SEARCH 12bit AUDIO AUDIO OUT A DUB INPUT DV OUT DATE/TIME LEVEL METER TAPE•BATTERY OTHER DISPLAY VIDEO OUT OSD CAMERA DATA LCD BACKLIGHT LCD/EVF SET EVF MODE 38 DETAIL LEVEL CHROMA LEVEL CHROMA PHASE COLOR - Panasonic AG-DVX100BPS | Operating Instructions - Page 39
Setting menus SCENE FILE screen Item/ (display mode) Description of settings DETAIL LEVEL For adjusting the detail amount. (Camera) -7 --- 0 --- +7 CHROMA LEVEL For adjusting the chroma level. (Camera) -7 --- 0 --- +7 CHROMA PHASE (Camera) COLOR TEMP (Camera) MASTER PED (Camera) A. IRIS - Panasonic AG-DVX100BPS | Operating Instructions - Page 40
operations are performed.) L/M/H: LOW/MID/HIGH are set to the 1/2/3 positions. For setting the rotational direction of the IRIS dial and iris control (in the MANUAL IRIS mode). DOWN OPEN: The iris opens when the IRIS dial is turned downward. UP OPEN: The iris opens when the IRIS dial is turned - Panasonic AG-DVX100BPS | Operating Instructions - Page 41
Setting menus SW MODE screen Item/ (display mode) Description of settings USER1 (Camera) USER2 (Camera) For setting the operation of the function allocated to the USER1 button. COLOR BAR: The color bar display is set to ON or OFF. SPOTLIGHT: The auto iris control for the spotlight is set to ON - Panasonic AG-DVX100BPS | Operating Instructions - Page 42
Setting menus PLAYBACK FUNCTIONS screen Item/ (display mode) Description of settings END SEARCH (VCR) For setting what kind of operation is to be performed when the END SEARCH button is pressed. BLANK: The unrecorded blanks on the video tape are searched. REC END: The part which was shot last - Panasonic AG-DVX100BPS | Operating Instructions - Page 43
and FIRST REC TC item settings. O When no signals are supplied to the DV connector, the TC MODE item, TCG item and FIRST REC TC item settings are bit to be recorded when recording the signals of the component connected to the DV connector. OFF: The user's bit selected for the UB MODE item is used - Panasonic AG-DVX100BPS | Operating Instructions - Page 44
performed. 30s : 30 sec. 1m : 1 min. 5m : 5 min. 10m : 10 min. AV IN/OUT SETUP screen Item/ (display mode) Description of settings A DUB INPUT (VCR) DV OUT (VCR) For selecting the sound which is to be recorded when audio dubbing is performed. MIC: The sound from the internal microphone or the - Panasonic AG-DVX100BPS | Operating Instructions - Page 45
. OFF ON ZOOM•FOCUS (Camera) For setting the zoom and focus value displays to ON or OFF. OFF ON TAPE•BATTERY (Camera) (VCR) For setting the remaining tape amount and remaining battery charge displays to ON or OFF. OFF ON OTHER DISPLAY (Camera) (VCR) For setting the amount of information to be - Panasonic AG-DVX100BPS | Operating Instructions - Page 46
to be performed by connecting a component for backup purposes to the DV connector. OFF: The component for backup purposes is not controlled. EXT pause mode OWhen condensation has formed inside the camera recorder OWhen a problem has occurred in the camera recorder CLOCK SET (Camera) (VCR) - Panasonic AG-DVX100BPS | Operating Instructions - Page 47
Screen displays Camera mode and VCR mode 1 Marker A I -PAUSE USER - 1 DV O TC 12 : 34 : 56 : 00 Z78 4 SP 2 4 PA MF 2 5 2 22222222222222 MA C RO 2222222222 P 3.2 K 5 22222222222222222 F 5 . 6 2 2 2 2 2 2 2 2 2 2 2 2 2 2 2 2 2 1 8 dB 6 SPOT L OW L I G H T ND 1/ 64 7 1/ 1 2 3 . 4 - Panasonic AG-DVX100BPS | Operating Instructions - Page 48
Screen displays < : A I -PAUSE USER - 1 DV O TC 12 : 34 : 56 : 00 Z78 = SP ; 2 4 PA MF 2 5 ? 22222222222222 MA C RO @ 2222222222 P 3.2 K > problem occurs in the camera recorder when face-to-face shooting is performed in the mirror mode. : This lights when the internal battery - Panasonic AG-DVX100BPS | Operating Instructions - Page 49
When the battery has run down completely, (and then ) flashes. (When the AC adapter is used, a display other than may appear: this is normal and not indicative of malfunctioning.) IBackup component status displays The status of the backup component connected to the DV connector appears here - Panasonic AG-DVX100BPS | Operating Instructions - Page 50
Screen displays NKJ A I -PAUSE USER - 1 DV O TC 12 : 34 : 56 : 00 Z78 SP 2 4 PA MF 2 5 22222222222222 MA C RO 2222222222 P 3.2 K 22222222222222222 F 5 . 6 2 2 2 2 2 2 2 2 2 2 2 2 2 2 : Playback 5 (6) : Fast forward/cue (rewind/review) ?1 (2?) : Slow playback (reverse slow playback) - Panasonic AG-DVX100BPS | Operating Instructions - Page 51
on the setting menu OTHER FUNCTIONS screen, and shooting has been performed without an external component connected to the DV connector. AUTO OFF This appears when a problem has occurred in the tape transport system. When this display appears, the camera recorder's power is automatically turned off - Panasonic AG-DVX100BPS | Operating Instructions - Page 52
Screen displays VCR mode F05 17 S 1 P TC 12 : 34 : 56 : 00 SP Q F5 . 6 R 22222222222222 1 8 dB S 2222222222 22222222222222222 22222222222222222 AUG 3 1 2 0 0 2 2 3 : 5 9 : 5 9 4 8 K CH1 CH2 22m i n V O L UME T PSearch number display The index number used to perform the index - Panasonic AG-DVX100BPS | Operating Instructions - Page 53
information display A Iris display B Gain display C ND filter display D Recommended ND filter display E Date and time display F Remaining battery charge display G Remaining tape display H Camera shake compensation display L Mic level automatic control display N AUTO button operation display MODE - Panasonic AG-DVX100BPS | Operating Instructions - Page 54
when recording is resumed. $ A digital video component equipped with a DV connector can be connected, and its video signals, audio signals and time be transmitted digitally. O When an IEEE 1394 cable has been connected to the DV connector, do not apply a strong load from outside. Doing so may damage - Panasonic AG-DVX100BPS | Operating Instructions - Page 55
to the shooting conditions. $ Batteries Have a fully charged battery ready. It is also recommended that a spare battery be kept on hand as well manual zoom operations can be performed. OCheck whether the auto focus and manual focus operations can be performed. OCheck whether the auto iris and manual - Panasonic AG-DVX100BPS | Operating Instructions - Page 56
, the information which appears in the viewfinder and on the LCD monitor is limited to the following items: O : Shooting O; : Shooting pause : Remaining battery charge display : Warning display When appears, return the LCD monitor to its original position, and check the message of the warning - Panasonic AG-DVX100BPS | Operating Instructions - Page 57
menu item settings before operating the camera recorder. OIf another model AG-DVX100 is to be used as the external component which will perform the . OBefore proceeding with backup recording, establish the status in which the DV signals can be recorded by the external component. OWhen the tape in - Panasonic AG-DVX100BPS | Operating Instructions - Page 58
in the 24P mode can be obtained by weeding out the [BoCe] [FoGe] frames in the figure. Furthermore, when an editing system that supports the advanced conversion system is used, editing can be performed with minimal picture quality deterioration compared with the 24P mode. OWhen an editing system - Panasonic AG-DVX100BPS | Operating Instructions - Page 59
Playback Normal playback Set the POWER switch to ON, and press the CAMERA/VCR button to switch to the VCR mode. Normal playback operations can be performed using the OPERATION lever or accessory wireless remote control unit. OPERATION lever 3 MENU 1 6; 5 ∫ 4 PUSH-SET Tape protection mode When - Panasonic AG-DVX100BPS | Operating Instructions - Page 60
Condensation How to tell when condensation has formed inside and what to do about it If, after the camera recorder's power has been turned on, the condensation display symbol flashes, it means that condensation has formed inside the camera recorder. If this happens, the power will be automatically - Panasonic AG-DVX100BPS | Operating Instructions - Page 61
Troubleshooting (Q&A) Power supply-related problems Q1: No power. A1: Has the battery or AC adapter battery has reached the end of its service life. Q2: The battery cannot be charged. A2: Is the DC cable connected to the AC adapter? The battery cannot be charged if this cable is connected. Problems - Panasonic AG-DVX100BPS | Operating Instructions - Page 62
Troubleshooting (Q&A) Problems during various kinds of video recording Q1: No automatic focusing A1-1: Has the manual Mosaic-type noise is generated during cue and review. A2: This is a phenomenon inherent to at "video input?" Read through the operating instructions of the TV set, and select the - Panasonic AG-DVX100BPS | Operating Instructions - Page 63
Troubleshooting (Q&A) Playback-related problems (audio) Q1: No playback sound is heard from the camera (See page 43) Other types of problems Q1: The cassette tape cannot be ejected. A1: Is power being supplied? Has the AC adapter been plugged in or the battery inserted properly? When the power is - Panasonic AG-DVX100BPS | Operating Instructions - Page 64
camera recorder body to become deformed or the surface coating to peel off. OWhen cleaning or otherwise maintaining the camera recorder, either remove its battery or disconnect its AC cable from the power outlet. OUse a soft, clean cloth to wipe the camera recorder. To remove stubborn stains, dilute - Panasonic AG-DVX100BPS | Operating Instructions - Page 65
battery and accessories) Dimensions (WaHaD) 5 1/2a6 5/16a14 3/8 inches (139a160a364 mm) Recording format Digital video SD format Tape format Mini DV 380,000 (pixel offset system) Lens Leica DICOMAR optical image stabilizer lens, motorized/manual mode switching, 10a zoom F1.6 (f = 4.5 to 45 mm) (35 - Panasonic AG-DVX100BPS | Operating Instructions - Page 66
high impedance Output: 316 mV, 600 Ω DV 4-pin, digital input/output, IEEE 1394 standard diameter), 77 mV, 32 Ω CAM REMOTE Mini jack (2.5 mm diameter) 66 [AC ADAPTER] AG-LW7208G 16:9 conversion lens AG-LA7200G XLR microphone AG-MC100G Hard carrying case AG-HT100G Soft carrying case AG-SC100G Battery - Panasonic AG-DVX100BPS | Operating Instructions - Page 67
Memo - Panasonic AG-DVX100BPS | Operating Instructions - Page 68
. Fax (800) 334-4880 Emergency after hour parts orders (800) 334-4881 TECHNICAL SUPPORT: Emergency 24 Hour Service (800) 222-0741 Panasonic Canada Inc. 5770 Ambler Drive, Mississauga, Ontario L4W 2T3 (905) 624-5010 Panasonic de Mexico S.A. de C.V. Av angel Urraza Num. 1209 Col. de Valle 03100 Mexico
-
 1
1 -
 2
2 -
 3
3 -
 4
4 -
 5
5 -
 6
6 -
 7
7 -
8
-
9
-
10
-
11
-
12
-
13
-
14
-
15
-
16
-
17
-
18
-
19
-
20
-
21
-
22
-
23
-
24
-
25
-
26
-
27
-
28
-
29
-
30
-
31
-
32
-
33
-
34
-
35
-
36
-
37
-
38
-
39
-
40
-
41
-
42
-
43
-
44
-
45
-
46
-
47
-
48
-
49
-
50
-
51
-
52
-
53
-
54
-
55
-
56
-
57
-
58
-
59
-
60
-
61
-
62
-
63
-
64
-
65
-
66
-
67
-
68
 |
 |
Before operating this product, please read the instructions carefully and save this
manual for future use.
Model AG-
P
Digital Video Camera Recorder
Ò
NTSC
VQT0A97-1
Printed in Japan
F0802W1092
@
P