Panasonic AG-DVX100BPS Operating Instructions - Page 10
Parts and their functions
 |
View all Panasonic AG-DVX100BPS manuals
Add to My Manuals
Save this manual to your list of manuals |
Page 10 highlights
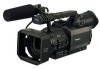
Parts and their functions 73 82 : (Eye cup) 9 (Eye-piece) = < 56 1 4 ; 1POWER switch Move this switch while pressing the lock release button. POWER ON OFF Lock release button 2START/STOP button When this button is pressed in the camera mode, shooting can be started or stopped. Operation is switched between the camera mode and VCR mode using the CAMERA/VCR button >. 3EJECT switch To open the cassette holder, slide this switch in the direction of the arrow while pressing the lock release button. Do not operate the switch while recording is in progress. The cassette holder will open but recording will continue, so external light and/or dust will adversely affect the tape. Do not insert or eject the cassette tape holding onto the cassette holder alone. Insert or eject the tape with the camera recorder placed on a flat and stable surface or, alternatively, support the camera recorder with both hands so that it will be kept in a stable condition even if the cassette holder is opened. EJECT Lock release button 10 4Cassette holder 5CAM REMOTE jack (2.5 mm mini jack) The remote control unit is connected to this jack to enable zooming and record start/stop to be initiated by remote control. 6PHONES jack (3.5 mm stereo mini jack) The headphones are connected to this jack to monitor the sound. 7Remote control sensor (rear) 8Tally lamp (rear) This lights or blinks depending on the status of the camera recorder. Lights: While shooting is in progress. Blinks: O When a remote control operation has been received (about 8 blinks per second) O When shooting is commenced (about 8 blinks per second) O When the tape has come to the end (about 4 blinks per second) O When a problem has arisen in the tape transport system (about 4 blinks per seconds) O When there is little tape or battery charge remaining (once a second) The settings for causing the tally lamp to flash are performed using the REC LAMP item on the setting menu OTHER FUNCTIONS screen. (See page 46) 9 Viewfinder :Diopter adjustment dial This is adjusted in such a way that the viewfinder screen comes into sharp focus. ;Power socket
-
 1
1 -
2
-
3
-
4
-
 5
5 -
 6
6 -
 7
7 -
 8
8 -
 9
9 -
 10
10 -
 11
11 -
 12
12 -
 13
13 -
 14
14 -
 15
15 -
16
-
17
-
18
-
19
-
20
-
21
-
22
-
23
-
24
-
25
-
26
-
27
-
28
-
29
-
30
-
31
-
32
-
33
-
34
-
35
-
36
-
37
-
38
-
39
-
40
-
41
-
42
-
43
-
44
-
45
-
46
-
47
-
48
-
49
-
50
-
51
-
52
-
53
-
54
-
55
-
56
-
57
-
58
-
59
-
60
-
61
-
62
-
63
-
64
-
65
-
66
-
67
-
68
 |
 |
