Panasonic CF-31AGP7B2M User Manual - Page 11
J: External Antenna Connector
 |
View all Panasonic CF-31AGP7B2M manuals
Add to My Manuals
Save this manual to your list of manuals |
Page 11 highlights
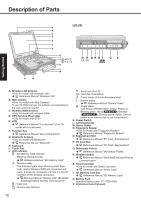
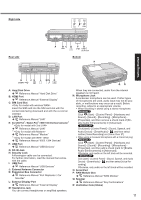
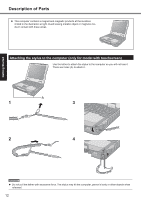
Right side E*1 E*2 E*3 1394 Getting Started Rear side A BC D FG Bottom P H I J K L MN O QR A: Hard Disk Drive Reference Manual "Hard Disk Drive" B: HDMI Port Reference Manual "External Display" C: SIM Card Slot Insert the SIM card into the SIM card slot with the contact side facing downward and with the cut corner oriented. D: LAN Port Reference Manual "LAN" E: 2nd LAN Port*1 / Modem Port*2 / IEEE 1394 Interface Connector*3 *1 Reference Manual "LAN" *2 Reference Manual "Modem" *3 Reference Manual "IEEE 1394 Devices" F: USB Port Reference Manual "USB Devices" G: DC-IN Jack H: Security Lock A Kensington cable can be connected. For further information, read the manual that comes with the cable. I: USB Port Reference Manual "USB Devices" J: External Antenna Connector K: Expansion Bus Connector Reference Manual "Port Replicator / Car Mounter" L: External Display Port Reference Manual "External Display" M: Headphone Jack You can connect headphones or amplified speakers. When they are connected, audio from the internal speakers is not heard. N: Microphone Jack A condenser microphone can be used. If other types of microphones are used, audio input may not be possible, or malfunctions may occur as a result. Before recording, adjust to an appropriate volume. When recording in stereo using a stereo microphone: Click (Start) - [Control Panel] - [Hardware and Sound] - [Sound] - [Recording] - [Microphone] [Properties], and then remove a check mark of [Enable Audio Enhancements] in [Advanced]. Click [start] - [Control Panel] - [Sound, Speech, and Audio Device] - [SmartAudio] - , and then select neither [Voice Recording] nor [Voice Over IP]. When using a monaural microphone with a 2-terminal plug: Click (Start) - [Control Panel] - [Hardware and Sound] - [Sound] - [Recording] - [Microphone] [Properties], and then add a check mark for [Enable Audio Enhancements] in [Advanced]. Otherwise, only audio on the left track will be recorded. Click [start] - [Control Panel] - [Sound, Speech, and Audio Device] - [SmartAudio] - , and then select [Voice Recording]. Otherwise, only audio on the left track will be recorded. O: Serial Port P: RAM Module Slot Reference Manual "RAM Module" Q: Speaker Reference Manual "Key Combinations" R: Ventilation Hole (Intake) 11
-
 1
1 -
2
-
3
-
4
-
5
-
 6
6 -
 7
7 -
 8
8 -
 9
9 -
 10
10 -
 11
11 -
 12
12 -
 13
13 -
 14
14 -
 15
15 -
 16
16 -
17
-
18
-
19
-
20
-
21
-
22
-
23
-
24
-
25
-
26
-
27
-
28
-
29
-
30
-
31
-
32
-
33
-
34
-
35
-
36
 |
 |
