Panasonic CQVX100U In-dash Dvd Monitor - Page 10
Preparation - remote
 |
UPC - 037988758432
View all Panasonic CQVX100U manuals
Add to My Manuals
Save this manual to your list of manuals |
Page 10 highlights
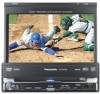
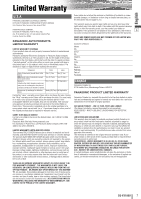
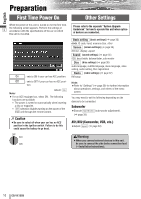
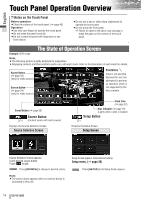
English Preparation First Time Power On Other Settings When the power of this unit is turned on for the first time, the following screen appears. Perform the settings in 9 accordance with the specifications of the car on which this unit is mounted. Please refer to the separate "System Upgrade Guidebook" for how to operate this unit when optional devices are connected. On : sets to ON if your car has ACC position. Off : sets to OFF if your car has no ACC posi- tion. default: On Note: ¡ For an ACC-equipped car, select ON. The following functions are available. ¡ The power is turned on automatically when inserting a disc or magazine. ¡ Off selection disables turning on the power of the main unit through the remote control. Caution ¡Be sure to select off when your car has no ACC position in the ignition switch. Failure to do this could cause the battery to go dead. Basic setting (basic settings) (a page 32) clock, ID code, input, memory clear, other Screen (screen settings) (a page 34) dimmer, display, aspect Sound (sound settings) (a page 35) SQ3, bass/treble, balance/fader, sub-woofer Disc (disc settings) (a page 36) audio language, subtitle language, menu language, video setting, audio setting, Divx registration Radio (radio settings) (a page 37) FM setup Note: ¡Refer to "Settings" (a page 30) for further information about operations, settings, and others of the menu screen. You may need to set the following depending on the devices to be connected. Subwoofer ¡Execute Sub-Woofer (sub-woofer adjustment). (a page 35) AV1/AV2 (Camcorder, VCR, etc.) ¡Adjust Input . (a page 33) OFF ACC IGN Warning ¡When you connect external devices to this unit, be sure to connect the side brake connection lead (aInstallation Instructions). 10 CQ-VX100U
-
 1
1 -
2
-
3
-
4
-
 5
5 -
 6
6 -
 7
7 -
 8
8 -
 9
9 -
 10
10 -
 11
11 -
 12
12 -
 13
13 -
 14
14 -
 15
15 -
16
-
17
-
18
-
19
-
20
-
21
-
22
-
23
-
24
-
25
-
26
-
27
-
28
-
29
-
30
-
31
-
32
-
33
-
34
-
35
-
36
-
37
-
38
-
39
-
40
-
41
-
42
-
43
-
44
-
45
-
46
-
47
-
48
 |
 |