Panasonic CQVX100U In-dash Dvd Monitor - Page 14
Touch Panel Operation Overview - video
 |
UPC - 037988758432
View all Panasonic CQVX100U manuals
Add to My Manuals
Save this manual to your list of manuals |
Page 14 highlights
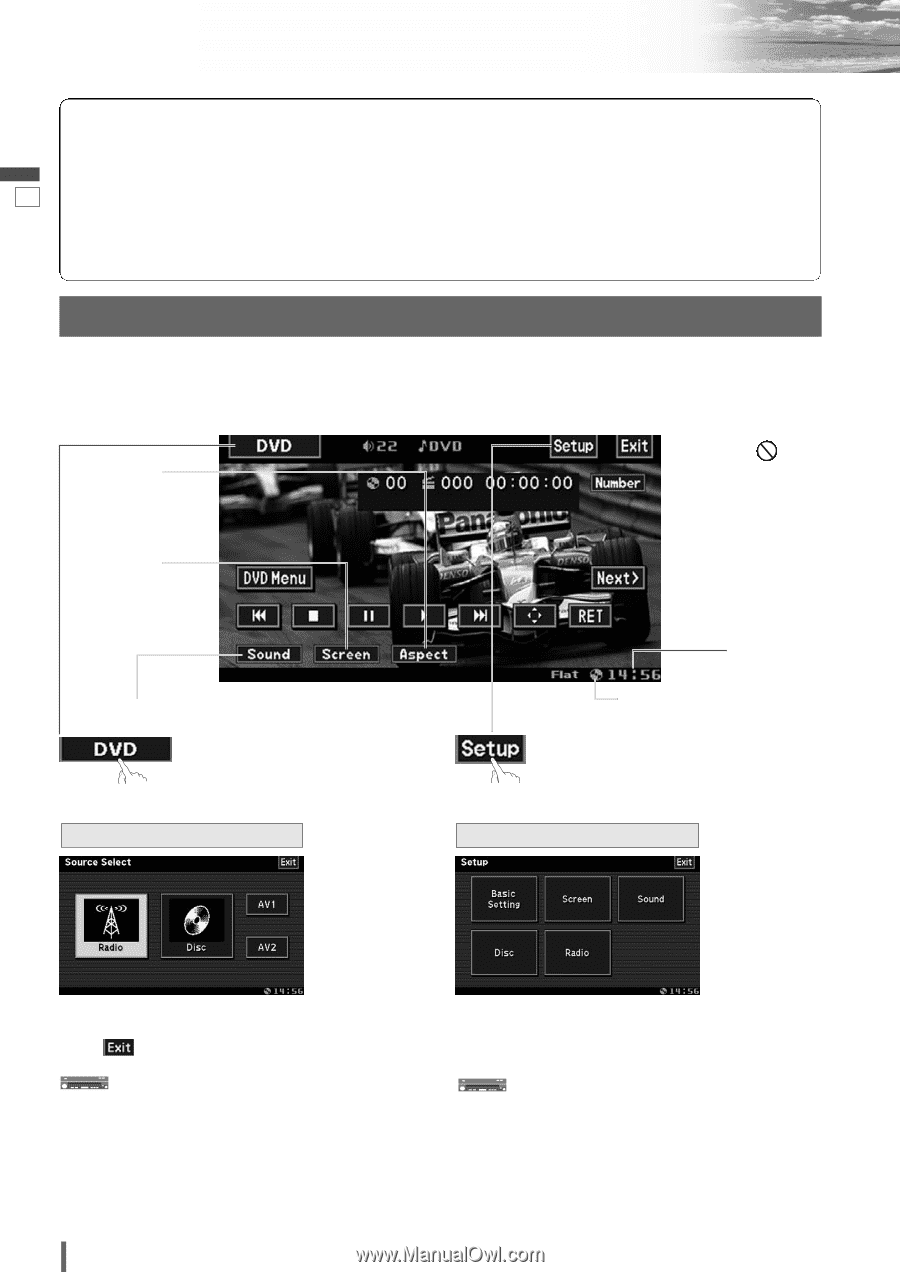
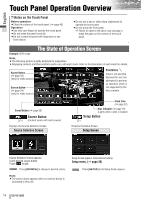
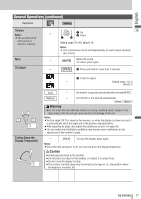
Touch Panel Operation Overview English ❒ Notes on the Touch Panel Before operation ¡Clean the surface of the touch panel. (a page 43) Operation 13 ¡Use only your fingers to operate the touch panel. ¡Do not press the panel forcefully. ¡Do not scratch the panel with fingernails or any hard objects. ¡Do not use a pen or other sharp implements to operate the touch panel. ¡Do not bump the front panel. a Failure to observe the above may damage or break the glass on the surface of the touch panel. The State of Operation Screen Example: DVD mode Note: ¡The following picture is partly darkened for explanation. ¡Displaying contents and their positions partly vary with each mode. Refer to the description of each mode for details. Aspect Button (a page 34) (only for video source) Screen Button (a page 34) (only for video source) Prohibition Input is not possible because the user has attempted to perform an operation which is not supported by the disc contents. Sound Button (a page 35) Source Button (Content varies with each source) Displays the Source Selection Screen. Source Selection Screen Clock time (a page 32) Disc indicator (a page 19) (Lights when a disc is loaded) Setup Button Displays the Setup Screen. Setup Screen Source Selection Screen appears. Touch desired source button. Touch to quit. Press [SOURCE] to change to desired source. Note: ¡The screen above appears when no external device is connected to this unit. Setup Screen appears. Select desired setting. Setup menu, (a page 30) Press [SETUP] to let Setup Screen appear. 14 CQ-VX100U
-
 1
1 -
2
-
3
-
4
-
5
-
6
-
7
-
8
-
 9
9 -
 10
10 -
 11
11 -
 12
12 -
 13
13 -
 14
14 -
 15
15 -
 16
16 -
 17
17 -
 18
18 -
 19
19 -
20
-
21
-
22
-
23
-
24
-
25
-
26
-
27
-
28
-
29
-
30
-
31
-
32
-
33
-
34
-
35
-
36
-
37
-
38
-
39
-
40
-
41
-
42
-
43
-
44
-
45
-
46
-
47
-
48
 |
 |