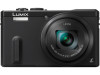
Panasonic DMC-ZS40K DMC-ZS40K Owner's Manual (English) - Page 12
AV OUT/DIGITAL] socket, Camera [ON/OFF] button - digital camera with 3 inch lcd
 |
View all Panasonic DMC-ZS40K manuals
Add to My Manuals
Save this manual to your list of manuals |
Page 12 highlights
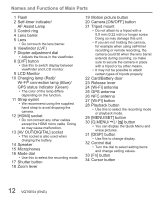
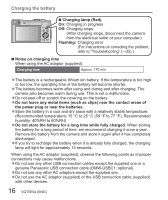
Names and Functions of Main Parts 1 Flash 2 Self-timer indicator/ AF Assist Lamp 3 Control ring 4 Lens barrel 5 Lens • Do not touch the lens barrier. 6 Viewfinder (LVF) 7 Diopter adjustment dial • Adjusts the focus in the viewfinder. 8 [LVF] button • Use this to switch display between viewfinder and LCD monitor. 9 LCD Monitor 10 Charging lamp (Red)/ Wi-Fi® connection lamp (Blue)/ GPS status indicator (Green) • The color of the lamp differs depending on the function. 11 Strap eyelet • We recommend using the supplied hand strap to avoid dropping the camera. 12 [HDMI] socket • Do not connect any other cables except the HDMI micro cable. Doing so may cause malfunction. 13 [AV OUT/DIGITAL] socket • This socket is also used when charging the battery. 14 Speaker 15 Microphones 16 Mode dial • Use this to select the recording mode. 17 Shutter button 18 Zoom lever 19 Motion picture button 20 Camera [ON/OFF] button 21 Tripod mount • Do not attach to a tripod with a 5.5 mm (0.22 inch) or longer screw. Doing so may damage this unit. • If you are not holding the camera, for example when using self-timer recording or remote recording, the camera could tilt when the lens barrel extends during zooming, so make sure to secure the camera in place with a tripod or by other means. • It may not be possible to attach certain types of tripods properly. 22 Card/Battery door 23 Release lever 24 [Wi-Fi] antenna 25 GPS antenna 26 NFC antenna 27 [Wi-Fi] button 28 Playback button • Use this to select the recording mode or playback mode. 29 [MENU/SET] button 30 [Q.MENU/ ] / [ ] button • You can display the Quick Menu and erase pictures. 31 [DISP.] button • Use this to change display. 32 Control dial • Turn the dial to select setting items and change setting values. 33 [Fn] button 34 Cursor button 12 VQT5E54 (ENG)
-
 1
1 -
2
-
3
-
4
-
5
-
6
-
 7
7 -
 8
8 -
 9
9 -
 10
10 -
 11
11 -
 12
12 -
 13
13 -
 14
14 -
 15
15 -
 16
16 -
 17
17 -
18
-
19
-
20
-
21
-
22
-
23
-
24
-
25
-
26
-
27
-
28
-
29
-
30
-
31
-
32
-
33
-
34
-
35
-
36
-
37
-
38
-
39
-
40
-
41
-
42
-
43
-
44
-
45
-
46
-
47
 |
 |