Panasonic DMPBDT300 DMPBDT300 User Guide - Page 14
STEP 4 : Connecting to, an AC power, STEP 5 : Setting, Easy Setting
 |
View all Panasonic DMPBDT300 manuals
Add to My Manuals
Save this manual to your list of manuals |
Page 14 highlights
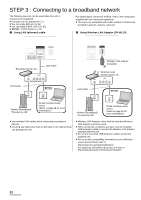
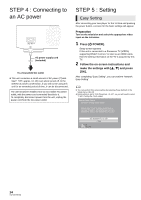
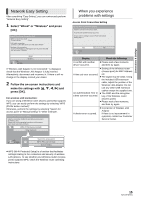
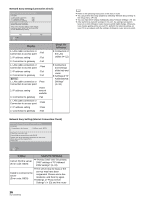
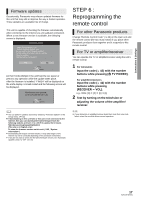
STEP 4 : Connecting to an AC power AC power supply cord (included) To a household AC outlet ≥ This unit consumes a small amount of AC power ("Quick Start": "Off", approx. 0.1 W) even when turned off. In the interest of power conservation, if you will not be using this unit for an extended period of time, it can be disconnected. The unit should be installed near an accessible AC power outlet, with the power cord connected directly to it. To completely disconnect power from the unit, unplug the power cord from the AC power outlet. STEP 5 : Setting Easy Setting After connecting your new player for the 1st time and pressing the power button, a screen for the basic settings will appear. Preparation Turn on the television and select the appropriate video input on the television. 1 Press [Í POWER]. Setup screen appears. If this unit is connected to a Panasonic TV (VIERA) supporting HDAVI Control 2 or later via an HDMI cable, then the setting information on the TV is acquired by this TV. 2 Follow the on-screen instructions and make the settings with [3, 4] and press [OK]. After completing "Easy Setting", you can perform "Network Easy Setting". ≥ You can perform this setup anytime by selecting "Easy Setting" in the Setup menu. (> 33) ≥ Initial setting is set to "2ch (Downmix) + 5.1ch", so you will need to select "7.1ch" if using the 7.1ch output. Analog Audio Output Set unit's analog audio output. Select only "7.1ch" to enjoy audio from a receiver through 7.1ch analog connections. Otherwise, select "2ch (Downmix) + 5.1ch." 2ch (Downmix) + 5.1ch 7.1ch OK RETURN 14 VQT2J87(ENG)
-
 1
1 -
2
-
3
-
4
-
5
-
6
-
7
-
8
-
 9
9 -
 10
10 -
 11
11 -
 12
12 -
 13
13 -
 14
14 -
 15
15 -
 16
16 -
 17
17 -
 18
18 -
 19
19 -
20
-
21
-
22
-
23
-
24
-
25
-
26
-
27
-
28
-
29
-
30
-
31
-
32
-
33
-
34
-
35
-
36
-
37
-
38
-
39
-
40
-
41
-
42
-
43
-
44
-
45
-
46
-
47
-
48
-
49
 |
 |
