Panasonic DMR-EZ28K Dvd Recorder - English / Spanish - Page 12
Setting the Channels and Clock, Automatic Clock and Channel - information
 |
UPC - 037988256624
View all Panasonic DMR-EZ28K manuals
Add to My Manuals
Save this manual to your list of manuals |
Page 12 highlights
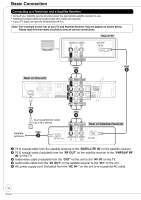
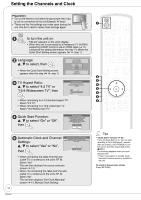
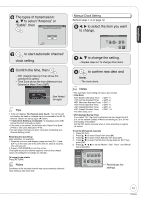
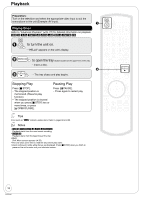
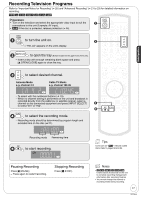
Setting the Channels and Clock Preparation: • Turn on the television and select the appropriate video input to suit the connections to this unit (Example: AV input). • These are the first settings you make upon buying the unit. You don't need to make these settings again. to turn the unit on. - "HELLO" appears on the unit's display. • When this unit is connected to a Panasonic TV (VIERA) supporting HDAVI Control 3 via an HDMI cable (➔ 11), it acquires the setting information from the TV. When the Quick Start Setting screen appears (➔ 14, step 1) Language: e, r to select, then • When the Quick Start Setting screen appears after this step (➔ 14, step 1) Select Language Seleccione el idioma Sélection de langue English Español Français Press OK Pulse OK Appuyer sur OK TV Aspect Ratio: e, r to select "4:3 TV" or "16:9 Widescreen TV", then Aspect Ratio Selection Select TV type and press OK. (Please refer to Operation Instruction for details) 4:3 4:3 TV 16:9 16:9 Widescreen TV • When connecting to a 4:3 standard aspect TV: Select "4:3 TV". • When connecting to a 16:9 widescreen TV: Select "16:9 Widescreen TV". Quick Start Function: e, r to select "On" or "Off", then Quick Start Setting The unit can be turned on faster, in about 1 second. Please note that Quick Start mode slightly increases power consumption when the unit is off. (See Operation Instructions for details) Turn Quick Start on ? On Off 12 RQT9046 Automatic Clock and Channel Settings: e, r to select "Yes" or "No", then Automatic Clock and Channel Settings Does this unit get its TV signal via RF IN? Example: Antenna, Cable TV or Cable Box connected to the unit's RF IN. Yes No • When connecting the cable from the wall (cable TV or antenna) to the unit's RF IN: Select "Yes". The unit then displays the source selection screen (➔ 13). • When not connecting the cable from the wall (cable TV or antenna) to the unit's RF IN: Select "No". The unit then displays "Set Clock Manually" screen (➔ 13, Manual Clock Setting). 8 Tips • "Quick Start" function (➔ 49) If you set Quick Start to on, you can start recording to DVD-RAM about 1 second after you press [^ DVD POWER] to turn the unit on and then sequentially press [* REC]. The following happens when you have selected "On". - Power consumption in standby mode increases because power is supplied to the unit. To return to the previous screen Press [RETURN].
-
 1
1 -
2
-
3
-
4
-
5
-
6
-
 7
7 -
 8
8 -
 9
9 -
 10
10 -
 11
11 -
 12
12 -
 13
13 -
 14
14 -
 15
15 -
 16
16 -
 17
17 -
18
-
19
-
20
-
21
-
22
-
23
-
24
-
25
-
26
-
27
-
28
-
29
-
30
-
31
-
32
-
33
-
34
-
35
-
36
-
37
-
38
-
39
-
40
-
41
-
42
-
43
-
44
-
45
-
46
-
47
-
48
-
49
-
50
-
51
-
52
-
53
-
54
-
55
-
56
-
57
-
58
-
59
-
60
-
61
-
62
-
63
-
64
-
65
-
66
-
67
-
68
-
69
-
70
-
71
-
72
-
73
-
74
-
75
-
76
-
77
-
78
-
79
-
80
-
81
-
82
-
83
-
84
 |
 |
