Panasonic DMR-EZ28K Dvd Recorder - English / Spanish - Page 73
General Issues, Playback Issues, VIERA Link, Picture - problems
 |
UPC - 037988256624
View all Panasonic DMR-EZ28K manuals
Add to My Manuals
Save this manual to your list of manuals |
Page 73 highlights
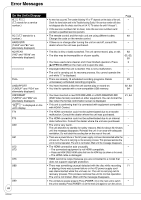
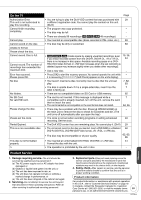
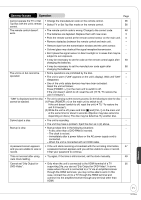
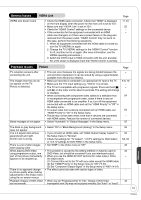
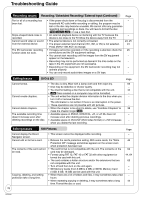
General Issues VIERA Link VIERA Link doesn't work • Check the HDMI cable connection. Check that "HDMI" is displayed on the front display when the power for the main unit is set to "On". • Make sure that "VIERA Link" is set to "On". • Check the "HDAVI Control" settings on the connected device. • If the connection for the equipment connected with an HDMI cable was changed, or if there was a power failure or the plug was removed from the power outlet, "HDAVI Control" may not work. In this case, perform the following operations. 1. When all equipment connected with the HDMI cable is turned on, turn the TV (VIERA) on again. 2. Change the TV (VIERA) settings for the "HDAVI Control" function to off, and then set to on again. (For more information, see the VIERA operating instructions.) 3. Switch the VIERA input to HDMI connection with this unit, and after this unit's screen is displayed check that "HDAVI Control" is working. Page 11, 61 55 − − Playback Issues Picture Page TV reception worsens after connecting the unit. The images from the unit do not appear on the TV. Picture is distorted. Status messages do not appear. • This can occur because the signals are being divided between the unit and other equipment. It can be solved by using a signal booster, available from electronics retailers. • Make sure recorder is connected to an appropriate AV input of the TV. • Make sure the TV's input setting (e.g., VIDEO 1) is correct. • The TV isn't compatible with progressive signals. Press and hold [g] and [q] on the main unit for about 5 seconds. The setting will change to interlace. • When connecting with component video cables to a television that is incompatible with progressive video, check if there is also an HDMI cable connected to an amplifier. If so, turn off the equipment connected with an HDMI cable and set the "HDMI Priority" to "Off" in the Setup menu. • To output video from a device connected with an HDMI cable, set "HDMI Priority" to "On" in the Setup menu. • Picture may not be seen when more than 4 devices are connected with HDMI cables. Reduce the number of connected devices. • Select "Automatic" in "Status Messages" in the Setup menu. − 8 to 10 − − 54 54 − 52 The black or gray background does not appear. The 4:3 aspect ratio picture expands left and right. Screen size is wrong. There is a lot of after-images when playing video. When playing DVD-Video using progressive output, one part of the picture momentarily appears to be doubled up. There is no apparent change in picture quality when making adjustments in the Video menu using the on-screen menus. Playback images of DVD-Video are not smooth. • Select "On" in "Black Background (Analog)" in the Setup menu. • If you connect an HDMI cable, set "HDMI Output Display Aspect" in the Setup menu to "Normal". • Check the settings for "TV Aspect", "4:3 TV settings for DVD-Video", or "4:3 TV settings for DVD-RAM" in the Setup menu. • Set "DNR" in the Video menu to "Off". • This problem is caused by the editing method or material used on DVD-Video, but should be corrected if you use interlaced output. • When you use the HDMI AV OUT terminal for video output, follow the steps below: (1) Connect this unit to the TV with any cable except the HDMI cable. (2) Set "HDMI Priority" in the Setup menu to "Off" (➔ 54). (3) Set "Component Output Signal" in the Setup menu to "480i" (➔ 54). • The effect cannot be seen with certain types of video. • When you set "Progressive/24p" to "24p", images of DVD-Video incompatible with 24p may not be played smoothly. Set "Auto1" or "Auto2". 52 55 53, 54 43 43 − − 43 73 Reference RQT9046
-
 1
1 -
2
-
3
-
4
-
5
-
6
-
7
-
8
-
9
-
10
-
11
-
12
-
13
-
14
-
15
-
16
-
17
-
18
-
19
-
20
-
21
-
22
-
23
-
24
-
25
-
26
-
27
-
28
-
29
-
30
-
31
-
32
-
33
-
34
-
35
-
36
-
37
-
38
-
39
-
40
-
41
-
42
-
43
-
44
-
45
-
46
-
47
-
48
-
49
-
50
-
51
-
52
-
53
-
54
-
55
-
56
-
57
-
58
-
59
-
60
-
61
-
62
-
63
-
64
-
65
-
66
-
67
-
 68
68 -
 69
69 -
 70
70 -
 71
71 -
 72
72 -
 73
73 -
 74
74 -
 75
75 -
 76
76 -
 77
77 -
 78
78 -
79
-
80
-
81
-
82
-
83
-
84
 |
 |
