Panasonic DMR-EZ28K Dvd Recorder - English / Spanish - Page 7
Media Handling, Rear Panel, The Unit's Display, Inserting Discs, Inserting an SD Card - - dvd recorder
 |
UPC - 037988256624
View all Panasonic DMR-EZ28K manuals
Add to My Manuals
Save this manual to your list of manuals |
Page 7 highlights
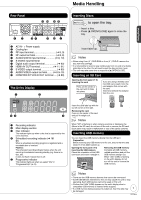
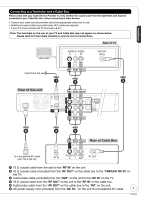
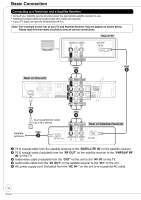
Media Handling Getting Started Rear Panel AC IN 12 bl bk 9 8 Y RF IN PB RF OUT PR VHF/ UHF COMPONENT VIDEO OUT 34 IN1 OUT AV OUT R-AUDIO-L OPTICAL DIGITAL AUDIO OUT VIDEO S VIDEO (PCM/BITSTREAM) 567 1 AC IN~ = Power supply 2 Cooling fan 3 RF input terminal 8, 9) 4 RF output terminal 8, 9) 5 AUDIO/VIDEO input terminal 9, 10) 6 S VIDEO input terminal 7 Digital audio output terminal 60) 8 HDMI AV OUT terminal 11, 61) 9 S VIDEO output terminal 60) bk AUDIO/VIDEO output terminal 8 to 10) bl COMPONENT VIDEO OUT terminal ..... (➔ 60) The Unit's Display 1 2 54 3 1 Recording indicator 2 Main display section 3 Disc indicator This indicator lights up when a disc that is supported by this unit is inserted. 4 Scheduled recording indicator (➔ 18) On: When a scheduled recording program is registered and a recordable disc is inserted. Flashes: The scheduled recording indicator flashes when the unit cannot go to scheduled recording standby (e.g. there is no disc, etc). It does not flash if Quick Start is off. 5 Progressive indicator This indicator lights up when you select "24p" in "Progressive/24p" (➔ 43). Inserting Discs ;OPEN/CLOSE to open the tray. - Insert a disc. - Press [; OPEN/CLOSE] again to close the tray. Insert label-up. Notes • When using 8 cm (3˝ ) DVD-RAM or 8 cm (3˝ ) DVD-R, remove the disc from the cartridge. • It is not possible to record or play continuously from one side of a double sided disc to the other. You will need to eject the disc and turn it over. • The unit may take some time to respond to [; OPEN/CLOSE]. Inserting an SD Card Opening the front panel (➔ 6) Inserting the card Press on the center of the card until it clicks into place. If you are using a miniSD card/ microSD card, insert it into the card adaptor that comes with the card. Insert and remove this adaptor from the unit. ADAPTER Insert the card label up with the cut-off corner on the right. Removing the card Press on the center of the card and pull it straight out. Notes When "SD" is flashing or when copying a picture or displaying the Album in the SD card, do not turn off the unit or remove the SD card. Such action may result in malfunction or loss of the card's contents. Inserting USB memory You can insert the USB memory directly into the USB port. Preparation Before inserting any USB memory to this unit, ensure that the data stored in it has been backed up. Opening the front panel (➔ 6) Inserting the USB memory Check the orientation of the USB connector and insert it straight in. Removing the USB memory Complete all USB memoryrelated operations and pull the USB memory straight out. When "uSb" (USB) is flashing on the unit's display, do not turn off the unit or remove the USB memory. Notes • There are few USB memory devices that cannot be connected. • Some USB devices inserted into this unit may cause this unit to stop operating. Such USB devices cannot be used on this unit. • Confirm that "uSb" (USB) appears on the unit's display when a compatible USB memory is inserted while stopped. • If a USB memory being accessed is pulled out, then the data may 7 be damaged. RQT9046
-
 1
1 -
 2
2 -
 3
3 -
 4
4 -
 5
5 -
 6
6 -
 7
7 -
 8
8 -
 9
9 -
 10
10 -
 11
11 -
 12
12 -
13
-
14
-
15
-
16
-
17
-
18
-
19
-
20
-
21
-
22
-
23
-
24
-
25
-
26
-
27
-
28
-
29
-
30
-
31
-
32
-
33
-
34
-
35
-
36
-
37
-
38
-
39
-
40
-
41
-
42
-
43
-
44
-
45
-
46
-
47
-
48
-
49
-
50
-
51
-
52
-
53
-
54
-
55
-
56
-
57
-
58
-
59
-
60
-
61
-
62
-
63
-
64
-
65
-
66
-
67
-
68
-
69
-
70
-
71
-
72
-
73
-
74
-
75
-
76
-
77
-
78
-
79
-
80
-
81
-
82
-
83
-
84
 |
 |
