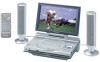
Panasonic DVD-LX9 Portable Dvd - Page 12
PREPARING THE MULTI CRADLE AND POWER SUPPLY, Multi cradle AC adaptor - batteries
 |
UPC - 037988250561
View all Panasonic DVD-LX9 manuals
Add to My Manuals
Save this manual to your list of manuals |
Page 12 highlights
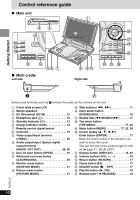
Getting Started Preparing the multi cradle and power supply BEFORE USE Remove the insulation sheet DC IN 9V Ë 4 Attach to cradle. (When the unit is off) Make sure built-in battery is attached. 1 PULL Make sure the built-in battery is attached whenever you use the unit. Multi cradle (AC adaptor) 1 Unwind speaker wire, then fit the wire back into the groove of the speaker base. 2 Twist and pull off the vinyl tip. Ë DC IN 9V DC IN 9V DC IN DC IN 2 Fit so unit clicks firmly into place. 3 Connect the speakers. + SPEAKER HAUT PARLEUR 4≠ R- COMPONENT VIDEO OUT (480P/480I) Y PB PR S VIDEO OUT SUB WOOFER CENTER AUDIO OUT SORROUND 5.1ch 2ch (MIX) FRONT VIDEO OUT R L R L + SPEAKER HAUT PARLEUR -4≠ L Push the levers and insert the wires. Light gray No line Dark gray Black line Caution Use the speakers only with the recommended system. Failure to do so may lead to damage to the connected equipment and/or the speakers, and may result in the risk of fire. Consult a qualified service person if damage has occurred or if you experience a sudden change in performance. 12 RQT6912 Household AC outlet (AC 120 V, 60 Hz) When using only the player Connect the AC adaptor directly to the player's DC IN terminal. The unit is in the standby condition (the [Í] indicator lights) when the AC power supply cord is connected. The primary circuit is always "live" as long as the AC adaptor is connected to an electrical outlet. ≥To conserve power When the unit is not going to be used for a long time, disconnect the AC power supply cord from the AC outlet. The unit consumes a small amount of power (approx. 0.9 W, when in the multi cradle) when in standby mode. ∫ To detach (When the unit is off) SD CARD : PUSH RELEASE RELEASE VIDEO AUDIO OPT OUT Pull the lever so the unit lifts off the cradle.
-
 1
1 -
2
-
3
-
4
-
5
-
6
-
 7
7 -
 8
8 -
 9
9 -
 10
10 -
 11
11 -
 12
12 -
 13
13 -
 14
14 -
 15
15 -
 16
16 -
 17
17 -
18
-
19
-
20
-
21
-
22
-
23
-
24
-
25
-
26
-
27
-
28
-
29
-
30
-
31
-
32
-
33
-
34
-
35
-
36
-
37
-
38
-
39
-
40
-
41
-
42
-
43
-
44
-
45
-
46
-
47
-
48
-
49
 |
 |
