Panasonic MC-UL815 MC-UL815 Owner's Manual (Multi-Language) - Page 48
Replacing Belt - rear nozzle latch
 |
View all Panasonic MC-UL815 manuals
Add to My Manuals
Save this manual to your list of manuals |
Page 48 highlights
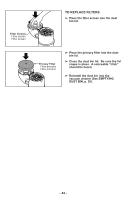
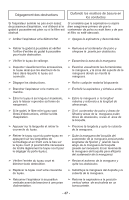
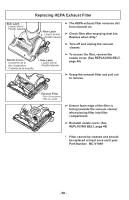
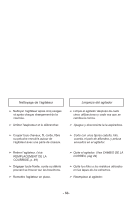
Side Latch Loquet latéral Pestillo laterale Replacing Belt Rear Latch Loquet arrière Pestillo trasero ➢ Replace belt whenever a burning rubber smell caused by excessive slippage occurs. ➢ Turn off and unplug the vacuum cleaner. ➢ Push in rear nozzle latch. Nozzle Cover Couvercle de la tête d'aspiration Cubierta de la boquilla Side Latch Loquet latéral Pestillo laterale ➢ Press side latches towards back of nozzle and rotate cover from nozzle. ➢ Remove agitator by carefully lifting out. ➢ Remove worn or broken belt. Agitator Agitateur Agitador Belt Groove Rainure de la courroie Polea para correa Belt Courroie Correa ➢ Clean agitator and the end caps. CAUTION Motor Shaft Arbre du moteur Eje del motor Belt Guide Glissière de la courroie End Cap Bouchon Guía para la correa Tapa del extremo Motor shaft may be hot. ➢ Loop new belt (part number MC-V380B) around motor shaft and agitator belt groove. Make sure belt is routed in the belt guide as shown. See illustration for correct belt routing. ➢ Reinstall agitator back into nozzle by placing end caps into grooves. ➢ After reinstalling the agitator, turn it by hand to make sure that belt is not twisted or pinched and that all rotating parts turn freely. ➢ Reinstall nozzle cover by aligning front edge of the cover with the nozzle and rotating. Ensure rear latch and side latches are locked into slots by pressing firmly. - 48 -
-
 1
1 -
2
-
3
-
4
-
5
-
6
-
7
-
8
-
9
-
10
-
11
-
12
-
13
-
14
-
15
-
16
-
17
-
18
-
19
-
20
-
21
-
22
-
23
-
24
-
25
-
26
-
27
-
28
-
29
-
30
-
31
-
32
-
33
-
34
-
35
-
36
-
37
-
38
-
39
-
40
-
41
-
42
-
 43
43 -
 44
44 -
 45
45 -
 46
46 -
 47
47 -
 48
48 -
 49
49 -
 50
50 -
 51
51 -
 52
52 -
 53
53 -
54
-
55
-
56
-
57
-
58
-
59
-
60
-
61
-
62
-
63
-
64
-
65
-
66
-
67
-
68
 |
 |
