Panasonic PT AE2000U Lcd Projector - Page 23
Switching the input signal, Switching the aspect ratio, Loading a saved setting
 |
UPC - 791871111536
View all Panasonic PT AE2000U manuals
Add to My Manuals
Save this manual to your list of manuals |
Page 23 highlights
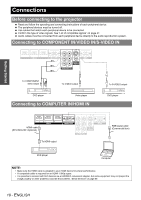
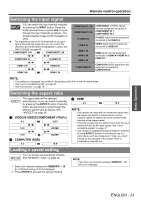
Basic Operation Remote control operation Switching the input signal You can switch the input method manually by pressing the INPUT button. Press the button several times or press I H to cycle through the input methods as follows. The actual projected image will be changed in a while. The graphical guidance will be displayed on the upper right of the projected image and you can confirm the selected input method which is highlighted in yellow. See "INPUT GUIDE" on page 40. COMPONENT 1 IN COMPONENT 2 IN COMPUTER IN S-VIDEO IN HDMI 3 IN VIDEO IN HDMI 2 IN HDMI 1 IN COMPONENT 1 IN COMPONENT 2 IN S-VIDEO IN VIDEO IN HDMI 1 IN HDMI 2 IN HDMI 3 IN COMPUTER IN COMPONENT (YPBPR) signals from the equipment connected to COMPONENT IN 1/ COMPONENT IN 2. S-VIDEO signal from the equipment connected to S-VIDEO IN. VIDEO signal from the equipment connected to VIDEO IN. HDMI signal from the equipment connected to HDMI IN 1/HDMI IN 2/ HDMI IN 3. COMPUTER (RGB) signal from the equipment connected to COMPUTER IN. NOTE: • If you select an unplugged input method, the guidance will blink on and off several times. • See "List of compatible signals" on page 47. • See "Connections" on page 18. Switching the aspect ratio The aspect ratio will be selected automatically, or you can switch it manually by pressing the ASPECT button. Press the button several times to cycle through the different aspect type as follows. See "ASPECT" on page 36. Q VIDEO/S-VIDEO/COMPONENT (YPBPR) 4:3 JUST 16:9 ZOOM2 14:9 Q COMPUTER (RGB) 4:3 ZOOM1 16:9 Q HDMI 4:3 16:9 NOTE: • If you project an image with an unmatched aspect ratio, the image may distort or some portions may be cropped. Select an aspect ratio which preserves the intention of the image creator. • The order of aspect type is defined not only by the input method but also by the input signals. See "List of compatible signals" on page 47. • If you project a copyrighted image enlarged or distorted by using ASPECT function in commercial use in a public place, such as a restaurant or hotel, you might infringe on the copyright of the creator which is protected by copyright law. Loading a saved setting You can access saved settings instantly. See "MEMORY LOAD" on page 34. 1. Select the required setting from MEMORY1 - 16. Undefined setting will not be displayed. 2. Press ENTER to activate the selected setting. NOTE: • If you have not saved any settings, MEMORY1 - 16 will not be displayed. ENGLISH - 23
-
 1
1 -
2
-
3
-
4
-
5
-
6
-
7
-
8
-
9
-
10
-
11
-
12
-
13
-
14
-
15
-
16
-
17
-
 18
18 -
 19
19 -
 20
20 -
 21
21 -
 22
22 -
 23
23 -
 24
24 -
 25
25 -
 26
26 -
 27
27 -
 28
28 -
29
-
30
-
31
-
32
-
33
-
34
-
35
-
36
-
37
-
38
-
39
-
40
-
41
-
42
-
43
-
44
-
45
-
46
-
47
-
48
-
49
-
50
-
51
-
52
-
53
-
54
-
55
-
56
-
57
-
58
 |
 |
