Panasonic PT AE2000U Lcd Projector - Page 24
Adjusting the signal condition with a waveform, Remote control operation, Displaying the waveform
 |
UPC - 791871111536
View all Panasonic PT AE2000U manuals
Add to My Manuals
Save this manual to your list of manuals |
Page 24 highlights
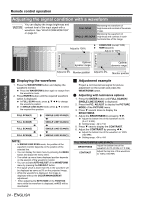
Remote control operation Basic Operation Adjusting the signal condition with a waveform You can display the image brightness and contrast level of the input signal with a waveform. See "WAVEFORM MONITOR" on page 32. FULL SCAN SINGLE LINE SCAN Monitoring the waveform of brightness and contrast of the whole image. Monitoring the waveform of brightness and contrast in each horizontal line of the image. COMPUTER (except 1080) 100% Adjust to 100% HDMI (Expand) 50% Adjust to 100% 0% 100% 100% ENTER ENTER Signal level Signal level 50% 50% Optimal Optimal dynamic range dynamic range 0% 0% Adjust to 0% Monitor position Adjust to 0% Monitor position J Displaying the waveform 1. Press the WAVEFORM button and display the waveform monitor. Press the WAVEFORM button again to escape from the waveform mode. 2. Press ENTER button until the required waveform option is displayed. In FULL SCAN mode, press F G I H to change the waveform position. In SINGLE LINE SCAN mode, press F G to select the required line position. FULL SCAN(Y) SINGLE LINE SCAN(B) FULL SCAN(R) SINGLE LINE SCAN(G) FULL SCAN(G) SINGLE LINE SCAN(R) FULL SCAN(B) SINGLE LINE SCAN(Y) NOTE: • In SINGLE LINE SCAN mode, the position of the waveform monitor depends on the position of the selected line. • You can display the main menu by pressing the MENU button and adjust the menu items. • The called up menu items displayed position depends on the position of the waveform monitor. • You can activate AUTO ADJUST of the WAVEFORM menu by pressing the DEFAULT button. • The signal which is lower than 0% in the waveform will be displayed as same as 0% on the projected image. • While the waveform is displayed, the image is displayed without the COLOR MANAGEMENT adjustment. • When adjusting the KEYSTONE of the POSITION menu while the waveform is displayed, xvYCC will be deactivated. J Adjustment example Project a commercial test signal for picture adjustment on the screen and press the WAVEFORM button. Q Adjusting with luminance options 1. Press the ENTER button until FULL SCAN(Y)/ SINGLE LINE SCAN(Y) is displayed. 2. Press the PIC. ADJUST to display the PICTURE MODE of the PICTURE menu. 3. Press G several times to display the BRIGHTNESS. 4. Adjust the BRIGHTNESS by pressing I H. Adjust the bottom line of the waveform to 0% (0 or 7.5 IRE). Setting range: -32 to +32 5. Press G once to display the CONTRAST. 6. Adjust the CONTRAST by pressing I H. Adjust the bottom line of the waveform to 100% (100 IRE). Setting range: -64 to +64 FULL SCAN(Y)/SINGLE LINE SCAN(Y) BRIGHTNESS Adjust the bottom line of the waveform to 0% (0 IRE or 7.5 IRE) CONTRAST Adjust the top line of the waveform to 100% (100 IRE) 24 - ENGLISH
-
 1
1 -
2
-
3
-
4
-
5
-
6
-
7
-
8
-
9
-
10
-
11
-
12
-
13
-
14
-
15
-
16
-
17
-
18
-
 19
19 -
 20
20 -
 21
21 -
 22
22 -
 23
23 -
 24
24 -
 25
25 -
 26
26 -
 27
27 -
 28
28 -
 29
29 -
30
-
31
-
32
-
33
-
34
-
35
-
36
-
37
-
38
-
39
-
40
-
41
-
42
-
43
-
44
-
45
-
46
-
47
-
48
-
49
-
50
-
51
-
52
-
53
-
54
-
55
-
56
-
57
-
58
 |
 |
