Panasonic PT-D3500 Dlp Projector - English/ French - Page 12
Rear And Side View Of The Main Unit/controls On Upper Panel, Temperature Monitor Temp
 |
View all Panasonic PT-D3500 manuals
Add to My Manuals
Save this manual to your list of manuals |
Page 12 highlights
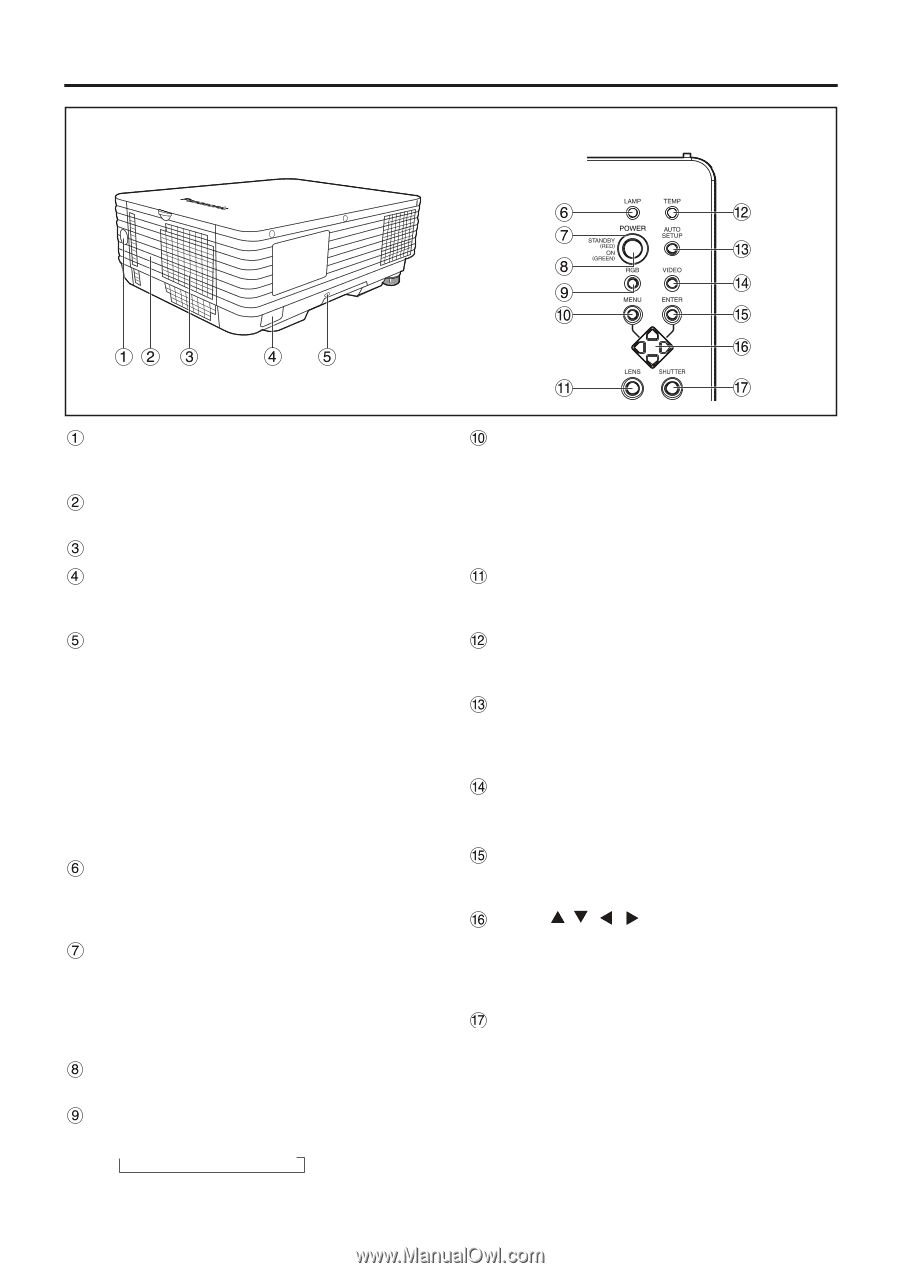
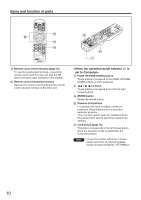
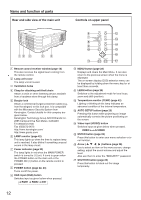
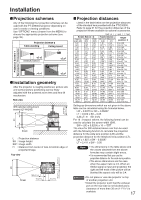
Name and function of parts Rear and side view of the main unit Controls on upper panel Remote control receiver window (page 14) This also receives the signal beam coming from the remote control. Lamp unit cover The lamp unit is housed. Ventilation holes Clasp for attaching anti-theft chain Attach a chain or other fastening device available from a hardware store through this clamp. Burglar lock Attach a commercial burglar prevention cable (e.g., from Kensington) to this lock port. It is compatible with the Microsaver Security System from Kensington. Contact details for this company are given below. Kensington Technology Group ACCO Brands Inc. 2885 Campus Drive San Mateo, CA94403 Tel (650)572-2700 Fax (650)572-9675 http://www.kensington.com/ http://www.gravis.com/ LAMP monitor (page 42) This lamp lights up when the time to replace lamp unit is reached. It also blinks if something unusual occurs in the lamp circuit. Power indicator (page 22) The lamp lights in red when the MAIN POWER switch is turned to ( I ) (on). It turns to green when the POWER button on the main unit or the POWER ON ( I ) button on the remote control is pressed. POWER button (page 22, 23) Turns on/off the power. RGB input (RGB) button Switches input as given below when pressed. → RGB1 → RGB2 → DVI 12 MENU button (page 28) Displays and clears the Main Menu. It can also return to the previous screen when the menu is displayed. The on-screen display (OSD) selection menu can be displayed by holding down the menu key for at least three seconds. LENS button (page 24) Switches to the adjustment mode for lens focus, zoom and shift (position). Temperature monitor (TEMP) (page 42) Lighting or blinking of this lamp indicates an abnormal condition of the internal temperature. AUTO SETUP button (page 25) Pressing this button while projecting an image automatically corrects the picture positioning on the screen. Video input (VIDEO) button Switches input as given below when pressed. VIDEO ←→ S-VIDEO ENTER button (page 28) Press this button to enter your menu selection or to run function. Arrow ( ) buttons (page 28) Use to select an item on the menu screen, change setting, adjust the sound volume and adjust the level. Also use them to enter the "SECURITY" password. SHUTTER button (page 25) Press this button to black out the image temporarily.
-
 1
1 -
2
-
3
-
4
-
5
-
6
-
 7
7 -
 8
8 -
 9
9 -
 10
10 -
 11
11 -
 12
12 -
 13
13 -
 14
14 -
 15
15 -
 16
16 -
 17
17 -
18
-
19
-
20
-
21
-
22
-
23
-
24
-
25
-
26
-
27
-
28
-
29
-
30
-
31
-
32
-
33
-
34
-
35
-
36
-
37
-
38
-
39
-
40
-
41
-
42
-
43
-
44
-
45
-
46
-
47
-
48
-
49
-
50
-
51
-
52
-
53
-
54
-
55
-
56
-
57
-
58
-
59
-
60
-
61
-
62
-
63
-
64
-
65
-
66
-
67
-
68
-
69
-
70
-
71
-
72
 |
 |