Panasonic PT-D3500 Dlp Projector - English/ French - Page 17
Installation, Projection Schemes, Installation Geometry - 05
 |
View all Panasonic PT-D3500 manuals
Add to My Manuals
Save this manual to your list of manuals |
Page 17 highlights
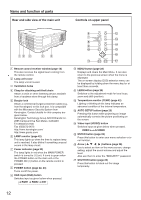
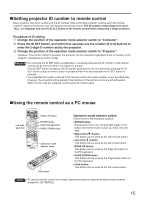
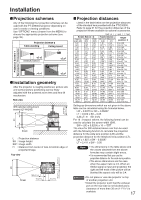
InPsrotajelcltaiotinosnchemes Projection distances Any of the following four projection schemes can be used with the PT-D3500U projector depending on user's needs or viewing conditions. Use "OPTION2" menu (chosen from the MENU) to choose the appropriate projection scheme (see page 35). Projection Scheme 2 Table standing Ceiling mount (Default position) I;nstallation geometry After the projector is roughly positioned, picture size and vertical picture positioning can be finely adjusted with the powered zoom lens and lens tilt mechanism. Side view SH Projection Scheme 1 Rear projection Front projection With optional ceiling mount bracket (ET-PKD35) ; ;H L L H Screen 172 270 (6 25/32) (10 5/8) 374-454 (14 23/32-17 7/8) L : Projection distance SH : Image height SW : Image width ;H : Distance from center of lens to bottom edge of 65 (2 9/16) SW 65 (2 9/16) Listed in the table below are the projection distances of the standard lens provided with the PT-D3500U. Refer to page 61 for the projection distances of the projection lenses available as optional accessories. Unit : m ( ) : inch [ ] : foot Screen Size (4 : 3) Projection distance: L Diagonal Height Width Minimum Maximum length (SD) (SH) (SW) (LW) (LT) 1.27 0.76 1.02 1.81 2.40 (50") [2'5''] [3'4''] [5'11''] [7'10''] 1.52 0.91 1.22 2.18 2.89 (60") [2'11''] [4'] [7'1''] [9'5''] 1.78 1.07 1.42 2.55 3.38 (70") [3'6''] [4'7''] [8'4''] [11'1''] 2.03 1.22 1.63 2.92 3.87 (80") [4'] [5'4''] [9'6''] [12'8''] 2.29 1.37 1.83 3.29 4.36 (90") [4'5''] [6'] [10'9''] [14'3''] 2.54 1.52 2.03 3.66 4.85 (100") [4'11''] [6'7''] [12'] [15'10''] 3.05 1.83 2.44 4.41 5.83 (120") [6'] [8'] [14'5''] [19'1''] 3.81 2.29 3.05 5.52 7.30 (150") [7'6''] [10'] [18'1''] [23'11''] 5.08 3.05 4.06 7.38 9.75 (200") [10'] [13'3''] [24'2''] [31'11''] 6.35 3.81 5.08 9.23 12.20 (250") [12'6''] [16'8''] [30'3''] [40'] 7.62 4.57 6.10 11.09 14.65 (300") [14'11''] [20'] [36'4''] [48'] 8.89 5.33 7.11 12.95 17.10 (350") [17'5''] [23'3''] [42'5''] [56'1''] 10.16 6.10 8.13 14.80 19.55 (400") [20'] [26'8''] [48'6''] [64'1''] 12.70 7.62 10.16 18.51 24.45 (500") [25'] [33'4''] [60'8''] [80'2''] 15.24 9.14 12.19 22.23 29.35 (600") [29'11''] [39'11''] [72'11''] [96'3''] Height position: H 0 to 0.38 (0 to 14 61/64) 0 to 0.46 (0 to 18 7/64) 0 to 0.53 (0 to 20 55/64) 0 to 0.61 (0 to 24 1/64) 0 to 0.69 (0 to 27 11/64) 0 to 0.76 (0 to 29 59/64) 0 to 0.91 (0 to 35 53/64) 0 to 1.14 (0 to 44 7/8) 0 to 1.52 (0 to 59 27/32) 0 to 1.91 (0 to 75 13/64) 0 to 2.29 (0 to 90 5/32) 0 to 2.67 (0 to 105 1/8) 0 to 3.05 (0 to 120 5/64) 0 to 3.81 (0 to 150) 0 to 4.57 (0 to 179 59/64) Setting-up dimensions which are not given in the above table can be calculated using the formulas below. LW = 0.03713 x SD - 0.05067 LT = 0.049 x SD - 0.05 (LW,LT: m SD: inch) For 16 : 9 aspect rations, the following formal can be used to calculate the screen width (SW). SW = (SD x 0.0254) x 16 ÷ 337 The value for SW obtained above can then be used with the following function to calculate the projection distance for the wide lens position (LW) and the projection distance for the telephoto lens position (LT). LW = 1.827 x SW - 0.05067 LT = 2.411 x SW - 0.05 Note • The dimensions in the table above and projected image. the values obtained from the above Top view formulas may contain slight errors. • It is recommended that you use the projection distance for the wide lens position. • The above dimensions are the case when the aspect ratio is 4:3. When an L SXGA signal is input and projected, the right and left ends of the picture will be blanked the aspect ratio will be 5:4. Screen 102 (4 1/64) 70 (2 3/4) 70 (2 3/4) Attention • Do not place or use one projector on top of another projection unit. • Install the projector such that the exhaust port on the rear side is not blocked and a clearance of more than 30 cm (1113/16") is available. 17
-
 1
1 -
2
-
3
-
4
-
5
-
6
-
7
-
8
-
9
-
10
-
11
-
 12
12 -
 13
13 -
 14
14 -
 15
15 -
 16
16 -
 17
17 -
 18
18 -
 19
19 -
 20
20 -
 21
21 -
 22
22 -
23
-
24
-
25
-
26
-
27
-
28
-
29
-
30
-
31
-
32
-
33
-
34
-
35
-
36
-
37
-
38
-
39
-
40
-
41
-
42
-
43
-
44
-
45
-
46
-
47
-
48
-
49
-
50
-
51
-
52
-
53
-
54
-
55
-
56
-
57
-
58
-
59
-
60
-
61
-
62
-
63
-
64
-
65
-
66
-
67
-
68
-
69
-
70
-
71
-
72
 |
 |
