Panasonic PT-D3500 Dlp Projector - English/ French - Page 25
Automatic Adjustment (auto Setup), Using The Freeze Function, Using The Shutter Function - user manual
 |
View all Panasonic PT-D3500 manuals
Add to My Manuals
Save this manual to your list of manuals |
Page 25 highlights
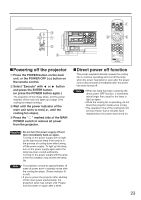
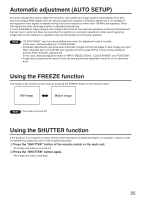
Automatic adjustment (AUTO SETUP) Automatic adjustment function adjust the resolution, clock phase and image position automatically when dotsstructured analog RGB signals such as computer signal are supplied. (Automatic adjustment is not available if moving picture input signals or signals having a dot clock frequency of more than 108 MHz are supplied.) When DVI signals are input, the image position is adjusted automatically. It is recommended to supply images with a bright white frame at the outermost periphery containing characters etc. that are clear in white and black contrast when the system is in automatic adjustment mode. Avoid supplying images that involve halftones or gradation such as photographs and computer graphics. Note • "CLOCK PHASE" may have been shifted even when the adjustment ended normally. In this case, manually adjust the "CLOCK PHASE". • Automatic adjustments cannot be performed when images with blurred edges or dark images are input. With composite sync and G-SYNC sync signals and some types of PCs, it may not be possible to perform these automatic adjustments. In this case, manually adjust the items of "INPUT RESOLUTION", "CLOCK PHASE" and "POSITION". • Image may be disturbed for about 4 seconds during automatic adjustment, which is not an abnormal error. Using the FREEZE function The image on the screen can be frozen by pressing the FREEZE button on the remote control. Still image Motion image Note • The audio is turned off. Using the SHUTTER function If the projector is not used for a certain period of time during the meeting intermission, for example, a shutter mode is available that allows the user to hide images temporarily. Press the "SHUTTER" button of the remote control or the main unit. The image and audio are turned off. Press the "SHUTTER" button again. The image and audio come back. 25
-
 1
1 -
2
-
3
-
4
-
5
-
6
-
7
-
8
-
9
-
10
-
11
-
12
-
13
-
14
-
15
-
16
-
17
-
18
-
19
-
 20
20 -
 21
21 -
 22
22 -
 23
23 -
 24
24 -
 25
25 -
 26
26 -
 27
27 -
 28
28 -
 29
29 -
 30
30 -
31
-
32
-
33
-
34
-
35
-
36
-
37
-
38
-
39
-
40
-
41
-
42
-
43
-
44
-
45
-
46
-
47
-
48
-
49
-
50
-
51
-
52
-
53
-
54
-
55
-
56
-
57
-
58
-
59
-
60
-
61
-
62
-
63
-
64
-
65
-
66
-
67
-
68
-
69
-
70
-
71
-
72
 |
 |
