Panasonic PT60DL54J PT50DL54 User Guide - Page 32
Photo Viewer Operations Cont., Example of Folder Structure, Photo Viewer Setup Menu, Procedure - digital camera
 |
View all Panasonic PT60DL54J manuals
Add to My Manuals
Save this manual to your list of manuals |
Page 32 highlights
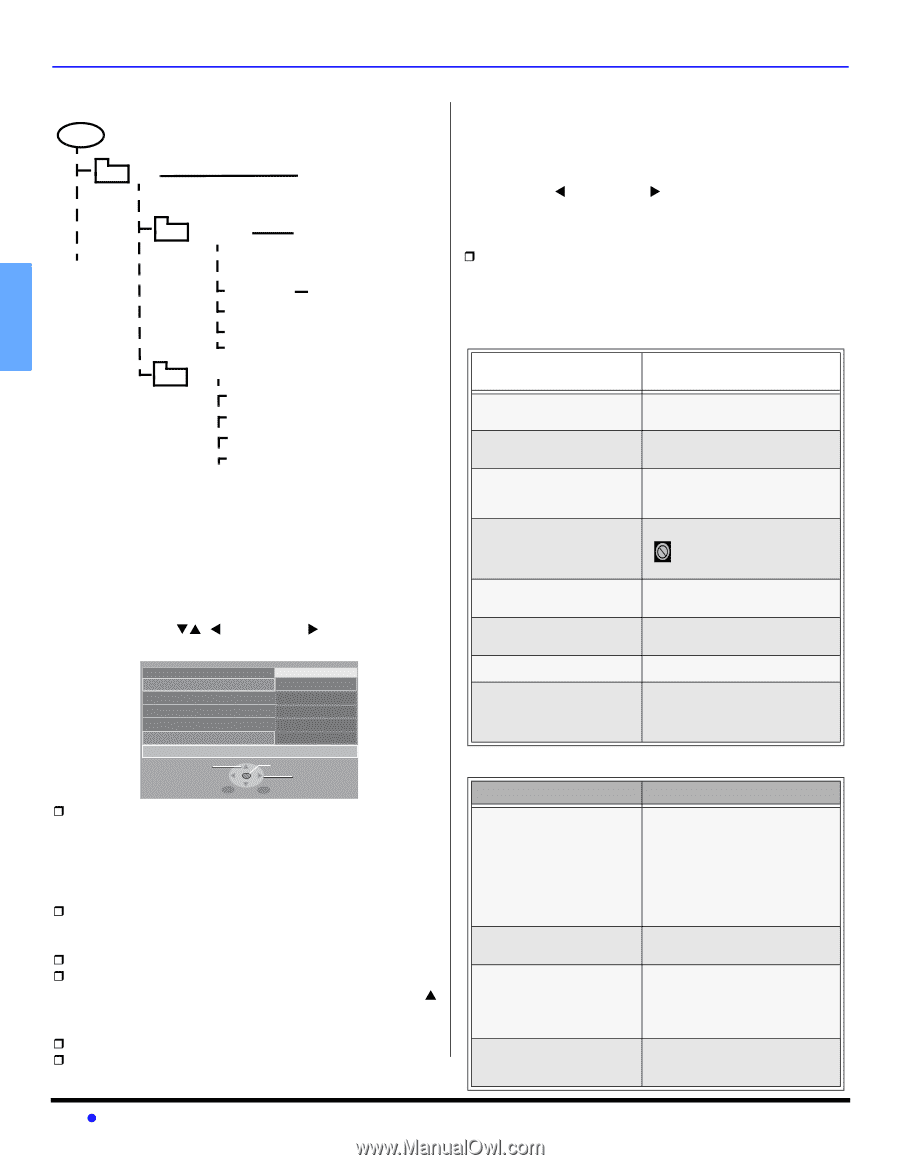
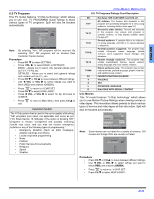
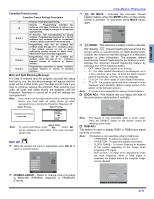
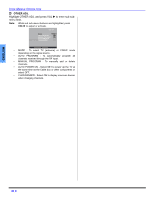
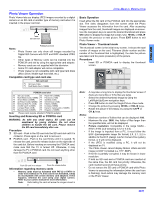
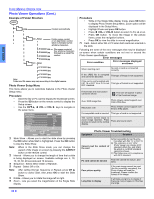
ENGLISH ICON MENUS OPERATION Photo Viewer Operations (Cont.) Example of Folder Structure ROOT DCIM Created automatically 100 _PANA Folder names consist of a 3-digit folder number which is followed by five arbitrary characters. P1000001.jpg P1000002.jpg P1000003.jpg P1000004.jpg File names consist of four arbitrary characters followed by a 4-digit file number. 101 _PANA P1010001.jpg P1010002.jpg P1010003.jpg P1010004.jpg Note: Folder and file names may vary according to the digital camera. Photo Viewer Setup Menu This menu allows you to customize features in the Photo Viewer Setup menu. Procedure • Insert the SD or PC card to display the thumbnail screen. • Press the SD button on the remote control to display the Setup screen. • Use the CHTS, W VOL or VOL X keys to navigate in the setup menu. Set up Menu Slide Show Internal Sequence Repeat Rotate Card SELECT MENU Return Start 5Sec Order Off left SD OK CHANGE EXIT ˆ Slide Show - Allows you to start the slide show by pressing the OK button while Start is highlighted. Press the OK button to stop the Slide Show. Note: When in the Slide Show mode, you can change the aspect of the image on screen by pressing the ASPECT button on the remote control. ˆ Interval - Allows you to change the length of time that a slide is being displayed on screen. Available settings are: 5, 10, 15, 30, 60, 90 seconds and 10 minutes. ˆ Sequence - Select either Order or Random. ˆ Repeat - Select Off or On. Note: After setting Interval, Sequence or Repeat, press CH S button to select Start, then press OK to start the Slide Show. ˆ Rotate - Allows you to rotate the image left or right. ˆ Zoom - Lets you select the magnification of the Single Slide display. Procedure • While in the Single Slide display mode, press SD button to display Photo Viewer Setup Menu. Zoom option will be displayed in the Setup Menu. • Highlight Zoom and press OK button. • Press W VOL or VOL X button to select To Fit, x2 or x4. • Press OK button. To move the image in the picture frame, press the navigation buttons. • Press OK to view the slide in normal magnification. ˆ Card - Select either SD or PC when both cards are inserted in the slots. Following are some of the error messages that may be displayed on-screen when certain conditions are not met or exceed the Photo Viewer specifications. Error messages Error condition Error messages displayed on-screen When inserting card No card or card is not inserted correctly If the JPEG file is corrupted and cannot be decoded. This type of image is not supported. If the card is not formatted with FAT 12 or FAT 16 or if it is not This type of format is not supported. DCF standard. If thumbnail and main picture cannot be shown This icon will appear in place of the thumbnail image. Over 3000 image files Photo Viewer cannot support over 3000 JPEG files. Resolution over Photo Viewer cannot support over 8192 x 8192 pixels. If incompatible card is inserted This type of card is not supported. The screen turned black to avoid image retention. Press any key to return to the normal Press any key to return. display. Photo Viewer Troubleshooting Symptoms Solutions Cannot read the content of the card A) Not compatible format. Must be formatted with FAT 12 or FAT 16. B) The extension is not "JPG". Photo Viewer can display EXIF standard JPEG file, and JPEG file which is not EXIF standard cannot be shown. C) The folders are not in compliance with DCF standard. PC card cannot be ejected Push the card all the way in, and eject. Poor picture quality If the main image cannot be read (the file is partially corrupted), the Photo Viewer will read the thumbnail. Please confirm the format of the image. Long time to display It will take a long time to display if there are many images or if the files are large. 30 z
-
 1
1 -
2
-
3
-
4
-
5
-
6
-
7
-
8
-
9
-
10
-
11
-
12
-
13
-
14
-
15
-
16
-
17
-
18
-
19
-
20
-
21
-
22
-
23
-
24
-
25
-
26
-
 27
27 -
 28
28 -
 29
29 -
 30
30 -
 31
31 -
 32
32 -
 33
33 -
 34
34 -
 35
35 -
 36
36 -
 37
37 -
38
-
39
-
40
-
41
-
42
-
43
-
44
-
45
-
46
-
47
-
48
-
49
-
50
-
51
-
52
-
53
-
54
-
55
-
56
-
57
-
58
-
59
-
60
-
61
-
62
-
63
-
64
-
65
-
66
-
67
-
68
-
69
-
70
-
71
-
72
-
73
-
74
-
75
-
76
-
77
-
78
-
79
-
80
-
81
-
82
-
83
-
84
-
85
-
86
-
87
-
88
-
89
-
90
-
91
-
92
-
93
-
94
-
95
-
96
-
97
-
98
-
99
-
100
-
101
-
102
-
103
-
104
-
105
-
106
-
107
-
108
-
109
-
110
-
111
-
112
 |
 |