Panasonic SDRS150 SDRS150 User Guide - Page 31
Changing the picture quality on the LCD monitor LCD AI
 |
UPC - 037988254460
View all Panasonic SDRS150 manuals
Add to My Manuals
Save this manual to your list of manuals |
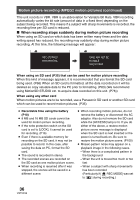
Page 31 highlights
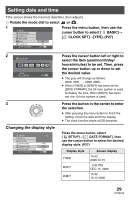
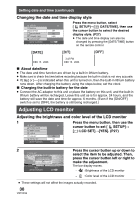
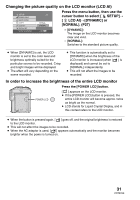
Changing the picture quality on the LCD monitor (LCD AI) SETUP POWER SAVE BEEP SOUND LCD AI LCD SET INITIAL SET SETUP ENTER 2/3 NORMAL DYNAMIC EXIT MENU Press the menu button, then use the cursor button to select [ SETUP]# [ LCD AI]#[DYNAMIC] or [NORMAL]. (P27) - [DYNAMIC]: The image on the LCD monitor becomes clear and vivid. - [NORMAL]: Switches to the standard picture quality. ≥ When [DYNAMIC] is set, the LCD monitor is set to the color level and brightness optimally suited for the particular scenes to be recorded. Crisp and bright images will be displayed. ≥ The effect will vary depending on the scene recorded. ≥ This function is automatically set to [DYNAMIC] when the brightness of the LCD monitor is increased (when [ ] is displayed) and cannot be set to [NORMAL] independently. ≥ This will not affect the images to be recorded. In order to increase the brightness of the entire LCD monitor Press the [POWER LCD] button. POWER LCD [ ] appears on the LCD monitor. ≥ If the [POWER LCD] button is pressed, the entire LCD monitor will become approx. twice as bright as the normal. ≥ LCD stands for Liquid Crystal Display, and in this context refers to the LCD monitor. ≥ When the button is pressed again, [ ] goes off, and the original brightness is restored to the LCD monitor. ≥ This will not affect the images to be recorded. ≥ When the AC adaptor is used, [ ] appears automatically and the monitor becomes brighter when the power is turned on. 31 VQT0X39
-
 1
1 -
2
-
3
-
4
-
5
-
6
-
7
-
8
-
9
-
10
-
11
-
12
-
13
-
14
-
15
-
16
-
17
-
18
-
19
-
20
-
21
-
22
-
23
-
24
-
25
-
 26
26 -
 27
27 -
 28
28 -
 29
29 -
 30
30 -
 31
31 -
 32
32 -
 33
33 -
 34
34 -
 35
35 -
 36
36 -
37
-
38
-
39
-
40
-
41
-
42
-
43
-
44
-
45
-
46
-
47
-
48
-
49
-
50
-
51
-
52
-
53
-
54
-
55
-
56
-
57
-
58
-
59
-
60
-
61
-
62
-
63
-
64
-
65
-
66
-
67
-
68
-
69
-
70
-
71
-
72
-
73
-
74
-
75
-
76
-
77
-
78
-
79
-
80
-
81
-
82
-
83
-
84
-
85
-
86
-
87
-
88
-
89
-
90
-
91
-
92
-
93
-
94
-
95
-
96
-
97
-
98
-
99
-
100
-
101
-
102
-
103
-
104
-
105
-
106
-
107
-
108
-
109
-
110
-
111
-
112
-
113
-
114
-
115
-
116
-
117
-
118
-
119
-
120
-
121
-
122
-
123
-
124
 |
 |