Panasonic TYTP42P6S TYTP42P6S User Guide - Page 12
In Case Of Windows 98/se
 |
View all Panasonic TYTP42P6S manuals
Add to My Manuals
Save this manual to your list of manuals |
Page 12 highlights
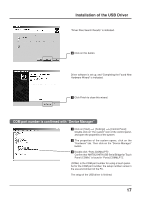
Installation of the USB Driver In case of Windows 98 / SE Install USB Driver First, PC is started, and then Windows is started. The CD-ROM with USB driver software is inserted into the CD-ROM drive. Next, touch panel and PC are connected with a USB cable. (see page 10) When a USB cable is connected, "Add New Hardware Wizard" is indicated. 1 Click on this button. 2 Next, choose this item. 3 Click on this button. 12 4 Next, choose this CD-ROM drive. 5 Click on this button. The following screen is displayed when the driver file on the CD-ROM is found and is ready to be copied. 6 Click on this button. Then, the driver file is copied and set up.
-
 1
1 -
2
-
3
-
4
-
5
-
6
-
 7
7 -
 8
8 -
 9
9 -
 10
10 -
 11
11 -
 12
12 -
 13
13 -
 14
14 -
 15
15 -
 16
16 -
 17
17 -
18
-
19
-
20
-
21
-
22
-
23
-
24
-
25
-
26
-
27
-
28
-
29
-
30
-
31
-
32
 |
 |

12
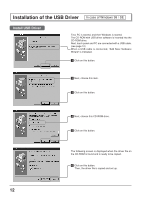
Installation of the USB Driver
First, PC is started, and then Windows is started.
The CD-ROM with USB driver software is inserted into the
CD-ROM drive.
Next, touch panel and PC are connected with a USB cable.
(see page 10)
When a USB cable is connected,
“
Add New Hardware
Wizard
”
is indicated.
1
Click on this button.
2
Next, choose this item.
3
Click on this button.
4
Next, choose this CD-ROM drive.
5
Click on this button.
The following screen is displayed when the driver file on
the CD-ROM is found and is ready to be copied.
6
Click on this button.
Then, the driver file is copied and set up.
Install USB Driver
In case of Windows 98 / SE