Panasonic VDRD200 Dvd Camcorder-english/spanish - Page 26
Connecting to the AC outlet, Turning the unit on/off, OFF/ON switch to ON.
 |
View all Panasonic VDRD200 manuals
Add to My Manuals
Save this manual to your list of manuals |
Page 26 highlights
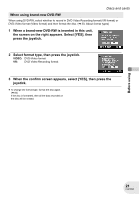
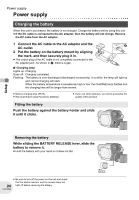
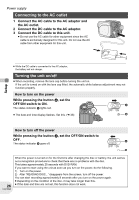
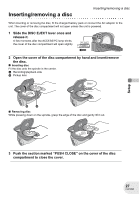
Power supply Connecting to the AC outlet 1 Connect the AC cable to the AC adaptor and the AC outlet. 2 Connect the DC cable to the AC adaptor. 3 Connect the DC cable to this unit. ≥ Do not use the AC cable for other equipment since the AC cable is exclusively designed for this unit. Do not use the AC cable from other equipment for this unit. Setup ≥ While the DC cable is connected to the AC adaptor, the battery will not charge. Turning the unit on/off ≥ When recording, remove the lens cap before turning the unit on. If the unit is turned on with the lens cap fitted, the automatic white balance adjustment may not function properly. How to turn on the power While pressing the button A, set the OFF/ON switch to ON. A The status indicator B lights red. ≥ The date and time display flashes. Set this. (l 38) B How to turn off the power While pressing the button A, set the OFF/ON switch to OFF. A The status indicator B goes off. B 26 LSQT0969 When the power is turned on for the first time after changing the disc or battery, the unit carries out a recognition procedure to check that there are no problems with the disc. This takes approximately 25 seconds with DVD-RAM. If you want to start using the unit as soon as you turn on the power, do the following. 1) Turn on the power. 2) After "READING DISC..." disappears from the screen, turn off the power. You can start recording approximately 8 seconds after you turn on the power again. ≥ Depending on the condition of the disc, it may take longer than this. ≥ If the date and time are not set, this function does not work.
-
 1
1 -
2
-
3
-
4
-
5
-
6
-
7
-
8
-
9
-
10
-
11
-
12
-
13
-
14
-
15
-
16
-
17
-
18
-
19
-
20
-
 21
21 -
 22
22 -
 23
23 -
 24
24 -
 25
25 -
 26
26 -
 27
27 -
 28
28 -
 29
29 -
 30
30 -
 31
31 -
32
-
33
-
34
-
35
-
36
-
37
-
38
-
39
-
40
-
41
-
42
-
43
-
44
-
45
-
46
-
47
-
48
-
49
-
50
-
51
-
52
-
53
-
54
-
55
-
56
-
57
-
58
-
59
-
60
-
61
-
62
-
63
-
64
-
65
-
66
-
67
-
68
-
69
-
70
-
71
-
72
-
73
-
74
-
75
-
76
-
77
-
78
-
79
-
80
-
81
-
82
-
83
-
84
-
85
-
86
-
87
-
88
-
89
-
90
-
91
-
92
-
93
-
94
-
95
-
96
-
97
-
98
-
99
-
100
-
101
-
102
-
103
-
104
-
105
-
106
-
107
-
108
-
109
-
110
-
111
-
112
-
113
-
114
-
115
-
116
-
117
-
118
-
119
-
120
-
121
-
122
-
123
-
124
-
125
-
126
-
127
-
128
-
129
-
130
-
131
-
132
-
133
-
134
-
135
-
136
-
137
-
138
-
139
-
140
-
141
-
142
-
143
-
144
-
145
-
146
-
147
-
148
-
149
-
150
-
151
-
152
-
153
-
154
-
155
-
156
-
157
-
158
-
159
-
160
 |
 |
