Panasonic VDRD310 Dvd Camcorder - English/spanish - Page 102
Connection And Recognition (windows), Procedures
 |
View all Panasonic VDRD310 manuals
Add to My Manuals
Save this manual to your list of manuals |
Page 102 highlights
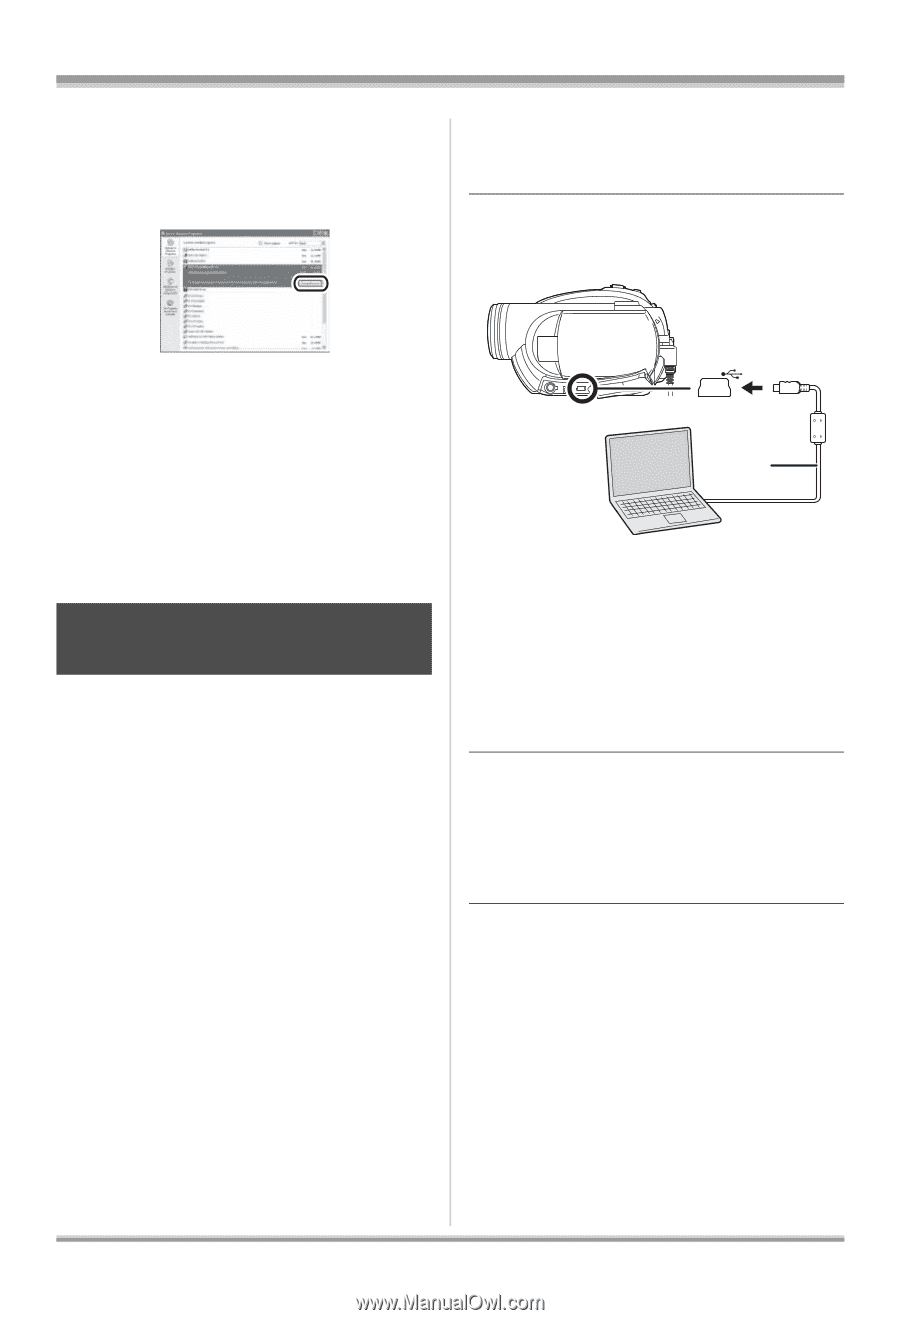
With a computer (VDR-D310/VDR-D230) 2 Select the software application to be deleted, then click [Change/ Remove] ([Change or Remove] or [Add/Remove]). 1 Insert a disc or card with recorded images in the unit, then turn on the unit. 2 Connect this unit and a computer. ≥ Proceed with the uninstallation by following the on-screen instructions. ≥ After uninstalling the software, be sure to reboot the computer. Connection and recognition (Windows) Connection and recognition procedures After the driver and software applications are installed, the unit must be connected to the computer and be correctly recognized by the computer. ≥ Connect after installing the driver and software applications. ≥ If the supplied CD-ROM is inserted in the computer, remove it. (If the [Setup Menu] is running, wait until it finishes, then remove the CD-ROM.) ≥ If the recognition procedure is not accomplished properly, operation will not be possible after connecting the unit to the computer. ≥ If the unit fails to operate normally, it may mean that you have not conducted the installation or recognition procedure properly. ≥ Be sure to finalize DVD-RW (VR format), DVD-RW (Video format) and DVD-R on this unit, before using them on the computer. Un-finalized discs will not be recognized by the computer. ¬ Connect this unit to the AC adaptor. A A USB cable (supplied) ≥ Insert the plugs as far as they will go. The unit and computer will not operate properly if the plugs are not inserted fully. ≥ Do not use any other USB cables except the supplied one. (Operation is not guaranteed with any other USB cables.) The USB function selection screen will appear. 3 Select [PC CONNECT(DISC)] or [PC CONNECT(CARD)] and press the joystick. This unit is automatically recognized by the computer. ≥ When the unit is connected to a computer, its power cannot be turned off. In this case, disconnect the USB cable (l 104). ≥ If the unit is connected to a computer when the USB function is set to [PC CONNECT(DISC)], no image will appear on the LCD monitor or the viewfinder. ≥ When this unit is connected to a computer, you cannot use this unit's DISC EJECT lever to remove a disc. Use Windows Explorer to rightclick the drive icon for this unit and select [Eject]. 102 LSQT1145
-
 1
1 -
2
-
3
-
4
-
5
-
6
-
7
-
8
-
9
-
10
-
11
-
12
-
13
-
14
-
15
-
16
-
17
-
18
-
19
-
20
-
21
-
22
-
23
-
24
-
25
-
26
-
27
-
28
-
29
-
30
-
31
-
32
-
33
-
34
-
35
-
36
-
37
-
38
-
39
-
40
-
41
-
42
-
43
-
44
-
45
-
46
-
47
-
48
-
49
-
50
-
51
-
52
-
53
-
54
-
55
-
56
-
57
-
58
-
59
-
60
-
61
-
62
-
63
-
64
-
65
-
66
-
67
-
68
-
69
-
70
-
71
-
72
-
73
-
74
-
75
-
76
-
77
-
78
-
79
-
80
-
81
-
82
-
83
-
84
-
85
-
86
-
87
-
88
-
89
-
90
-
91
-
92
-
93
-
94
-
95
-
96
-
 97
97 -
 98
98 -
 99
99 -
 100
100 -
 101
101 -
 102
102 -
 103
103 -
 104
104 -
 105
105 -
 106
106 -
 107
107 -
108
-
109
-
110
-
111
-
112
-
113
-
114
-
115
-
116
-
117
-
118
-
119
-
120
-
121
-
122
-
123
-
124
-
125
-
126
-
127
-
128
-
129
-
130
-
131
-
132
-
133
-
134
-
135
-
136
-
137
-
138
-
139
-
140
-
141
-
142
-
143
-
144
-
145
-
146
-
147
-
148
-
149
-
150
-
151
-
152
-
153
-
154
-
155
-
156
 |
 |