Panasonic VDRD310 Dvd Camcorder - English/spanish - Page 106
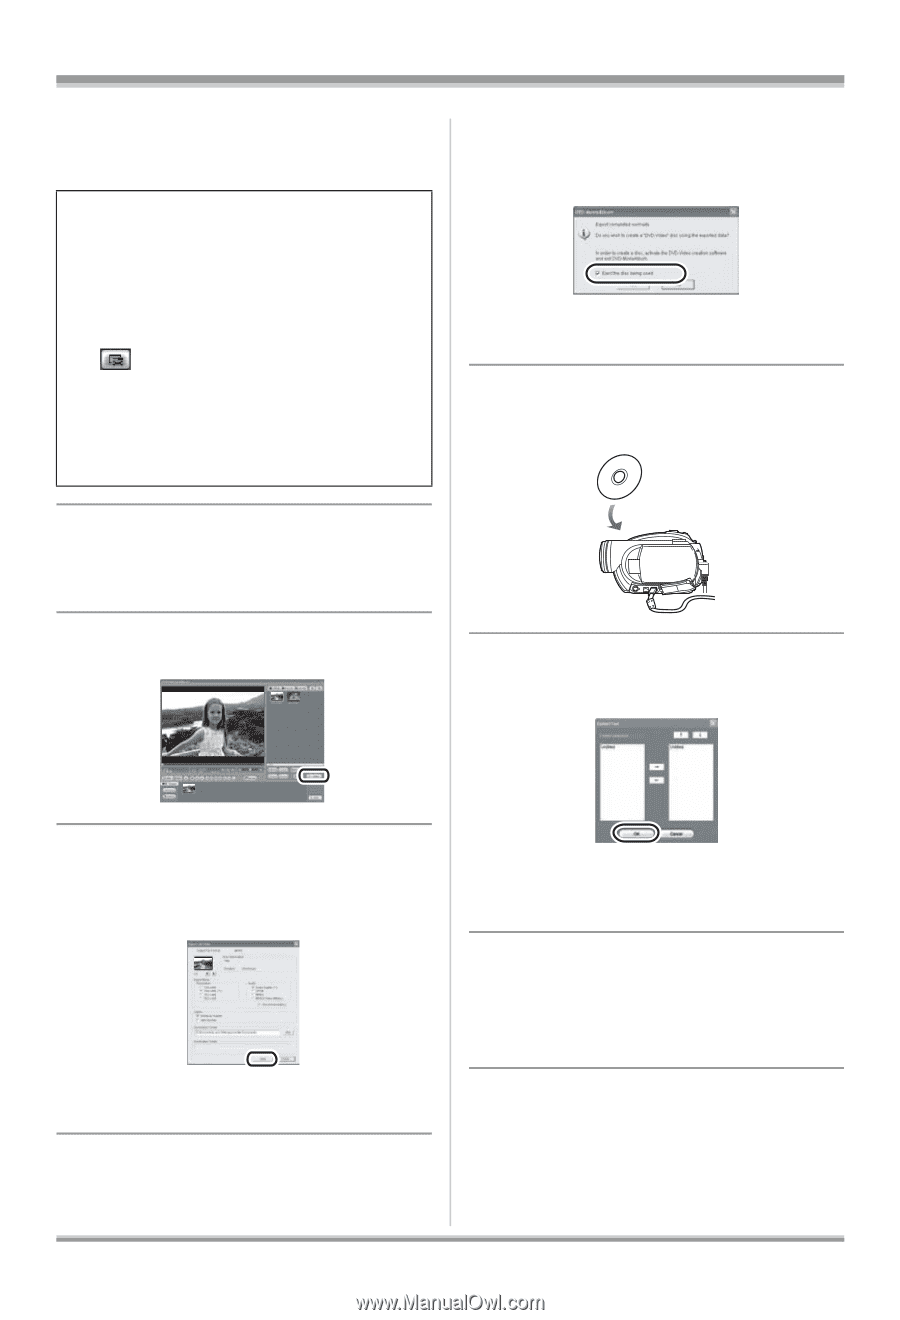
Click [Export]., small box for [Eject the disc
 |
View all Panasonic VDRD310 manuals
Add to My Manuals
Save this manual to your list of manuals |
Page 106 highlights
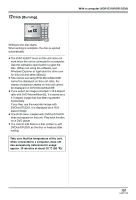
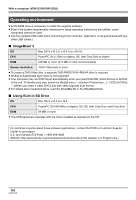
With a computer (VDR-D310/VDR-D230) ≥ If the screen showing a brief explanation of the application is displayed, close it. DVD-MovieAlbumSE starts and the images recorded on the disc are displayed. When starting DVD-MovieAlbumSE, the [Mount Information] dialog box may appear or the recorded images may not be shown. If this occurs, try the following procedure. If there are multiple drives, a drive other than this unit may be selected. 1) Click [Preference] on the dialog box or ([Preference]) button at top right of DVD-MovieAlbumSE screen, and then click the [Device setting] tab. 2) Choose the drive where the disc is loaded in the [Drive Select] column, and then click [OK]. small box for [Eject the disc being used.], and then click [Yes]. DVD-MovieAlbumSE automatically closes and DVDfunSTUDIO automatically starts. 9 Insert a brand-new DVD-RW or DVD-R disc into the unit. 5 (When using a DVD-RAM only) Edit the images on the disc as required. 6 Click [Export]. 10 When the [CollectTool] screen appears, click [OK]. 7 Set the export settings in the [Export all titles] screen and click [Start]. ≥ It is recommended that you do not change the settings displayed on the screen. 8 When export is complete, a message will appear. Check the The exported scene will be automatically registered on the DVDfunSTUDIO editing screen. 11 Edit the DVD menu as required. ≥ Set the disc size to [8cm DVD] or [8cm DVD DL]. ≥ Select the desired destination drive to write to if necessary. 106 LSQT1145
-
 1
1 -
2
-
3
-
4
-
5
-
6
-
7
-
8
-
9
-
10
-
11
-
12
-
13
-
14
-
15
-
16
-
17
-
18
-
19
-
20
-
21
-
22
-
23
-
24
-
25
-
26
-
27
-
28
-
29
-
30
-
31
-
32
-
33
-
34
-
35
-
36
-
37
-
38
-
39
-
40
-
41
-
42
-
43
-
44
-
45
-
46
-
47
-
48
-
49
-
50
-
51
-
52
-
53
-
54
-
55
-
56
-
57
-
58
-
59
-
60
-
61
-
62
-
63
-
64
-
65
-
66
-
67
-
68
-
69
-
70
-
71
-
72
-
73
-
74
-
75
-
76
-
77
-
78
-
79
-
80
-
81
-
82
-
83
-
84
-
85
-
86
-
87
-
88
-
89
-
90
-
91
-
92
-
93
-
94
-
95
-
96
-
97
-
98
-
99
-
100
-
 101
101 -
 102
102 -
 103
103 -
 104
104 -
 105
105 -
 106
106 -
 107
107 -
 108
108 -
 109
109 -
 110
110 -
 111
111 -
112
-
113
-
114
-
115
-
116
-
117
-
118
-
119
-
120
-
121
-
122
-
123
-
124
-
125
-
126
-
127
-
128
-
129
-
130
-
131
-
132
-
133
-
134
-
135
-
136
-
137
-
138
-
139
-
140
-
141
-
142
-
143
-
144
-
145
-
146
-
147
-
148
-
149
-
150
-
151
-
152
-
153
-
154
-
155
-
156
 |
 |