Panasonic WJRT416 WJRT416 User Guide - Page 45
Setup items, Monitor System Info.
 |
View all Panasonic WJRT416 manuals
Add to My Manuals
Save this manual to your list of manuals |
Page 45 highlights
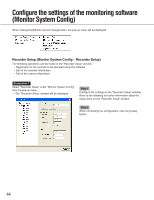
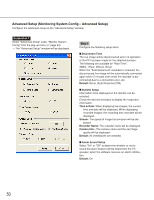
Setup items Tree view of the recorders and the cameras operable using the monitoring system The names of the recorders and the camera channels will be displayed. When the icon is clicked, the information of the respective device will be displayed on the right of the window. Monitor System Info. The name of the monitoring system will be displayed. Edit the name of the monitoring system. Click the [Edit] button, and then edit the name of the monitoring system. To apply the edited name, click the [OK] button. Recorder Info. Adding/deletion of a recorder to/from the monitoring system and edit of the recorder information can be made. Refer to page 14 for how to add a recorder to the monitoring system. Click the desired recorder icon, and then click the [Edit] button. Edit "IP Address", "Name", "Password" or "Server Port". To apply the edited item, click the [OK] button. Click the desired recorder icon, and then click the [Delete] button. Click the [OK] button on the displayed confirmation window to delete the recorder from the monitoring system. Camera Info. Edit of the information and the alarm recording duration of the selected camera can be made. Click the desired camera icon, and then click the [Edit] button. Edit "Name" (up to 12 characters) or "Rec. Duration". To apply the edited item, click the [OK] button. Images recorded by the alarm recording will be stored the "Mpeg" folder in the directory selected in the "Choose Directory" section on the "Advanced Setup" window. Important: • The same camera channel name cannot be applied to two or more camera channels when they are connected to the same recorder. • Before editing "Name" of "Camera Info.", make sure that images from the camera channel currently editing are not being displayed. Rec. Duration: Select the recording duration of the alarm recording using this software from among 10 999 seconds. Alarm images recorded by the alarm recording using this software can be saved on the PC. (The alarm recording starts when the recorder detects an alarm occurrence.) The default is "30" (sec.). Alarm Recording: Select a camera channel to be used for recording when an alarm occurs in the camera channel respective to the currently selected camera icon in the tree view on the "Recorder Setup" window. The default is "Off". Important: • It is impossible to configure/edit the settings of the current login recorder. • The alarm recording will start only when being logged in the recorder. • Depending on the timing to start recording images, the first several seconds of the recorded image may not be played on the RT4Viewer. 45
-
 1
1 -
2
-
3
-
4
-
5
-
6
-
7
-
8
-
9
-
10
-
11
-
12
-
13
-
14
-
15
-
16
-
17
-
18
-
19
-
20
-
21
-
22
-
23
-
24
-
25
-
26
-
27
-
28
-
29
-
30
-
31
-
32
-
33
-
34
-
35
-
36
-
37
-
38
-
39
-
 40
40 -
 41
41 -
 42
42 -
 43
43 -
 44
44 -
 45
45 -
 46
46 -
 47
47 -
 48
48 -
 49
49 -
 50
50 -
51
-
52
-
53
-
54
-
55
-
56
-
57
-
58
-
59
 |
 |